Table Of Content
Introduction
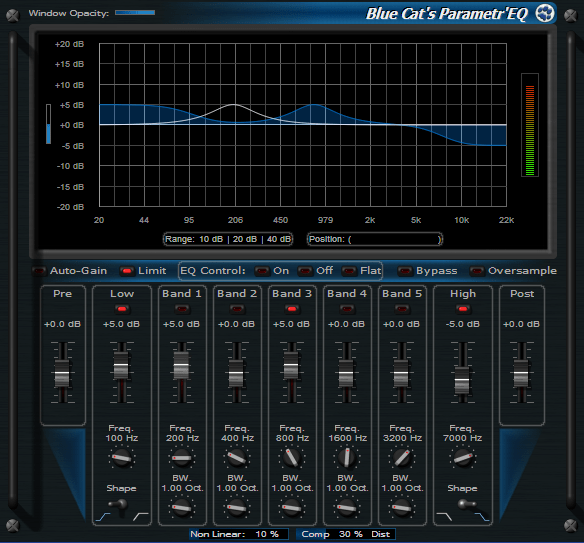
Blue Cat's Parametr'EQ is a 7 bands parametric equalizer combining the advantages of both the digital and analog worlds. Its special non-linear and oversampling features let you easily simulate the compression and distortion that may occur in an analog EQ or on the contrary obtain a very clean and transparent digital EQ.
The plug-in includes a low shelf/low cut filter, a high shelf/high cut filter and 5 boost/cut band filters. An optional brickwall limiter has been added to the output to protect your ears and monitors. Its wide range of gain (+/-40 dB per band) and bandwidth (one hundredth to five octaves) makes it suitable for any equalization task, especially with the extra zooming capability that lets you define your own range for the user interface. The included skins let you choose the layout that best suits your needs, and you can completely customize the user interface thanks to Blue Cat's Skinning language support.
The graph displays the computed frequency response of the plug-in, so that you can exactly know how your signal is processed. This is not an approximated or "ideal" response curve based on the controls of the user interface, but the exact computed frequency response of the filter, which makes this plug-in a true WYSIWYG (What You See Is What You Get) equalizer.
Thanks to the included Smooth Update technology, every single parameter of this equalizer can be automated in your favorite sequencer or controlled by MIDI in real time (MIDI learn included). You will get an absolutely zipper-free continuous time-varying equalization. Filters activation and bypass functions are now totally smooth and won't damage your ears or speakers.
Last but not least, this equalizer has absolutely no latency, which make it perfect for real time applications.
This version is a mono effect, which means that you will get the same effect on left and right sides of your audio signal. You may also want to check the Stereo Parametr'EQ plugin or Widening Parametr'EQ plugin for more advanced control on the stereo channels.
System Requirements
MacOS
- An Intel processor.
- Mac OS 10.5 or newer.
- Any VST / Audio Unit / RTAS / AAX compatible application (32/64-bit) .
Windows
- An SSE2-enabled processor (Pentium 4 or newer).
- Microsoft Windows Vista, Windows 7, 8, 10 or 11.
- Any DirectX / VST / RTAS / AAX compatible host software (32 or 64 bit).
For more information about supported platforms, see our Knowledge Base.
Demo Limitations:
- One single instance of the plug-in per session.
- The effect is bypassed for 4 seconds every 40 seconds.
Installation
The plug-ins versions cannot be run standalone: they require a host application (see the System Requirements chapter for more information). Depending on which host application you use, you might need to install the plug-ins in different locations.
Before installing one of the plug-in versions, you should close all your host applications.
Windows
Install
All versions of the plug-in provide an installation program. Follow the steps of the wizard to install the software on your machine. During the installation you will be asked where you want the software to be installed. For the VST version, you should install the plug-in inside the VST plug-ins folder used by your host application(s). The default path set in the installer should work for most applications, but you should check your host software documentation to know where it looks for VST plug-ins. For other plug-in types, you should just use the standard path.
Some applications will not automatically rescan the new plug-ins, so you might have to force a refresh of the plug-ins list.
Upgrade
When a new version of the software is released, just launch the new installer: it will update the current installation.
Uninstall
To uninstall the software, simply launch the "Uninstall" program that is available in the start menu or in the configuration panel. It will take care of removing all files from your computer.
Mac
Install
On Mac the plug-ins are available as drive images. After download, double click on the file to open it. You can then drag and drop the file(s) to the shortcut that is provided within the image. It will install the software for all users on the machine.
In case you do not have admin rights on your Mac or if you want to install the software to another directory, just copy the files to the appropriate location. If required, more information is available in the README.txt file that is included in the package.
Upgrade
When a new version of the software is released, open the new image and copy the files over the previous ones. The new version will replace the older one.
Uninstall
To uninstall the software, simply remove the component(s) from the folder where you have copied them during install (move them to the trash).
First Launch
Blue Cat Audio plug-ins cannot be run standalone, they require a host application (see the System Requirements chapter for more information). Some host applications will require you to scan the plug-ins before they are available in the application.
If the plug-in is not available in the application, please check that it has been installed in the appropriate directory (with no host application running), and that the host application has scanned it.
Using Blue Cat's Parametr'EQ
The User Interface
Note: The main toolbar, menus and basic features available with all our plug-ins are detailed in the Blue Cat Audio Plug-ins Basics section.
The Parametr'EQ effect is delivered with several skins. All of them offer the same controls, but their layout slightly differ. Here is detailed description of the default skin:
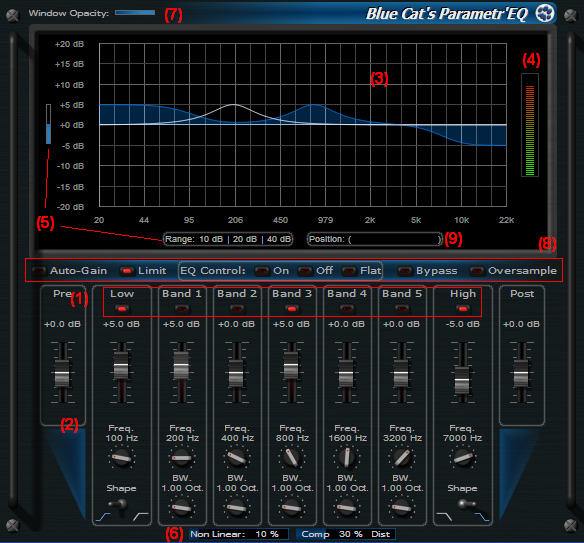
Activate each filter separately. This enables you to lower CPU consumption if you do not activate all filters.
Controls for the filters and in/out gain. You can select the shape of the filter (cut or shelf) for the low and high filters.
EQ response graph: this graph shows the global response curve of the EQ (blue curve), and the response curve for the current filter you are manipulating (white curve).
Output Meters: the meters in the center (green/red) show the output level of the plugin, and the blue meters on the left and right show the compression amount, when the output limiter is activated
Zoom: you can zoom the graph and sliders (change their range) by using either the blue slider on the left or clicking on the predefined range values (10,20 or 40 dB). This allows you to precisely manage the range of your EQ.
Non linear behavior: these two sliders let you control the linear behavior of the filters. See the parameters section for more information.
Window Opacity management: use this slider to make the plugin window transparent (this behavior heavily depends on your host application).
Misc controls:
Auto-Gain: the user interface automatically adjusts the input gain to prevent distortion
Limit:enable/disable the output limiter
EQ control: shortcuts for all bands
Bypass: bypass the plug-in (with smooth bypass transition, as opposed to most host bypass functionality)
Oversample: activate/deactivate oversampling
When moving the mouse over the graph, the position of the mouse is displayed at this place so that you can exactly measure the EQ curve you are applying.
The various elements of the user interface (knobs, sliders, buttons...) are simple and intuitive to operate, but more information about how to interact with them is available in the "Plug-ins Basics" chapter of this manual.
Operation
The EQ
To operate the EQ, you just need to activate the band you are interested in and move the slider and knobs to adjust the parameters of the filter. The EQ graph above is updated in real time. It is also possible to first adjust the filter curve visually (with the filter disabled) and apply the filter once it's setup. It is particularly useful in live situations where you may want the filter to be applied only when it's close to its final position. The activation of the filters is smooth and will not produce any artefact in the output.
In case you are using the plugin on a stereo track the same EQ will be applied to both channels.
Non Linear Mode
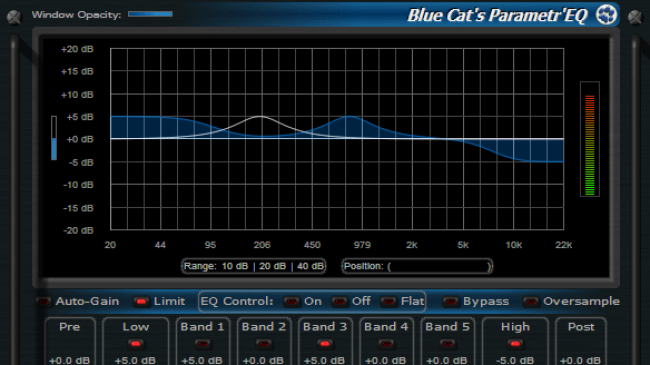
This EQ offers the ability to introduce non linearities in the signal chain: by default the EQ is transparent and operates as shown on the upper graph, but it is possible to activate the non linear behavior by increasing the "Non Linear" parameter value. It controls the amount of "non linearity" of each filter.
Once this is activated, you can choose the balance of distortion versus compression applied in every filter. This lets you control the type of color added to the EQ.
With extreme settings and extreme boosts this EQ becomes a powerful distortion unit, with different amounts of distortion spread accross various parts of the spectrum. When using this capability extensively it is recomended to activate the "oversampling" function to limit unwanted artefacts, especially when boosting high frequencies.
The Output Limiter
In order to prevent from signal overshoot when manipulating the EQ, a simple brickwall limiter has been added at the end of the signal chain. We advise you to activate it when setting up the EQ. It can be deactivated later when you are confident with your settings.
You can also use the limiter to alter the sound of your track and trigger it on purpose by boosting the input gain, even though it does not offer many settings.
About Oversampling
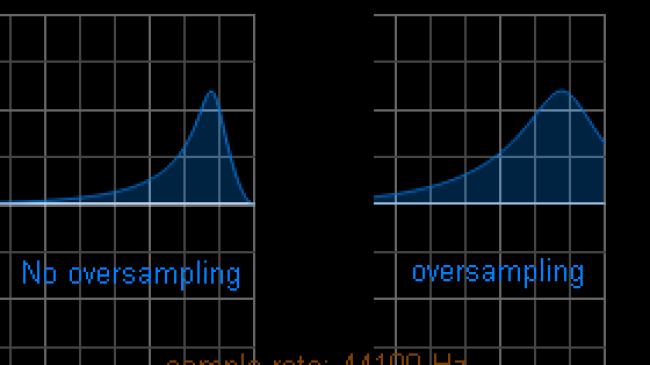
Thanks to oversampling, the plug-in internally works at a higher sample rate. This is particularly useful when working with high frequency content at lower sample rates (such as 44.1 kHz).
Running in oversampled mode has several effects on sound quality:
Filter curves are identical to analog filters when approaching the upper side of the spectrum:

Non-linear mode potential artifacts are reduced: when working in non linear mode with very high settings (100% Non-linear and 100% distortion for example), the plug-in may produce aliasing artifacts on high frequencies. Use oversampling to avoid these digital artifacts and produce a warmer sound. Note that the produced digital distortion can be interesting as well in some cases.
The drawback of oversampling is of course CPU hit, since the plug-in will have to convert audio data and process much more samples. Note that if your host is already running at 96 kHz you may not need to use the oversampling functionality.
Tip: Use Automation!
Since this plugin integrates the smooth update technology, you can use and abuse of automation to create time varying widening or narrowing filter effects. It is also possible to control these variations in real time thanks to the ability of the plugin to be controlled via MIDI, as shown in our MIDI Wah tutorials (see the tutorials section).Blue Cat Audio Plug-Ins Basics
This chapter describes the basic features that are common to all our plug-ins. If you are already familiar with our products, you can skip this part.
User Interface Basics
About Skins
Like all Blue Cat Audio plug-ins, Blue Cat's Parametr'EQ uses a skinnable user interface. It means that the appearance and behavior of the user interface can be entirely customized.
Especially with third party skins, the experience may be quite different from the one offered by the default skins that we provide. However, our plug-ins and our skinning engine have several standard features that will be available whatever your favorite skin. This is what is described in this chapter.
More information about custom skins can be found in the skins section.
Main Toolbar and Menu
Menu
If you right click on the background of the plug-in, the following pop-up menu appears:
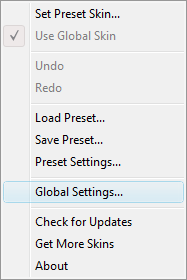
The description of the commands associated to each menu item are available below.
Toolbar
In some skins, an optional toolbar gives you access to the some of the functionalities of the main menu.
| Icon | Name | Function |
|---|---|---|
|
|
Menu | Open the main menu |
|
|
Undo | Undo |
|
|
Redo | Redo |
|
|
Load | Load Preset |
|
|
Save | Save Preset |
|
|
Manual | User Manual |
|
|
About | About |
|
|
Website | Opens our website |
Commands
The Commands available from the main menu or the toolbar are:
- Set Preset Skin: change the skin for the current preset.
- Use Global Skin: use the skin defined in the global settings for the current preset. This item is enabled only if a skin has been defined for the current preset.
- Undo/Redo: undo or redo the latest modifications. This includes all changes made to the current preset settings.
- Load Preset: load preset from file.
- Save Preset: save current preset to file.
- Presets Settings: open the presets settings window. It enables you to change the skin and MIDI settings for the current preset.
- Global Settings: open the global settings window. It enables you to change the skin and MIDI settings that are used by default in all instances of the plug-in.
- User Manual: open this user manual.
- Check Updates: check the updates for this software on our website.
- Get More Skins: get more skins for this software.
- About: displays the “about” dialog box.
MIDI control
Blue Cat's Parametr'EQ can also be remotely controlled via MIDI using MIDI CC ("Control Change") messages if your host application supports it. It is possible to customize the channel, control numbers and range used for each parameter in the MIDI settings panel available from the main menu (see the Plug-in Settings chapter for more details).
Controls
Examples
Here are a few examples of typical controls you will encounter in the user interface of our plug-ins:
| slider | slider | knob | button | Text control |
|
|
 |
 |
|
|
Interacting with Controls
You can interact with the controls of the plug-in interface either with the mouse or the keyboard.
Setting the keyboard focus on a control (so that it responds to key strokes) may be automatic (when you pass the mouse over it it gets focus) or manual (you have to click on the control to set the focus on it). Note that all host applications behave differently regarding keyboard handling. In some applications you may not be able to use all keys described later in this manual to interact with our plug-ins. It is usually made obvious to you to know the active surfaces of the skin (the places where you can click with the mouse): the mouse cursor usually changes when you can do something on a control. In the default skins delivered with the plug-in, the cursor changes to a small hand or an arrow to tell you when your mouse is over an active control.
Mouse
Various mouse movements will let you interact with the controls:
| Mouse Interaction | Action |
|---|---|
| Left Click | Acquire focus and start dragging or push (button) |
| Left Click + Alt Key | Set the value to default |
| Left Double Click |
Acquire focus and launch the “fine
tuning” edit box (except button):
 |
| Right Click | Set the value to default |
| Mouse Wheel | Increment or decrement the position (focus required) |
| Mouse Drag | Change the control position depending on mouse movement (except button) |
Keyboard
All control widgets support the following keys (note that some of them are caught by the host and thus never forwarded to the control. For example in Steinberg Cubase SX you cannot use the arrow keys to control the plug-in):
Keys Common to All Controls
| Key | Action |
|---|---|
| Up Arrow | Small increment of the position (up or right) |
| Down Arrow | Small increment of the position (down or left) |
| Left Arrow | Same as Down Arrow |
| Right Arrow | Same as Up Arrow |
| Page Up | Large increment of the position (up or right) |
| Page Down | Large decrement of the position (down or left) |
| + | Small increment of the value of the control |
| - | Small decrement of the value of the control |
| d | Set to default value (same as mouse right click) |
| e |
Opens the 'fine tuning' window to precisely
set the parameter:
 |
| SHIFT | When the key is down, the fine tuning mode is on, and you can modify the value with better precision when moving the mouse, the mouse wheel or using the keyboard. Just release the key to get back to the normal mode. |
Keys Specific to Buttons
| Key | Action |
|---|---|
| Enter | Pushes the button |
More
Check our online tutorial for more screenshots and more examples of our plug-ins user interfaces.
Blue Cat's Parametr'EQ Parameters
All parameters described below can be automated and controlled via MIDI if your host application supports it. You can precisely define this behavior in the settings panels described later in this manual.
Input
|
Param id |
Name |
Unit |
Description |
|---|---|---|---|
|
General |
|||
|
dsp.input0 |
Bypass |
|
Bypass the effect. |
|
dsp.input1 |
Limiter On |
|
Activate the output brickwall limiter. |
|
dsp.input2 |
Oversample |
|
Activate oversampling. When on, the audio signal is oversampled for the internal computation. This makes filter curves symmetric for high frequencies even if you use low sample rates and reduces artifacts when using very high non linear and distortion settings. |
|
dsp.input3 |
Non Linear |
% |
When non zero, selects the amount of non linearity of the filters. |
|
dsp.input4 |
Comp-Dist |
% |
When non linearity is enabled (“Non-Linear” set to a non zero value), this parameter controls the non-linear behavior of the filters. When set to 0%, the filters have a compression-like behavior and when set to 100% they sound more like tube distortion. |
|
dsp.input5 |
Clip Reset |
|
Reset output meter clip information. |
|
dsp.input6 |
Pre-gain |
dB |
Input Gain of the plugin (before entering the filtering stages). |
|
dsp.input35 |
Post-gain |
dB |
Output Gain of the plugin (after the filters, but before the output limiter). |
|
Low |
|||
|
dsp.input7 |
Low Active |
|
Activate/deactivate low filter. |
|
dsp.input8 |
Low Frequency |
Hz |
Cut-off frequency of the low filter. |
|
dsp.input9 |
Low Gain |
dB |
Gain of the low shelf filter |
|
dsp.input10 |
Low Mode |
|
0: Low shelf, 1: Low cut |
|
High |
|||
|
dsp.input11 |
High Active |
|
Activate/Deactivate high shelf filter. |
|
dsp.input12 |
High Frequency |
Hz |
Cut-off frequency of the high shelf filter. |
|
dsp.input13 |
High Gain |
dB |
Gain of the low shelf filter |
|
dsp.input14 |
High Mode |
|
0: High shelf, 1: High cut |
|
Band filters |
|||
|
dsp.input15 |
Mid 1 Active |
|
Activate/Deactivate band filter 1. |
|
dsp.input16 |
Mid 1 Frequency |
Hz |
Cut-off frequency of the band filter 1. |
|
dsp.input17 |
Mid 1 Bandwidth |
Hz |
Cut-off frequency of the band filter 1. |
|
dsp.input18 |
Mid 1 Gain |
dB |
Gain of the band filter 1. |
|
(...) |
Repeated for all band filters until band filter 5. |
||
Output
Mono Plugin
|
Param id |
Name |
Unit |
Description |
|---|---|---|---|
|
dsp.output0 |
Compression |
dB |
Compression of the output limiter. |
|
dsp.output1 |
Peak |
dB |
Output peak value of the audio signal at the plugin output. |
|
dsp.output2 |
Clip |
|
Clip information for the audio signal at the plugin output. |
Stereo Plugin
|
Param id |
Name |
Unit |
Description |
|---|---|---|---|
|
dsp.output0 |
Compression (L) |
dB |
Compression of the output limiter for the left channel. |
|
dsp.output1 |
Peak (L) |
dB |
Output peak value of the audio signal at the plug-in output. for the left channel |
|
dsp.output2 |
Clip (L) |
|
Clip information for the audio signal at the plug-in output for the left channel. |
|
dsp.output3 |
Compression (R) |
dB |
Compression of the output limiter for the right channel. |
|
dsp.output4 |
Peak (R) |
dB |
Output peak value of the audio signal at the plug-in output for the right channel. |
|
dsp.output5 |
Clip (R) |
|
Clip information for the audio signal at the plug-in output for the right channel. |
Blue Cat's Parametr'EQ Curves
The Parametr'EQ plug-in also provides visual feedback about the response curve of the equalizer with output curves.
|
Curve id |
Name |
Description |
|---|---|---|
|
dsp.output_curve0 |
Frequency Response |
Global frequency response of the equalizer. |
|
dsp.output_curve1 |
Frequency Response (dB) |
Global frequency response of the equalizer (decibels) |
|
dsp.output_curve2 |
Low Frequency Response (dB) |
Frequency response of the low shelf filter. |
|
dsp.output_curve3 |
High Frequency Response (dB) |
Frequency response of the high shelf filter. |
|
dsp.output_curve4 |
Mid 1 Frequency Response (dB) |
Frequency response of the band pass filter 1. |
|
dsp.output_curve5 |
Mid 2 Frequency Response (dB) |
Frequency response of the band pass filter 2. |
|
dsp.output_curve6 |
Mid 3 Frequency Response (dB) |
Frequency response of the band pass filter 3. |
|
dsp.output_curve7 |
Mid 4 Frequency Response (dB) |
Frequency response of the band pass filter 4. |
|
dsp.output_curve8 |
Mid 5 Frequency Response (dB) |
Frequency response of the band pass filter 5. |
Plug-in Settings
In addition to the controls offered in the main user interface, Blue Cat's Parametr'EQ has various settings that let you fine tune the behavior of the plug-in. You can choose to change these settings either for the current preset or globally for all instances of the plug-in.
The Global Settings Window
The settings available in this window apply to all instances of the plug-in, for all presets, if not overridden in the presets settings. Consider these settings as “default” settings.
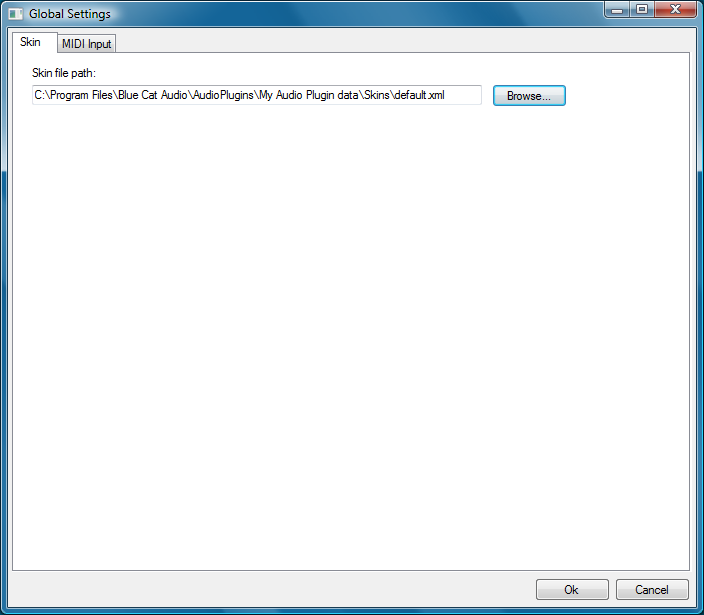
Global Skin
You can change the default skin for all instances of the plug-in: write the skin file path in the text edit box or click on the button to open a file chooser dialog. If you have several instances of the plug-in opened in your session, you will have to re-open the user interfaces of these plug-ins to see the skin change.
Global MIDI Input Settings
For each parameter you can define a default MIDI channel and CC number. You can then control the plug-in with an external MIDI controller or one of our plug-ins that generate MIDI messages.
The following settings are available for each plug-in parameter:
- Channel: MIDI Channel for the parameter control. If set to 0, the plug-ins will accept Control Change Messages from all MIDI Channels (MIDI Omni mode).
- CC: Control Change Number.
- Learn: click on this button to activate the MIDI learn functionality. When it is activated, you can move your MIDI controller, and the plug-in will automatically set the MIDI Channel and CC Number.
- Enable MIDI: enable/disable the MIDI control of the parameter.
- Response: response curve of the MIDI control: from very fast to slow control.
- Min: minimal value of the parameter when MIDI controlled.
- Max: Maximum value of the parameter when MIDI controlled.
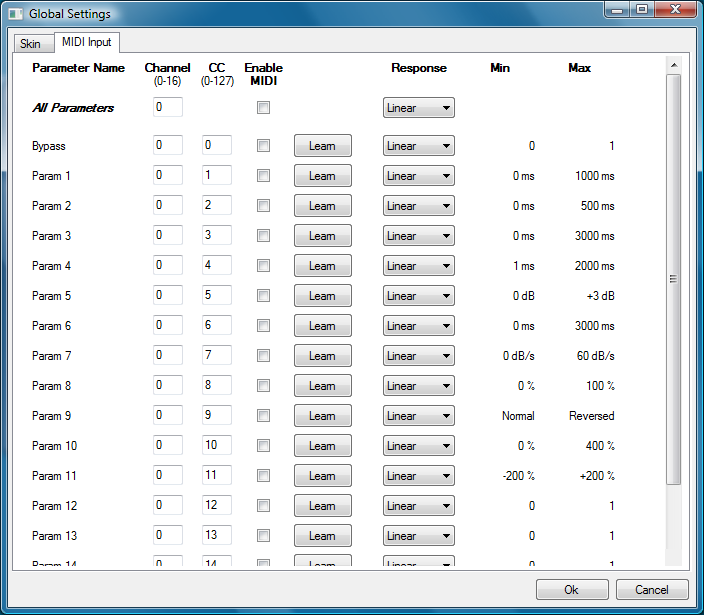
Note: if the Min value is higher than the Max value, the response curve will be reversed: increasing the control value will decrease the parameter value.
Note: if you double click on the parameter text control boxes for the max and min values, a “fine tuning” edit box will appear and let you change the min and max values with more precision:

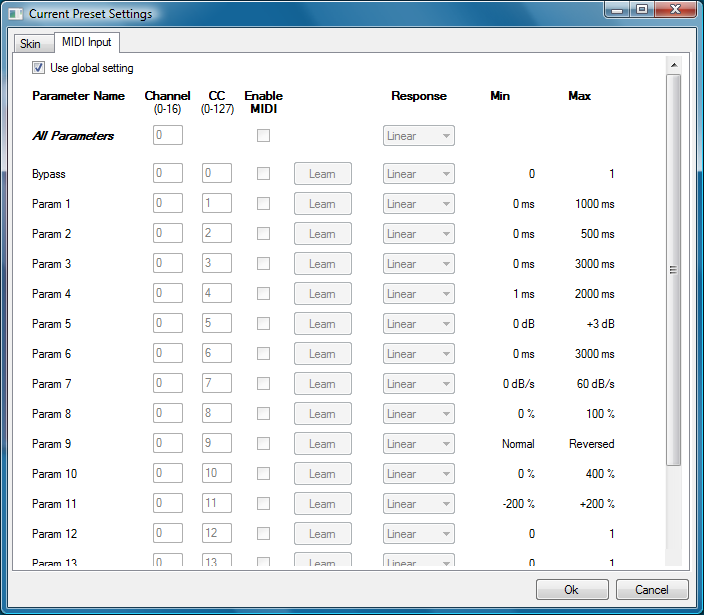
The Current Preset Settings Window
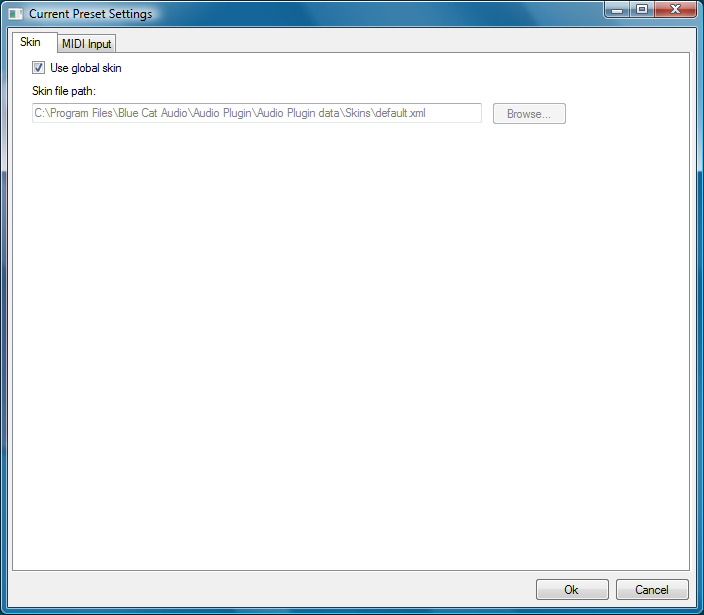
In this window you can change the settings for the current preset of the current instance of the plug-in only.
Preset Skin
You can choose to use the global skin setting or to change the skin for the current preset. This way you can have different skins for different instances of the plug-in in the same session in order to differentiate them.
Preset MIDI Input Settings
Use the global settings or override them for the current preset. The parameters are the same as for the global input settings.
About Skins
Blue Cat's Parametr'EQ integrates Blue Cat's skinning engine that allows you to customize the user interface. You can download alternate skins for your plug-in at the following address:
If you don't find a skin that fits your need or if you want a custom one, you can choose to create your own skin.
Choosing the Skin
There are two ways to select the skin of your plug-in: you can change the default (or 'global') skin, or change the skin for the current preset only (either in the preset settings page or from the main menu). The global skin applies to all plug-in instances (choose this one if you want to use the skin used by default, regardless of the session or preset), whereas the current preset skin only applies to the current preset of the current plug-in instance (use this one if you want to change only the skin for the current session/preset).
Note: in some host applications, the plug-in window won't resize automatically when you choose a skin with a different size. In this case, just close the window and re-open it: it will be displayed with the right size.
Selecting Skins
The global skin (used by default if no preset skin has been selected) can be changed in the global settings pane. The current preset skin can be changed in the preset settings page , or from the main menu, using the "Set Preset Skin..." command.
Create a Custom Skin
You can create custom skins for your plug-in in order to adapt it to your exact needs. You can change its look and feel and make it completely integrated in your virtual studio!
Just read the Blue Cat's Skinning Language manual and download the samples for the tutorial on http://www.bluecataudio.com/Skins. You can get ready to create your own skins in a few minutes. You can then share your skins on our website.
More...
This manual only covers the main aspects of Blue Cat's Parametr'EQ. Our website offers many additional resources for your Blue Cat's Parametr'EQ plug-in. It is constantly updated, so keep an eye on it!
Updates
As you can see in the history log below, we care about constantly updating our products in order to give you the latest technology available. Please visit our website often to check if Blue Cat's Parametr'EQ has been updated, or subscribe to our Newsletter to be informed of the latest news about our products.
Note: minor version updates are available from the same location as the original full version download (link received by email upon purchase). The demo version publicly available on our website will not let you register.
You can also follow us on twitter, facebook and instagram for almost real time updates notification, and subscribe to our YouTube channel to watch the latest videos about our software.
Versions History
V3.52 (2014/03/20) |
|
V3.51 (2013/06/27) |
|
V3.51 (2011/02/10) |
|
V3.5 (2010/05/04) |
|
V3.41 (2009/05/05) |
Mac VST update: fixed incompatibility issues with Cubase 5 on Mac. |
V3.4 (2009/03/09) |
|
V3.3 (2008/03/28) |
|
V3.2 (2007/09/17) |
|
V3.1 (2007/06/04) |
|
V3.0 (2007/05/21) |
|
V2.1 (2006/11/29) |
|
V2.0 (2006/10/18) |
|
V1.1 (2005/06/13) |
Brand new GUI based on customer feedback. |
V1.0 (2005/05/19) |
First release. |
Thanks again for choosing our software!

See you soon on www.bluecataudio.com!

