Get used to the user interface features of Blue Cat Audio products! They have been designed for an optimal workflow, so here are the tips and tricks to save time. All these features are explained in details in the user manuals, but this is a summary of the main things you want to know before you start using the plugins.
Step By Step
01 - When moving over an active widget, the cursor changes to show you you can do something with it, and the widget is usally highlited:

02 - Another cursor change example:

03 - When hovering over a widget or a curve, a tooltip shows you detailed information about the parameter value:

04 - Once the widget has focus (usually visible - see the left knob), the parameter can be changed thanks to the mouse wheel or keyboard:
, the parameter can be changed thanks to the mouse wheel or keyboard.png "Step 04 - Once the widget has focus (usually visible - see the left knob), the parameter can be changed thanks to the mouse wheel or keyboard")
05 - In this case you can use the following keys:

06 - Holding the shift key while dragging the mouse or using the keys lets you fine tune the parameter (enhanced precision):
.png "Step 06 - Holding the shift key while dragging the mouse or using the keys lets you fine tune the parameter (enhanced precision)")
07 - Right click on the widget resets the parameter to its default value:

08 - Double clicking on a widget opens a popup window that lets you enter an exact value:

09 - Some plugins offer the 'Window opacity' feature that enables you to see thru the plugin window - drag a slider and change the opacity value:

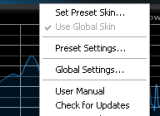
10 - Right clicking on the background of the plugin brings the main popup menu:

11 - The following functions are available:
- Set Preset Skin: change the skin (personalized user interface) for the current preset only.
- Use Global Skin: reset the current skin to the default one chosen in the global settings.
- Preset Settings: open the current preset settings window. It allows you to edit the current MIDI settings and skin.
- Global Settings: open the global settings window. It allows you to edit the default MIDI settings and skin (that can be overriden in each preset).
- User Manual: opens the user manual, where you will find everything you need to know about the plugin.
- Check for Updates: redirects to our website to check wether a new version is available.
- Get More Skins: redirects to our website to get new skins for your product.
- About: opens the about box, where you will find product information and version.
Any questions, comments? You want to submit your own tutorial to win a free license? Please post on our Forum!