")


")


Table Of Content
Introduction
Blue Cat's Oscilloscope Multi is a unique multiple tracks real time waveform renderer and comparator: it lets you visualize the content of several audio tracks on the same screen and compare them thanks to its X-Y view.
The plugin offers stereo or mid-side channels waveform extraction as well as several synchronization modes. The zooming and precise measurement capabilities let you analyze the waveforms in details, and the XY phase scope view will help you track phase issues within an effect chain or while recording with multiple microphones.
The additional histogram display complements the toolset to check the distribution of the values in the waveform and get an idea of the average peak level.
The four memory slots let you store any waveform in memory: it helps you make comparisons between several setups or portions of your audio project very easily.
Thanks to Blue Cat's skinning language support and the included window opacity management feature, you can adapt the plug-in user interface to your personal needs and enhance your workflow.


System Requirements
MacOS
- An Intel or Apple Silicon processor.
- Mac OS 10.9 or newer.
- Any VST / Audio Unit / AAX compatible application (64-bit) .
Windows
- An SSE2-enabled processor (Pentium 4 or newer).
- Microsoft Windows Vista, Windows 7, 8, 10 or 11.
- Any VST / AAX compatible host software (32 or 64 bit).
For more information about supported platforms, see our Knowledge Base.
Demo Limitations:
- Two instances of the plug-in per session.
- The plug-in is frozen for a few seconds every 45 seconds.
Installation
The plug-ins versions cannot be run standalone: they require a host application (see the System Requirements chapter for more information). Depending on which host application you use, you might need to install the plug-ins in different locations.
Before installing one of the plug-in versions, you should close all your host applications.
Windows
Install
All versions of the plug-in provide an installation program. Follow the steps of the wizard to install the software on your machine. During the installation you will be asked where you want the software to be installed. For the VST version, you should install the plug-in inside the VST plug-ins folder used by your host application(s). The default path set in the installer should work for most applications, but you should check your host software documentation to know where it looks for VST plug-ins. For other plug-in types, you should just use the standard path.
Some applications will not automatically rescan the new plug-ins, so you might have to force a refresh of the plug-ins list.
Upgrade
When a new version of the software is released, just launch the new installer: it will update the current installation.
Uninstall
To uninstall the software, simply launch the "Uninstall" program that is available in the start menu or in the configuration panel. It will take care of removing all files from your computer.
Mac
Install
On Mac the plug-ins are available as drive images with an installer. After download, double click on the dmg file to open it. You can then double click on the installer (.pkg file) to install the package.
Note for Mac OS 10.15 Catalina or newer: you may have to right click on the installer and select "Open" instead of double clicking on the file to launch the installation if your computer is not connected to the Internet.
Upgrade
When a new version of the software is released, just launch the new installer: it will update the current installation.
Uninstall
To uninstall the software, simply remove the component(s) from their install location (move them to the trash):
- AAX plug-ins are installed in the /Library/Application Support/Avid/Audio/Plug-Ins/ folder
- Audio Units (AU) are installed in the /Library/Audio/Plug-Ins/Components/ folder
- RTAS Plug-ins are installed in the /Library/Application Support/Digidesign/Plug-Ins/ folder
- VST plug-ins are installed in the /Library/Audio/Plug-Ins/VST folder
- VST3 plug-ins are installed in the /Library/Audio/Plug-Ins/VST3 folder
If you want to completely remove all settings and configuration files, you can also remove these additional directories that may have been created on your computer:
- ~/Library/Preferences/Blue Cat Audio/[Plug-in name and TYPE], where TYPE is VST, AU, RTAS or AAX: global preferences.
- ~/Library/Preferences/Blue Cat Audio/[Plug-in name]: license information
- ~/Documents/Blue Cat Audio/[Plug-in name]: user data, such as presets, additional skins and user-created plug-in data.
Please be aware that these directories may contain user data that you have created. Remove these directories only if you do not want to reuse this data later.
First Launch
Blue Cat Audio plug-ins cannot be run standalone, they require a host application (see the System Requirements chapter for more information). Some host applications will require you to scan the plug-ins before they are available in the application.
If the plug-in is not available in the application, please check that it has been installed in the appropriate directory (with no host application running), and that the host application has scanned it.
Using Blue Cat's Oscilloscope Multi
The User Interface
Note: The main toolbar, menus and basic features available with all our plug-ins are detailed in the Blue Cat Audio Plug-ins Basics section.
Blue Cat's Oscilloscope Multi's user interface is composed of three main panels:
- The time view, where you can actually see the waveforms shared by all the instances of the plug-in.
- The X-Y (or Lissajous) view, which lets you display X-Y plots of several waveforms to compare them and check their phase relationship.
- The routing pane where you can choose which analysis curve you want to display and share with other plug-in instances.
The main elements of the user interface are described below:

- Select the screen size (small, medium or large).
- Choose between waveform and XY panes (to be displayed in (A)). Choose the display mode (single or dual screen). In dual screen mode, you can show both the waveform and the XY panes at the same time.
- Show the routing matrix to select and rename the curves routed from this instance of the plug-in.
- You can freeze all curves (for all instances) in order to get a snapshot of all the curves.
- Synchronize all instances. Click here to trigger a synchronization between all instances of the plugin. You might need to use this function to make sure all instances of the plugin are in sync. In some hosts applications the instances of the oscilloscope might run out of sync (when the plugin is instantiated while audio is running, or sometimes at startup), showing out of phase signals when it should not. This feature is useful to overcome such issues, and also to restart the signal flow when desired.
- Select the stereo operation mode for the current instance. By default ('stereo') channel 1 is left and channel 2 is right. In 'Mid-Side' mode channel one becomes the mono part of the signal (Mid) and the scond channel is the stereo part of the signal (Side).
- Flow/Loop/Trigger: click here to change the display mode for all instances of the plugin.
- Curves display settings:
- Filled: show filled curves. This option may become CPU-heavy when you have multiple curves to display with a large screen setting.
- Antialias: antialiased curves look better (smoother), but you may want to disable this option if you prefer "old style" display.
- Name: display the name of the curve on the graph (overlay).
- Show List: display the list of available curves at the right of the current pane.
- Delay compensation: this slider lets you add a delay to the waveforms generated by the current instance of the plug-in. You can use it to align waveforms that you want to compare if they are not perfectly in sync.
- These two sliders let you control the x and y zoom for the graphs in both views. Once zoomed, you can drag the rulers with the mouse (click on the vertical or horizontal ruler when the cursor is a small hand and drag to move in the graph). It is also possible to zoom the screen by selecting an area with the mouse. You can then right click on the graph to unzoom.

- (A) Current display (waveform or XY pane or both).
- (B) This is the place where the coordinates of the mouse cursor are displayed when the mouse is over a graph.
The Routing Pane
In order to route curves to the display and share them among instances, you need to open the routing pane (by clicking on the “Routing” button).

- List of available curves for the current instance. These are the curves you can route to a shared curve numbered from 1 to 16. Their meaning depend on the stereo mode you have chosen: in stereo mode, channel 1 is left and channel 2 is right. In Mid / Side mode channel 1 represents the mid channel (mono part of the signal) and channel 2 the side channel (stereo part of the signal).
- Select a shared curve slot to display and share the curve corresponding to the row.
- When a slot is not available it means that it is already in use by this instance or another instance. You can click on the 'X' button to free the slot occupied by the curve corresponding to the row.
- When a slot is selected for an output waveform, it shows a blue border.
- Use this button to reset all curves affectations for this instance of the plugin.
- You can assign a name to each analysis curve. It will be displayed in the main pane when the curve is connected to a bus:

Waveform View
When first opening the plugin, the display pane is in 'Time' mode (waveform view). In this mode the plugin displays waveforms (evolution of the audio signal over time) as well as an histogram of values for the waveform.

- The main waveform display. It shows the evolution of the signal over time.
- The histogram display. It shows the distribution of sample values for the waveform.
- Select the shared curves to display. No curve will be shown on this view until you select the curves you want to share in the routing pane. The curve names can be customized (see the routing pane).
- The four “A B C D” buttons let you store the curve to one of the proposed memory slots. The curves stored into these slots can be shown/hidden with the buttons available in (5). This is useful when you want to store and compare waveforms.
- Show/Hide curves stored in memory.
- In trigger mode, lets you select the trigger value.
About Display modes
The plug-in offers three display modes: flow (default), loop, or trigger.
In flow mode, the signal is reproduced "as is", flowing on the display as it is received by the plug-in. That's the default behavior, which lets you seein real time the evolution of the waveform. The issue is that the signal may flow quite fast, so in some cases you might need to freeze the display on a regular basis to take the time to look at the waveform.
In loop mode, the signal evolves from left to right and loops back to the begining as soon as it reaches the top right of the display. It is much more "e;stable"e; for the eyes, but it does not offer the same flexibility and a much slower refresh rate when zooming on a particular area.
If both loop and flow modes respect the absolute synchronization between instances, the trigger mode behaves differently. With this mode you can specify the value as well as the direction used to sync the signals with the display. It means that the waveforms displayed on the screen are not in absolute time sync anymore. So you should not try to measure absolute phase differences (the Lissajous view typically does not mean the same thing). This mode is useful when looking in details at the shape of a waveform that does not change much over time. It ensures that the waveform will not move too fast horizontally on the screen so that you can focus on the shape of the signal.
The controls for the trigger mode are described below. They appear on the screen only when the trigger mode is selected:

- Trigger mode selection.
- Trigger value for all instances of the plug-in: this is the value that the plug-in will try to match for the last value displayed at the right of the screen (it's the opposite from a traditional analog oscilloscope that uses the trigger for the left of the screen).
- Trigger direction: up or down. That's the target direction of the waveform when it reaches the trigger value.
As an example, here is the same waveform as above, with ooposite trigger direction (up):

XY (Lissajous) View
In this mode, you can select several waveforms and analyze their relationship by displaying them on a single XY graph (you can read more about X-Y analysis in the usage section):

- Select the XY curves you want to display (2 curves are available for comparisons).
- Store the curve to one of the memory slots.
- For each XY curve, choose the waveform for the vertical axis (X)
- For each XY curve, choose the waveform for the vertical axis (Y)
- Show/hide curves stored in memory slots.
- Choose display options:
- Connect Points: when this option is checked, points are connected by segments. Without this option, only dots are plotted on the graph.
- Time amount: this controls the portion of the waveform used for the XY display. With 100% the whole second you can see in the time view is displayed. Reducing the amount of time lets you see instant changes, whereas increasing it shows you a more averaged view of the waveforms over time.
- Density: the larger the value, the larger the number of points are sampled and plotted on the graph. It is sometimes necessary to adjust this value for a clearer display and better performance (the larger the value, the more CPU the rendering requires).
Memory Curves
As shown earlier, it is possible save several types of curves in memory slots. Clicking on the little blue arrow below each memory slot opens a menu to manage these curves: they can be copied and pasted to other slots (even in another application), or be saved as files to be reloaded later:

This lets you make multiple measurements and reuse them elsewhere as references.
Screen Configurations
The plug-in is setup by default to work in single screen mode, but you can switch to dual screen mode using the display mode button:

The various elements of the user interface (knobs, sliders, buttons...) are simple and intuitive to operate, but more information about how to interact with them is available in the "Plug-ins Basics" chapter of this manual.
Operation
The Principle
Blue Cat's Oscilloscope Multi uses our unique data sharing technology to share complex information between several instances of the plugin. This lets you visualize the shape of several audio tracks in the same plugin instance:

Each analyzer is both able to produce and display shared curves.
Multiple Instances Analysis
The procedure to compare the waveforms of several tracks is the following:
Insert the plugin one one or several audio tracks in your sequencer
For each instance, open the routing pane and select the curves you want to see and share.
Adjust the settings for the audio analysis in each instance.
Open the user interface of an instance of the plugin and select the shared curves you want to see.
Watch the result!
Note that in order to keep the waveforms synchronized you might have to restart the audio engine or playback after inserting all the instances (it depends on your host application). You can also use the sync capability of the plugin to force all instances to resynchronize and compensate the delay between waveforms thanks to the delay slider.
X-Y View
The X-Y view is a very simple tool to compare several waveforms. You can either use it to compare the waveforms for two channels of the same track (typically left and right) or two waveforms of different tracks to see their relationship. A typical usage is to check phase issues between several simultaneous recordings of the same song with different microphones or check the phase of a stereo recording using Left and Right waveforms.
The principle is described hereafter:

Each blue dot corresponds to a sample value. Its x coordinate corresponds to the value of the waveform chosen for the X axis for this sample, and the y coordinate corresponds to the value of the waveform chosen for the y axis for this sample. The display can be divided into two zones:
In phase values: the values plotted in this area are in phase.
Out of phase values: the values plotted in this area are out of phase.
It is thus very easy to determine whether the waveforms are in or out of phase (see the examples in the table below). The relative intensity of both waveforms is also easy to see on the graph: the closer to the X axis, the larger the relative value of the Y waveform compared to the X waveform.
Note: for best results to compare phases between tracks, you should switch to “Loop Mode” which is more stable over time than the “Flow Mode”. Do not forget to synchronize instances as well with the sync button, in case your host does not properly synchronize processing chains itself.
|
Waveforms correlation and XY graph shape |
|
 |
Uncorrelated waveforms Both waveforms have nothing in common. In this case the graph shows a cloud with no particular direction. In the case of a stereo signal (X=right, Y=left), it means that there will be no phase cancellation when mixing both channels into mono, and that the signal strongly sounds stereo. |
 |
Strongly correlated waveforms On the graph shown here, both signals are identical. Signals that are strongly correlated will display a similar shape, close to the Y=X axis. In the case of a stereo signal (X=right, Y=left), it means that both channels are strongly correlated, close to a mono signal. |
 |
Anti phase waveforms The graph here shows two signals with opposite phase. Signals are strongly correlated but if they are summed together, it will produce silence. |
For more information about how to use this plug-in in your favorite host application, have a look at the Blue Cat's Oscilloscope Multi Tutorials.
Blue Cat Audio Plug-Ins Basics
This chapter describes the basic features that are common to all our plug-ins. If you are already familiar with our products, you can skip this part.
User Interface Basics
About Skins
Like all Blue Cat Audio plug-ins, Blue Cat's Oscilloscope Multi uses a skinnable user interface. It means that the appearance and behavior of the user interface can be entirely customized.
Especially with third party skins, the experience may be quite different from the one offered by the default skins that we provide. However, our plug-ins and our skinning engine have several standard features that will be available whatever your favorite skin.
More information about custom skins can be found in the skins section.
The Main Toolbar
In most skins, an optional toolbar at the top of the user interface gives you access to the main options and settings of the plug-in:

Smooth Bypass
On the left, the power button can be used to smoothly bypass the plug-in.
Presets Area
At the center of the toolbar, you can see the current preset area (the "Default Settings" box). It displays the name of the current preset, with a "*" at the end if it has been modified since loaded.
The arrows on the left and right let you navigate thru the (factory and user) presets available for the plug-in.
Clicking on the preset name opens the presets menu which lets you manage the presets of the plug-in.
Using the knob on the bottom right of this area, you can reduce the opacity of the window, and make it transparent (the actual result may depend on the host application). Additional messages may appear in the area next to this knob, depending on the plug-in.
Some plug-ins may also propose you to manually select the audio I/O inside the plug-in (bottom left of the presets area), regardless of the host configuration. It can be useful for example to save CPU by selecting mono to stereo configurations (instead of full stereo sometimes chosen by default by the host), or add extra channels to manage side chain internally, when the host does not provides any side chain input. Please note that this does not change the number of I/O seen by the host application.
Commands
The icons in the toolbar give you access the to the following commands that are detailed in the next paragraph:
| Icon | Name | Function |
|---|---|---|
|
|
Menu | Open the main menu |
|
|
Control Settings | Display the controls settings menu (to manage automation and MIDI control, as described here). |
|
|
Undo | Undo |
|
|
Redo | Redo |
|
|
Manual | User Manual |
|
|
About | About |
|
|
Zoom | Scale the user interface (from 70% to 200%). |
The Main Menu
The main menu is available from the main toolbar, or if you right click anywhere on the background of the plug-in:
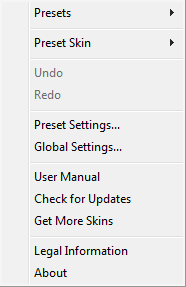
- Presets: opens the presets menu to manage presets.
- Preset Skin: opens the skins menu to choose the skin for the current preset and manage alternative skins for the software.
- Undo/Redo: undo or redo the latest modifications. This includes all changes made to the current preset settings such as MIDI or automation preferences.
- Presets Settings: open the presets settings window. It lets you change the skin, MIDI and automation settings for the current preset.
- Global Settings: open the global settings window. It lets you change the skin, MIDI and automation settings that are used by default in all instances of the plug-in (if not overridden by the current preset).
- User Manual: open this user manual.
- Check for Updates: opens up our website to let you check if any update for this software is available.
- Get More Skins: get more skins for this software.
- Legal Information: browse licensing and misc legal documents.
- About: displays the “about” dialog box.
Controls
Examples
Here are a few examples of typical controls you will encounter in the user interface of our plug-ins:
| slider | slider | knob | button | Text control |
|
|
 |
 |
|
|
Interacting with Controls
You can interact with the controls of the plug-in interface either with the mouse or the keyboard.
Setting the keyboard focus on a control (so that it responds to key strokes) may be automatic (when you pass the mouse over it it gets focus) or manual (you have to click on the control to set the focus on it). Note that all host applications behave differently regarding keyboard handling. In some applications you may not be able to use all keys described later in this manual to interact with our plug-ins. It is usually made obvious to you to know the active surfaces of the skin (the places where you can click with the mouse): the mouse cursor usually changes when you can do something on a control. In the default skins delivered with the plug-in, the cursor changes to a small hand or an arrow to tell you when your mouse is over an active control.
Mouse
Various mouse movements will let you interact with the controls:
| Mouse Interaction | Action |
|---|---|
| Left Click | Acquire focus and start dragging or push (button) |
| Left Click + Alt Key | Set the value to default |
| Left Double Click |
Acquire focus and launch the “fine
tuning” edit box (except button):
 |
| Right Click | Set the value to default |
| Mouse Wheel | Increment or decrement the position (focus required) |
| Mouse Drag | Change the control position depending on mouse movement (except button) |
Keyboard
All control widgets support the following keys (note that some of them are caught by the host and thus never forwarded to the control. For example in Steinberg Cubase SX you cannot use the arrow keys to control the plug-in):
Keys Common to All Controls
| Key | Action |
|---|---|
| Up Arrow | Small increment of the position (up or right) |
| Down Arrow | Small increment of the position (down or left) |
| Left Arrow | Same as Down Arrow |
| Right Arrow | Same as Up Arrow |
| Page Up | Large increment of the position (up or right) |
| Page Down | Large decrement of the position (down or left) |
| + | Small increment of the value of the control |
| - | Small decrement of the value of the control |
| d | Set to default value (same as mouse right click) |
| e |
Opens the 'fine tuning' window to precisely
set the parameter:
|
| SHIFT | When the key is down, the fine tuning mode is on, and you can modify the value with better precision when moving the mouse, the mouse wheel or using the keyboard. Just release the key to get back to the normal mode. |
Keys Specific to Buttons
| Key | Action |
|---|---|
| Enter | Pushes the button |
Presets
To get started with the plug-in and discover its capabilities, a couple of factory presets are provided. You can also save your own presets and recall them later for other projects. Our plug-ins propose a full-featured preset manager to let you save, browse, organize and recall its presets.
The Presets Menu
The presets menu can be opened from the main menu or the main toolbar. It displays the list of presets available for the plug-in as well as commands to load, save or organize presets:
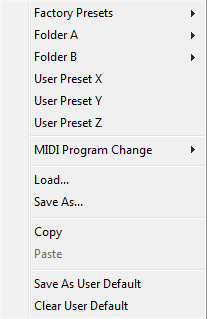
- Factory Presets: shows the list of factory presets delivered with the plug-in.
- "Folder A" to "User Preset Z": user presets and categories.
- MIDI Program Change: activate MIDI Program Change support (see below).
- Load: load preset from file.
- Save: save current state to last loaded user preset.
- Save As: save current preset to a file.
- Copy copy preset to the system clipboard.
- Paste paste preset from the system clipboard, if available.
- Save As User Default: save the current state as the default preset. This preset is used every time a new instance of the plug-in is created.
- Clear User Default: reset the default preset to its factory state: this makes the plug-in forgets the custom settings you might have saved as a default preset.
More about Presets
There are two types of presets: factory presets (read only) that are provided with the plug-in, and user presets that can be created and stored by the user.
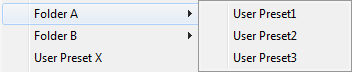
The user presets are stored in a subdirectory of the documents folders of your profile ("Documents" on Mac, and "My Documents" on Windows): Blue Cat Audio/[Plug-in Name]/Presets. Each preset is stored as an individual file. You can create folders and subfolders in the Presets directory to classify your presets, as shown in the example below:
If you save a preset named "Default" in the root Presets directory, it will override the factory default preset (that's what "Save As Default" does). To restore the factory default preset, you can just remove this file or use the "Reset Default" command.
MIDI Program Change
It is possible to load presets remotely using MIDI "Bank Select" and "Program Change" messages. To enable this feature, select a MIDI channel to receive the events from in the MIDI Program Change menu item from the presets menu:
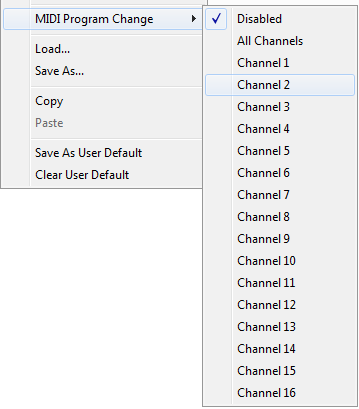
This setting is saved for each plug-in istance with your session but not in presets (except for the default preset, using the "Save as User Default command"). Once activated, the plug-in menu will display the bank number followed by the preset number for each preset:
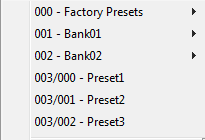
Every root folder is considered as a new bank, starting with the factory presets (bank 0). Program and bank numbers may change while you add folders and presets, so you should be careful when naming them if bank and program numbers matter to you. It is recommended to use folders to make this task simpler. As a side note, sub folders do not define additional banks (all presets contained in sub folders are associated with the current bank.
As specified by MIDI, bank select messages are not used until a program is actually selected.
MIDI Implementation note: the software supports all types of Bank Select methods. You can use either MIDI CC 0 or MIDI CC 32 to select banks. If both are used simultaneously, they are combined together so that you can use more banks (in this case CC0 is LSB and CC32 is MSB, and actual bank number is 128*CC0+CC32).
MIDI and Automation Control
Blue Cat's Oscilloscope Multi can also be remotely controlled via MIDI using MIDI CC ("Control Change") messages or automation curves, if your host application supports it. It is possible to customize the channel, control numbers, range and response curve used for each parameter in the settings panel available from the main menu (see the Plug-in Settings chapter for more details).
MIDI and Automation Settings Menu
The main menu
Most skins also provide the ability to change MIDI and automation settings directly in the main user interface. Clicking on the control settings icon in the main toolbar opens the following menu:
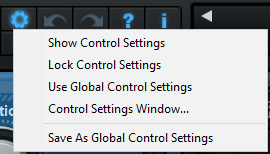
- Show Control Settings: show direct access to individual control settings for each parameter in the user interface (see next paragraph).
- Lock Control Settings: lock the current controls settings for MIDI and automation so that they remain unchanged when loading presets.
- Use Global Control Settings: ignore the current MIDI/automation settings and use the global settings instead.
- Control Settings Window: display the control settings window, to change control settings for all parameters.
- Save As Global Control Settings: save the current settings as global settings (used by default, when no specific MIDI/Automation setting has been set for the cuirrent preset).
Individual Control Settings
When this feature is activated using the "Show Control Settings" item in the MIDI and Automation Settings menu, dropdown menu buttons appears next to the main controls displayed by the plug-in:
Clicking on this button shows the MIDI/Automation settings menu:
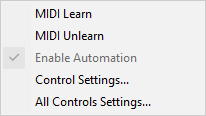
- MIDI Learn: launches MIDI learn mode for the control: touch your MIDI controller and the control will learn from it the MIDI channel and CControl Number. To end the learn mode, reopen this menu and deselect the option.
- MIDI Unlearn: deactivates MIDI control for this parameter.
- Control Settings: launches the advanced settings panel described below. This controls the settings for the current preset.
- All Control Settings: display the control settings window, with access to all parameters.
Advanced MIDI and Automation Settings
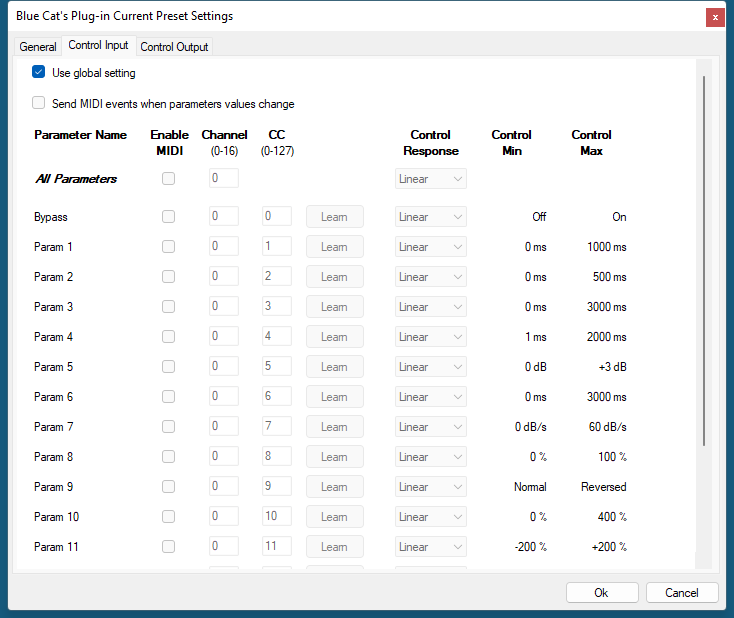
You can completely customize the way the plug-in is controlled by automation and MIDI. For a global view of all parameters at a time, you can use the Plug-in Settings window for the current preset which is available from the main menu.
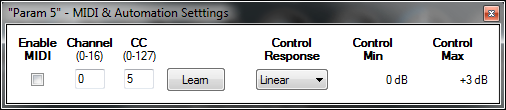
MIDI Settings:
- Enable MIDI: enable/disable the MIDI control of the parameter.
- Channel: MIDI Channel for the parameter control. If set to 0, the plug-ins will accept Control Change Messages from all MIDI Channels (MIDI Omni mode).
- CC: Control Change Number.
- Learn: click on this button to activate the MIDI learn functionality. When it is activated, you can move your MIDI controller, and the plug-in will automatically detect the control settings .
MIDI and automation settings:
- Response: response curve of the MIDI or automation control: from very fast to slow control.
- Min: minimal value of the parameter when MIDI controlled or automated.
- Max: Maximum value of the parameter when MIDI controlled or automated.
Note: if the Min value is higher than the Max value, the response curve will be reversed: increasing the control value will decrease the parameter value.
Note: if you double click on the parameter text control boxes for the max and min values, a “fine tuning” edit box will appear and let you change the min and max values with more precision:
More
Check our online tutorial for more screenshots and more examples of our plug-ins user interfaces.
Blue Cat's Oscilloscope Multi Parameters
All parameters described below can be automated and controlled via MIDI if your host application supports it. You can precisely define this behavior in the settings panels described later in this manual.
The input parameters of this plug-in are described below. They affect the audio analysis for the current instance of the plug-in.
|
Param id |
Name |
Unit |
Description |
|---|---|---|---|
|
dsp.input0 |
Bypass |
|
Bypass the plugin. |
|
dsp.input1 |
Stereo Mode |
|
This parameter controls the channels used for waveforms in the current plugin. 'Stereo' uses Left and Right channels and 'Mid-Side' adds an MS matrix to display Mid and Side channels waveforms. |
|
dsp.input2 |
View Mode |
|
Controls the way the data is fed into the output curves: in 'Flow' mode, the waveform flows in real time (each new sample pushes the older samples to the past), whereas in 'Loop' mode, the new samples loop back to the beginning of the wavefor when the one second buffer is filled. |
|
dsp.input3 |
Sync |
|
Any change in value of this parameter triggers a synchronization of the instance: the waveform display restarts at this point. |
|
dsp.input4 |
Delay |
ms |
Delays the waveform of the current instance. It can be used to compensate the delay between signals that are not in sync. |
Blue Cat's Oscilloscope Multi Curves
The Oscilloscope Multi plug-in's main purpose is to provide visual feedback about the audio content of the audio signal. This is done thanks to several output curves that can be routed to one of the 16 display curves. The plug-in has two channels. In stereo mode, channel 1 is left and channel 2 is right. In Mid / Side mode channel 1 represents the mid channel (mono part of the signal) and channel 2 the side channel (stereo part of the signal).
|
Curve id |
Name |
Description |
|---|---|---|
|
dsp.output_curve0 |
Instant Waveform (1) |
Instant audio content for channel 1. |
|
dsp.output_curve1 |
Instant Waveform (2) |
Instant audio content for channel 2. |
Plug-in Settings
In addition to the controls offered in the main user interface, Blue Cat's Oscilloscope Multi has various settings that let you fine tune the behavior of the plug-in. You can choose to change these settings either for the current preset or globally for all instances of the plug-in.
The Global Settings Window
The settings available in this window apply to all instances of the plug-in, for all presets, if not overridden in the presets settings. Consider these settings as “default” settings.
General
You can change the default skin for all instances of the plug-in: write the skin file path in the text edit box or click on the button to open a file chooser dialog. If you have several instances of the plug-in opened in your session, you will have to re-open the user interfaces of these plug-ins to see the skin change.
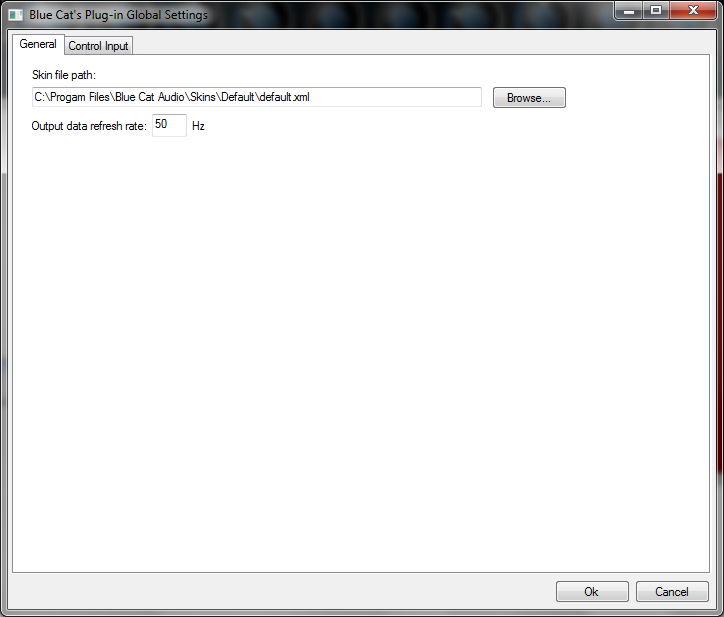
The output data refresh rate can also be customized for all instances of the plug-in. It controls the refresh rate of non-audio data produced by the plug-in (parameters, curves...). It also controls the refresh rate of output MIDI CC messages or output automation data. The higher the refresh rate, the better precision, but also the higher cpu usage (some host applications may also have trouble recording MIDI data at high refresh rates). The default value is 50 Hz.
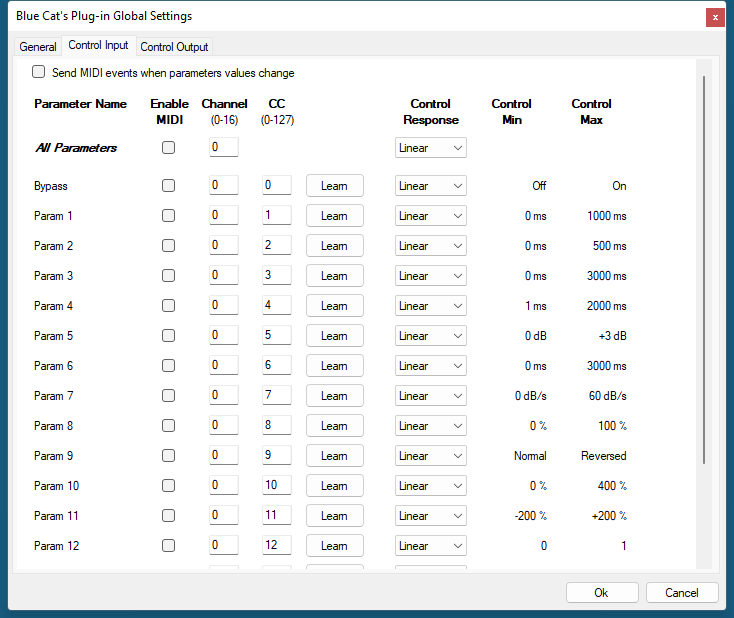
Global Control Input Settings (MIDI and Automation)
The plug-in offers a couple of settings that affect the way it is controlled by MIDI messages or automation. While the first settings only apply to MIDI control, the "Control Response", "Min" and "Max" settings apply to both automation and MIDI control.
For each parameter you can define a default MIDI channel and CC number. You can then control the plug-in with an external MIDI controller or one of our plug-ins that generate MIDI messages.
The settings below are available for each plug-in parameter.
MIDI Settings:
- Enable MIDI: enable/disable the MIDI control of the parameter.
- Channel: MIDI Channel for the parameter control. If set to 0, the plug-ins will accept Control Change Messages from all MIDI Channels (MIDI Omni mode).
- CC: Control Change Number.
- Learn: click on this button to activate the MIDI learn functionality. When it is activated, you can move your MIDI controller, and the plug-in will automatically detect the control settings .
MIDI and automation settings:
- Response: response curve of the MIDI or automation control: from very fast to slow control.
- Min: minimal value of the parameter when MIDI controlled or automated.
- Max: Maximum value of the parameter when MIDI controlled or automated.
Note: if the Min value is higher than the Max value, the response curve will be reversed: increasing the control value will decrease the parameter value.
Note: if you double click on the parameter text control boxes for the max and min values, a “fine tuning” edit box will appear and let you change the min and max values with more precision:
"Send MIDI events when parameters values change": activate this option when using a control surface that accepts MIDI events as input. MIDI messages will be sent to the output of the plug-in when the user change the parameters values in the user interface, to keep the software and the controller in sync. MIDI is only sent for parameters that are activated for MIDI control.
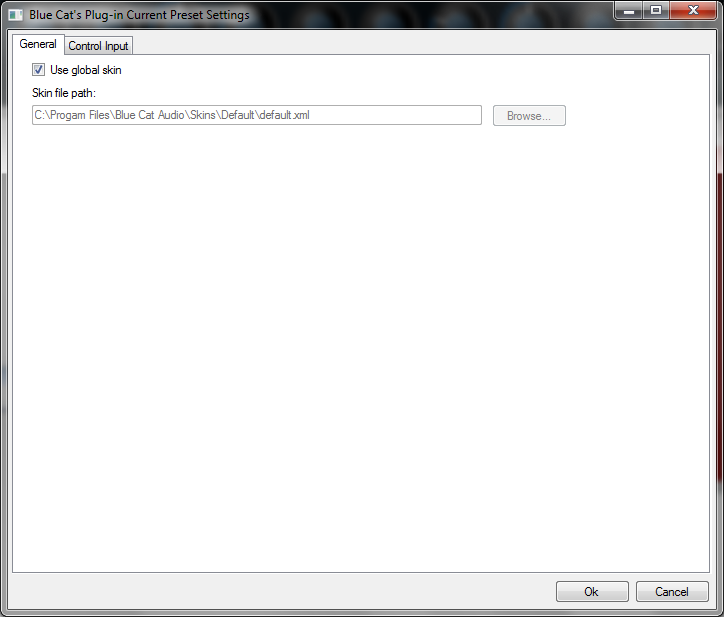
The Current Preset Settings Window
In this window you can change the settings for the current preset of the current instance of the plug-in only.
Preset Skin
You can choose to use the global skin setting or to change the skin for the current preset. This way you can have different skins for different instances of the plug-in in the same session in order to differentiate them.
Preset Control Input Settings (MIDI and Automation)
Use the global settings or override them for the current preset. The parameters are the same as for the global input settings.
About Skins
Blue Cat's Oscilloscope Multi integrates Blue Cat's skinning engine that allows you to customize the user interface. You can download alternate skins for your plug-in at the following address:
If you don't find a skin that fits your need or if you want a custom one, you can choose to create your own skin.
Choosing the Skin
There are two ways to select the skin of your plug-in: you can change the default (or 'global') skin, or change the skin for the current preset only (either in the preset settings page or from the main menu). The global skin applies to all plug-in instances (choose this one if you want to use the skin used by default, regardless of the session or preset), whereas the current preset skin only applies to the current preset of the current plug-in instance (use this one if you want to change only the skin for the current session/preset).
Note: in some host applications, the plug-in window won't resize automatically when you choose a skin with a different size. In this case, just close the window and re-open it: it will be displayed with the right size.
The Skins Menu
The skins menu can be opened from the main menu. It displays the list of skins available for the plug-in as well as commands to manage the skin used by default when no preset skin has been selected:
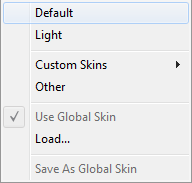
- First Section - Factory Skins: shows the list of factory skins delivered with the plug-in ("Default" and "Light" in this example).
- Second Section - User Skins: shows the list of user skins that have been installed in the Documents Skins folder for the plug-in (see below).
- Use Global Skin: use the global skin for the current preset/session (unloads any custom skin previously selected for the current preset).
- Load: opens a file browser dialog to manually select the skin from the file system.
- Save As Global Skin: use the current preset skin as the global skin (loaded by default if no preset skin has been defined).
Installing User Skins
To select user skins directly from the skins menu, install them in the "Skins" directory available in the plug-in's documents folder:
[Your Documents Folder]/Blue Cat Audio/[Plugin Name]/Skins/
The skin engine will scan this folder for new skins (xml files) and display them in the menu. The skin files should be in the root skins folder or in a subdirectory inside this folder: subdirectories are not scanned recursively.
Other Methods to Select Skins
You can also select the skins in the settings panels available from the main menu:
The global skin (used by default if no preset skin has been selected) can be changed in the global settings pane. The current preset skin can be changed in the preset settings page .
Create a Custom Skin
You can create custom skins for your plug-in in order to adapt it to your exact needs. You can change its look and feel and make it completely integrated in your virtual studio!
Just read the Blue Cat's Skinning Language manual and download the samples for the tutorial on http://www.bluecataudio.com/Skins. You can get ready to create your own skins in a few minutes. You can then share your skins on our website.
More...
This manual only covers the main aspects of Blue Cat's Oscilloscope Multi. Our website offers many additional resources for your Blue Cat's Oscilloscope Multi plug-in. It is constantly updated, so keep an eye on it!
Updates
As you can see in the history log below, we care about constantly updating our products in order to give you the latest technology available. Please visit our website often to check if Blue Cat's Oscilloscope Multi has been updated, or subscribe to our Newsletter to be informed of the latest news about our products.
Note: minor version updates are available from the same location as the original full version download (link received by email upon purchase). The demo version publicly available on our website will not let you register.
You can also follow us on twitter, facebook and instagram for almost real time updates notification, and subscribe to our YouTube channel to watch the latest videos about our software.
Versions History
V2.44 (2025/09/08) |
|
V2.43 (2025/08/12) |
|
V2.42 (2024/09/09) |
|
V2.41 (2022/12/12) |
|
V2.4 (2021/10/19) |
|
V2.32 (2020/11/12) |
|
V2.31 (2020/04/28) |
|
V2.3 (2019/06/12) |
Warning: because of a bug of the initial VST3 release, this new version may not work with existing sessions that used the VST3 format. See this blog post for more details and how to fix it. |
V2.2 (2016/03/03) |
|
V2.1 (2015/09/07) |
|
V2.03 (2014/01/09) |
New Features:
|
V2.02 (2013/06/21) |
|
V2.01 (2013/05/14) |
Bug fixes:
|
V2.0 (2012/10/22) |
New Features:
|
V1.7 (2011/07/11) |
|
V1.62 (2011/02/10) |
|
V1.61 (2010/11/29) |
Fixed incompatibility issues with older presets in the previous version. |
V1.6 (2010/11/18) |
|
V1.5 (2010/06/19) |
Performance Improvements (all platforms):
|
V1.41 (2010/02/25) |
|
V1.4 (2010/02/15) |
|
V1.31 (2009/05/05) |
Mac VST update: fixed incompatibility issues with Cubase 5 on Mac. |
V1.3 (2009/02/27) |
|
V1.2 (2008/12/10) |
|
V1.1 (2008/06/09) |
|
V1.0 (2008/05/12) |
First version. |
Thanks again for choosing our software!
See you soon on www.bluecataudio.com!