Table Of Content
Introduction
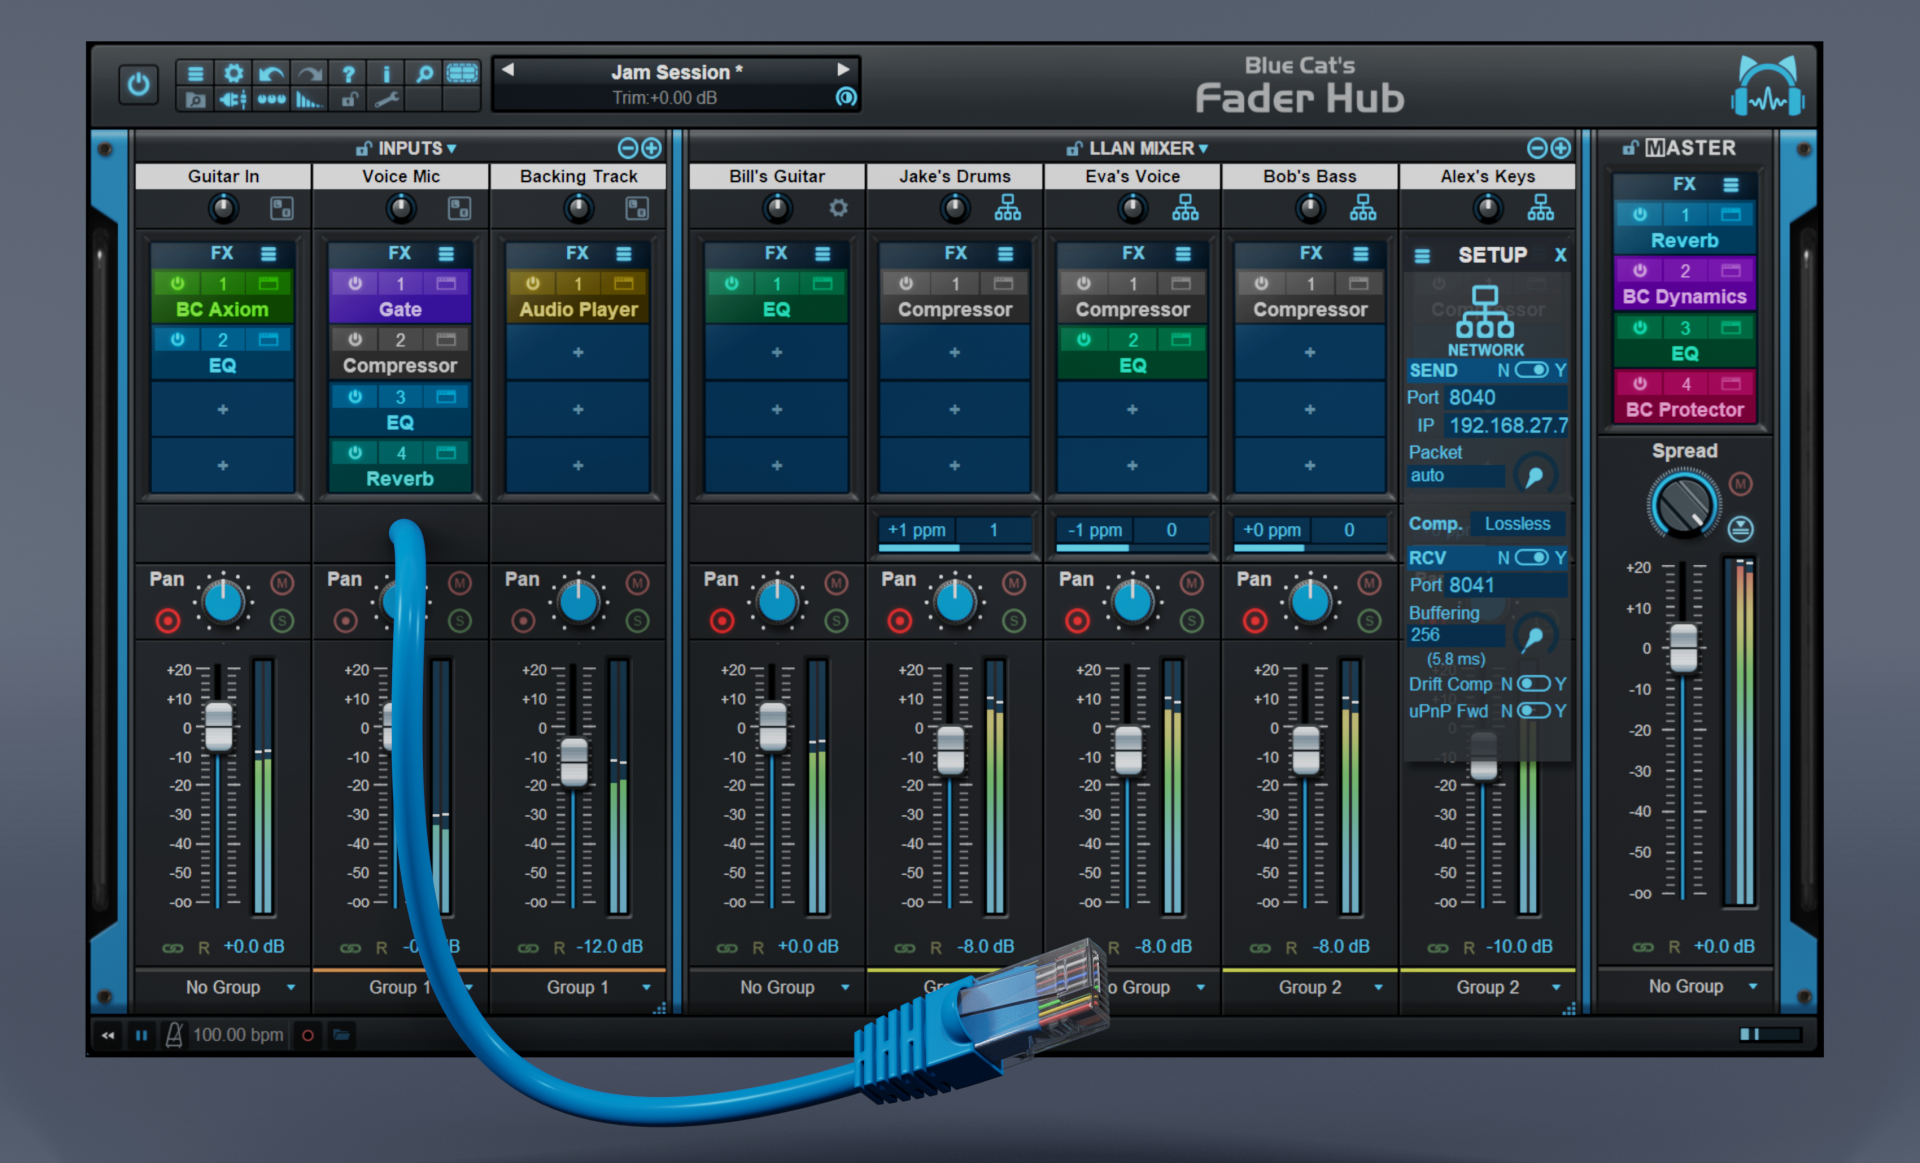
Blue Cat's Fader Hub is a network mixing and streaming software that provides an easy solution to play and record with other musicians or aggregate audio streams from multiple devices on a local network or thru the Internet, in real time.
Join the LLAN party! Connect your instrument and play with other musicians over the Low Latency Audio Network (LLAN) thanks to this unique network mixing and streaming console.
Fader Hub features a local mixing console to mix several audio inputs from an audio interface, and a network mixer that can send the local mixdown (or individual inputs) to other computers over the network, and mix it locally with the audio streams received from them.
It is fully compatible and interoperable with the Connector plug-in. It includes several built-in audio effects and can also load third party VST, Audio Unit and VST3 plug-ins.
Fader Hub can also record the full mix and individual streams to disk, making it easy to record multiple instruments over an IP network, with automatic latency compensation and transport synchronization.
Thanks to Fader Hub's low latency peer-to-peer connection, every musician with a laptop in a band can easily manage his/her personal headphone mix, while keeping the lowest possible latency for his/her own instrument.
With "Synced inputs", it is also possible to play a backing track or a click in perfect sync for everyone accross all connections, whatever the distance, resulting in even shorter latency to play together!
Typical applications: Network audio, live sound, multitrack recording, personal headphones mixing, online jamming, remote collaboration, remote recording, online music teaching, distributed mixing, plug-in host.
System Requirements
MacOS
- An Intel or Apple Silicon processor.
- Mac OS 10.9 or newer.
- For the plug-in, any VST / Audio Unit / AAX compatible application (64-bit) .
- For the standalone application, a Core Audio compatible audio interface.
Windows
- An SSE2-enabled processor (Pentium 4 or newer).
- Microsoft Windows Vista, Windows 7, 8, 10 or 11.
- For the plug-in, any VST / AAX compatible host software (32 or 64 bit).
- For the standalone application, an ASIO, MME or WASAPI compatible audio interface (ASIO recommended).
For more information about supported platforms, see our Knowledge Base.
Demo Limitations:
- Limited number of instances of the plug-in per session.
- The application or the plug-in is regularly bypassed for a few milliseconds.
Installation
The standalone version does not require any host application and can be run without requiring any third party application.
The plug-ins versions cannot be run standalone: they require a host application (see the System Requirements chapter for more information). Depending on which host application you use, you might need to install the plug-ins in different locations.
Before installing one of the plug-in versions, you should close all your host applications.
Windows
Install
All versions of the plug-in provide an installation program. Follow the steps of the wizard to install the software on your machine. During the installation you will be asked where you want the software to be installed. For the VST version, you should install the plug-in inside the VST plug-ins folder used by your host application(s). The default path set in the installer should work for most applications, but you should check your host software documentation to know where it looks for VST plug-ins. For other plug-in types, you should just use the standard path.
Some applications will not automatically rescan the new plug-ins, so you might have to force a refresh of the plug-ins list.
Upgrade
When a new version of the software is released, just launch the new installer: it will update the current installation.
Uninstall
To uninstall the software, simply launch the "Uninstall" program that is available in the start menu or in the configuration panel. It will take care of removing all files from your computer.
Mac
Install
On Mac the plug-ins are available as drive images with an installer. After download, double click on the dmg file to open it. You can then double click on the installer (.pkg file) to install the package.
Note for Mac OS 10.15 Catalina or newer: you may have to right click on the installer and select "Open" instead of double clicking on the file to launch the installation if your computer is not connected to the Internet.
Upgrade
When a new version of the software is released, just launch the new installer: it will update the current installation.
Uninstall
To uninstall the software, simply remove the component(s) from their install location (move them to the trash):
- Standalone applications are installed in the /Applications folder
- AAX plug-ins are installed in the /Library/Application Support/Avid/Audio/Plug-Ins/ folder
- Audio Units (AU) are installed in the /Library/Audio/Plug-Ins/Components/ folder
- RTAS Plug-ins are installed in the /Library/Application Support/Digidesign/Plug-Ins/ folder
- VST plug-ins are installed in the /Library/Audio/Plug-Ins/VST folder
- VST3 plug-ins are installed in the /Library/Audio/Plug-Ins/VST3 folder
If you want to completely remove all settings and configuration files, you can also remove these additional directories that may have been created on your computer:
- ~/Library/Preferences/Blue Cat Audio/[Plug-in name and TYPE], where TYPE is VST, AU, RTAS or AAX: global preferences.
- ~/Library/Preferences/Blue Cat Audio/[Plug-in name]: license information
- ~/Documents/Blue Cat Audio/[Plug-in name]: user data, such as presets, additional skins and user-created plug-in data.
Please be aware that these directories may contain user data that you have created. Remove these directories only if you do not want to reuse this data later.
First Launch
Standalone Application
Once the application has been installed, simply double click on its icon to launch it. On Mac, the application will be located in the 'Applications' folder if using the default install location. On Windows, you will find it in the start menu.
The first time you launch the application, it will ask you if you want to configure the audio interface:
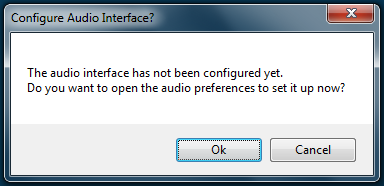
It is recommended to configure the audio interface before using the application, but you can still do it later by clicking on the "Edit/Audio Setup" menu. This opens the Audio/MIDI Preferences window reproduced below:
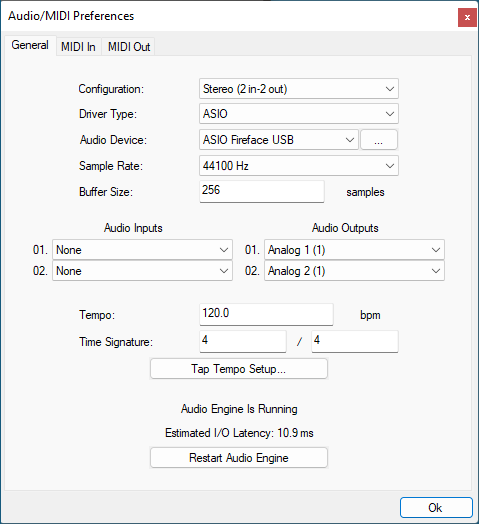
If the default setup displayed in the panel does not correspond to your needs, you can do the following:
- Choose the appropriate I/O configuration, if available.
- On Windows, choose the type of audio driver (ASIO is recommended. If you do not have an ASIO driver, we recommend using the ASIO4All driver).
- Choose the driver to use for audio input and audio output, if available (with ASIO, you can only choose a single driver for both).
- Select the sample rate and buffer size. Increasing the size of the buffer uses less CPU but adds latency.
- Select the audio inputs and outputs to use with the software.
- You can also set the tempo and time signature if relevant.
- Click on "Tap Tempo Setup" if you want to tap tempo with a MIDI controller.
Changes are applied to the application in real time and saved when closing the preferences window. You can see the status of the audio engine at the bottom of the window, as well as the estimated i/o latency (it depends on the sample rate, buffer settings and selected audio interface(s).
If the status of the engine is 'NOT Running', you may need to change the settings: try to increase the buffer size, change the sample rate (it might not be supported by the interface) or select another audio interface.
The MIDI In and MIDI Out panes let you select the MIDI devices to be used as input and ouput. You can either use them all, none, or select from a list:
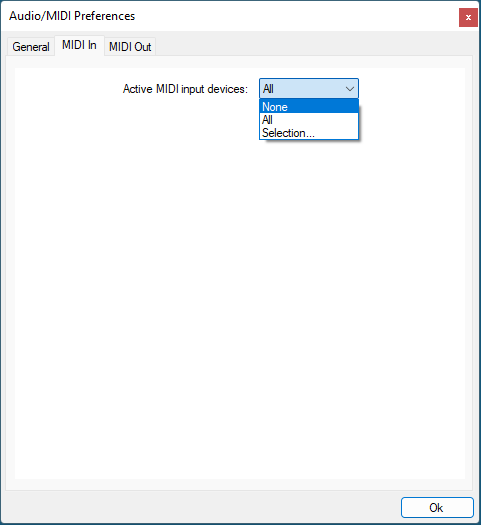
Once the this has been setup, you can close the window and start using the application.
Warning:Please make sure that all MIDI devices are connected and powered on before launching the application as they are scanned upon launch.
Standalone Application: Network Server
It is also possible to use the applications as a "slave" of another application that sends audio and MIDI with the Connector plug-in locally or over the network. To do this you should select the "Network Audio" driver type and "Connector Slave" driver.
Click on the button with 3 dots at the right of the driver name to access the connection settings (see the Connector Manual for more details):
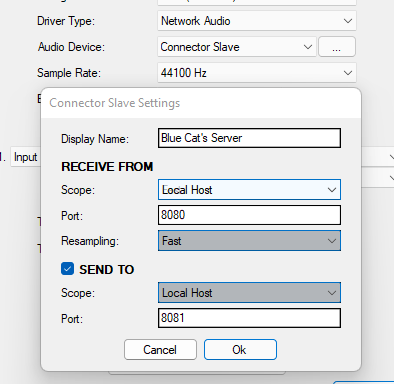
Note: in this mode, the application will not process audio unless some data is sent to it by an instance of the connector plug-in loaded into an active audio application.
Audio Plug-Ins
Blue Cat Audio plug-ins cannot be run standalone, they require a host application (see the System Requirements chapter for more information). Some host applications will require you to scan the plug-ins before they are available in the application.
If the plug-in is not available in the application, please check that it has been installed in the appropriate directory (with no host application running), and that the host application has scanned it.
Using Blue Cat's Fader Hub
Introduction
Blue Cat's Fader Hub is a powerful network mixing and streaming console that lets you connect with other musicians over a network and mix your local audio inputs with network streams.
Local Audio Mixer
Our Fader Hub tour starts with a local audio mixer that lets you mix up to 8 stereo audio inputs or virtual instruments together:
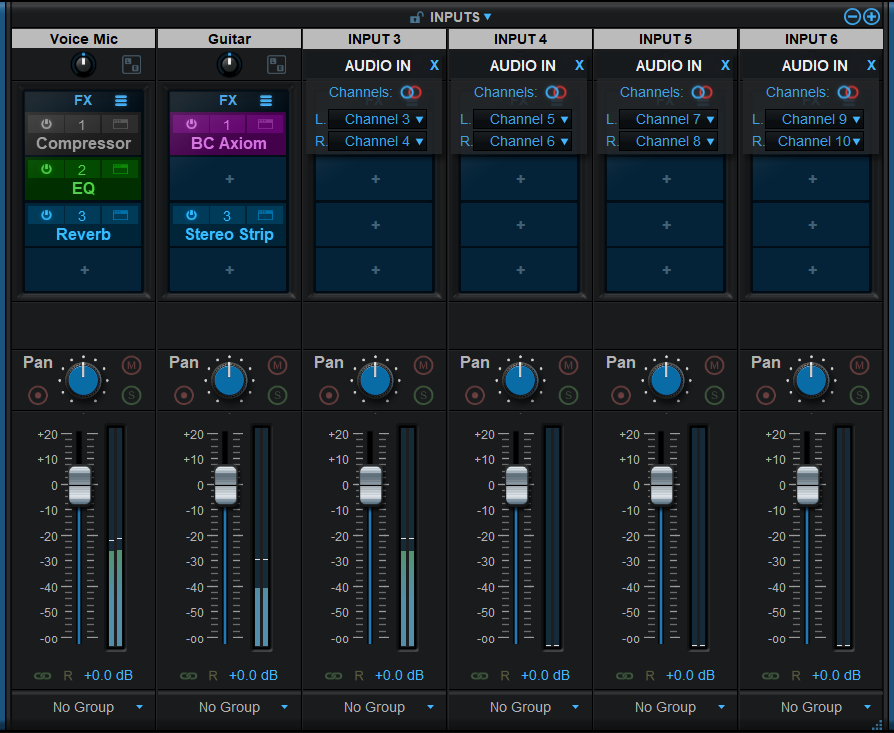
This part of the software behaves like a traditional mixing console, with audio effects on each strip thanks to audio plug-ins support. This local mix can be monitored locally, sent to other computers over the network, and be mixed together with audio streams coming form other computers thanks to the other built-in mixer.
When using fader Hub as a network mixer, you can choose for each input if it operates in "live" or "synced" mode. In live mode, the input is sent as soon as possible to all other connected instances of Fader Hub, while in synced mode, it is synchronized so that all connected participants (including the local instance) hear it exactly at the same time (it may imply additional delay, so it is mainly recommended for non-live music: backing tracks, click track...).
Peer-to Peer LLAN Mixer (Network)
At the core of Fader Hub is the LLAN mixer (Low Latency Audio network) that performs the following operations:
- Send the local mix to other musicians/computers over the network (or other applications on the same machine).
- Receive other musicians's own mix from the network.
- Mix these streams together with additional effects for local monitoring or recording (master and aux bus available).
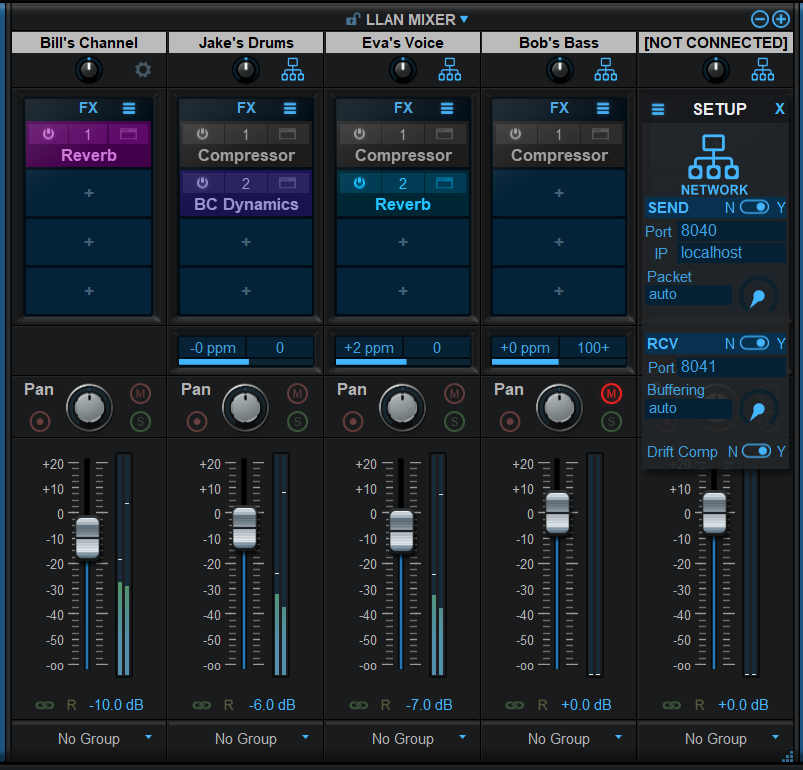
For each network channel strip, it is possible to choose whether to send or receive audio individually, so the software can also be used only as a receiver or only as a sender depending on your needs.
You can also choose to completely deactivate the network mixer (only keep a single buss) to use Fader Hub as a more traditional mixing console, using the audio inputs of your audio interface.
Since version 1.2 you can also choose to compensate the network latency so that all participants are synchronized. As ths may imply extra delay, it is recommended mainly in a machine that perform playbakc/recording but is not used by someone playing live.
Recording
Fader Hub can record the complete mixdown of the session (master output), and each individual audio stream separately, effectively behaving like a multitrack recorder with network capabilities.

Since version 1.2, all individual recorded stems are compensated for latency so they are perfectly in sync, regardless of the latency between the participants, even if latency compensation is off.
Individual tracks can be imported into your favorite DAW (Digital Audio Workstation) software for additional editing of the performance.
Note: when used as a plug-in in a DAW, armed strips will be recorded when the host is recording, and the master output is not recorded.
Built-In Effects
Blue Cat's Fader Hub includes top quality built-in studio effects (compressor, EQ, gate, reverb...) that can be used in plug-in slots, next to third party VST, VST3 or AU plug-ins.
Fader Hub is also available as a built-in plug-in (in the Utility category), so that you can load it into itself and add even more network connections.
Built-in plug-ins offer the same preset management and control features as the main plug-in (MIDI learn, undo/redo, parameters range...). For more details about each effect and its controls, please refer to the included documentation ("?" icon in the toolbar of each plug-in).
Signal Flow
The audio signal is routed into the software thru the following paths:
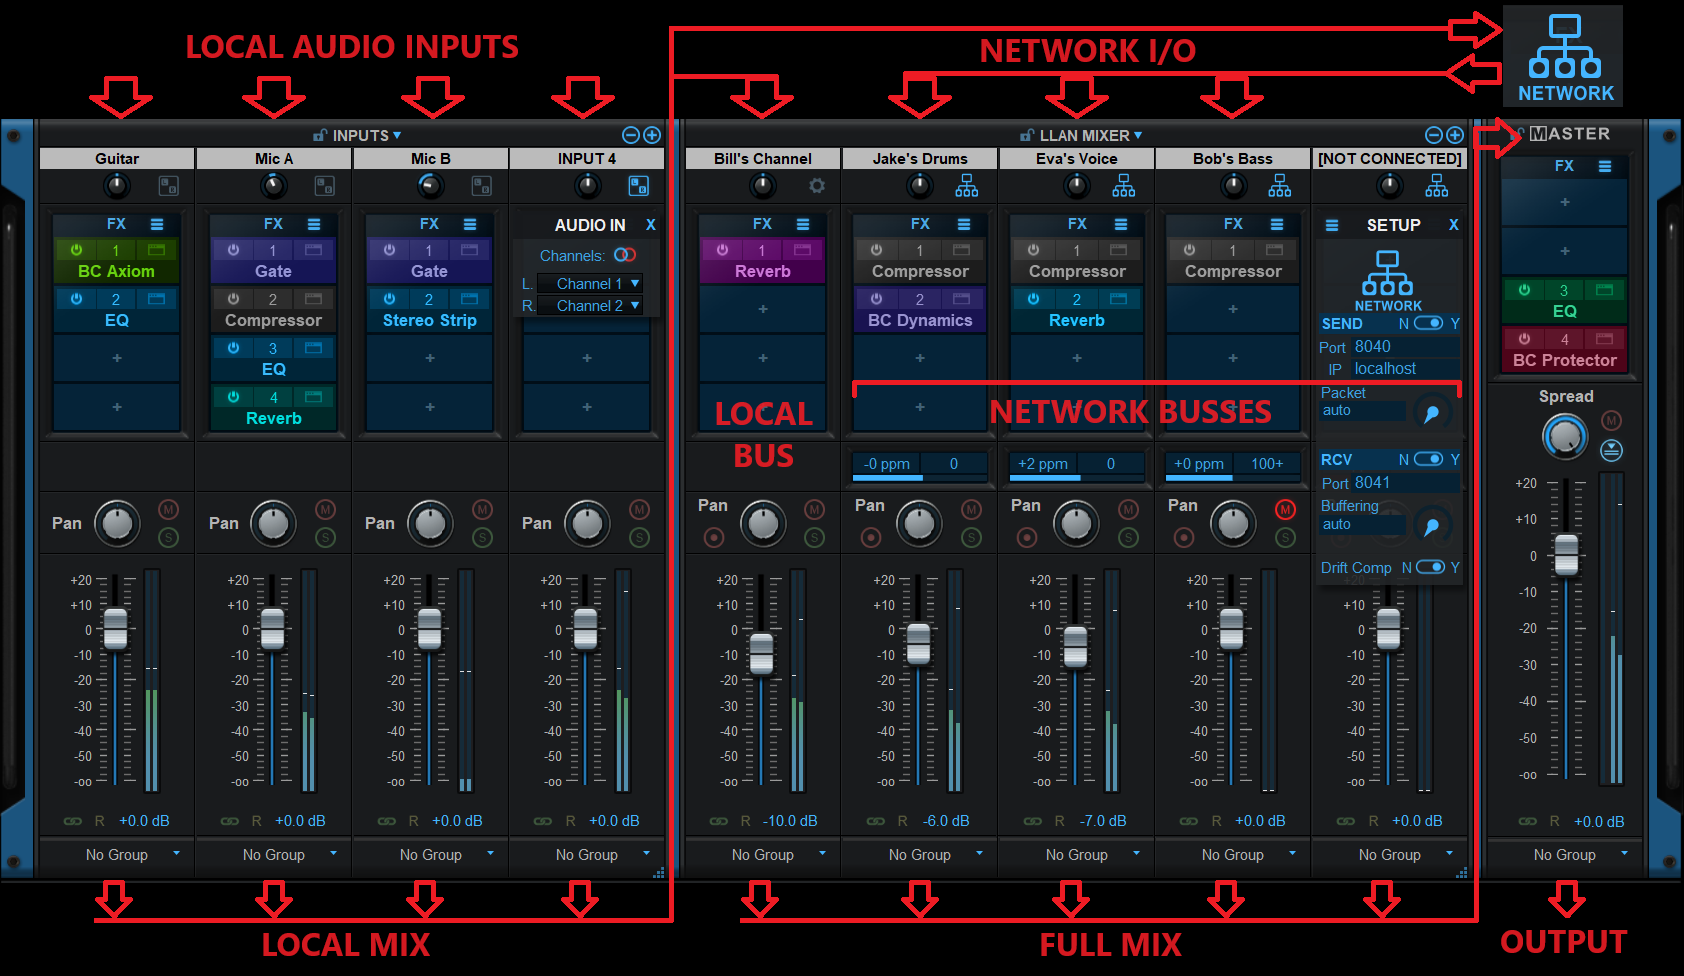
Note: the signal sent to others thru the network is the raw local mix. Any additional effects and treatments made on the local bus are not heard by others and are applied only locally on the full mix sent to the master.
Since version 1.1 for each local input you can choose if it is sent to others and/or heard locally. Similarly when using an auxiliary output, you can choose for each LLAN Mixer strip if the output is sent to the master and/or aux output.
Multichannel Mode
Starting with version 1.3, it is now possible to send individual inputs instead of a stereo mix to other instances (multichannel - or "multitrack" - send mode).
As a result, Fader hub instances that are receiving individual inputs can get up to 64 strips (128 audio channels) to record individually and mix together:
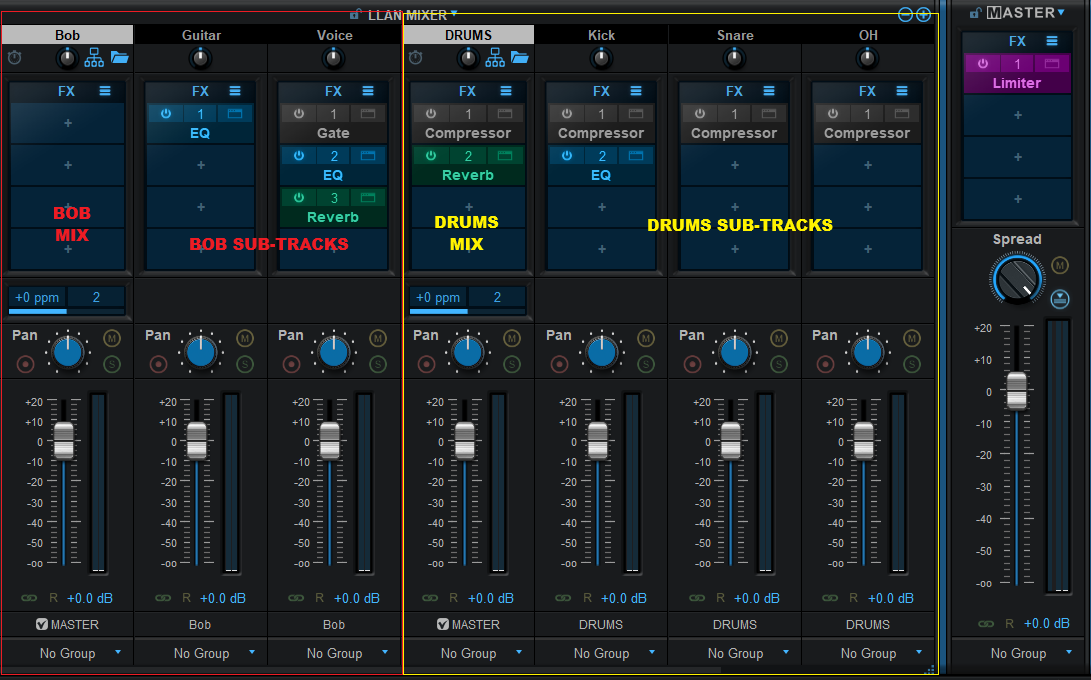
Thanks to this powerful feature, you can agggregate up to 64 stereo audio sources (128 channels) together from several machines / audio interfaces over a local network or even thru the Internet.
Advanced Features
Multicore Processing
Fader Hub includes a multicore processing engine that can spread individual strips processing on separate processor cores. It lets you use all your processor cores at the same time and load more effects or instruments in the console at the same time.
Note: effects that are processed in series (one after the other) inside a strip cannot be parallelized and do not benefit from multicore processing. Only effects from separate strips can be processed independently.
The multicore engine can be activated or deactivated for each preset independently. When using very few plug-ins with low CPU usage in parallel, the cost of multicore processing can be higher than the benefits (you can check the CPU usage with the built-in CPU meter at the bottom right of the user interface).
Performance also depends on the host application and its own multicore processing strategy, so you may want to try and compare with or without multicore enabled.
Parameters Mapping & Macros
With Blue Cat's Fader Hub, it is possible to map hosted plug-ins parameters in order to control them with host automation (when used as a plug-in), an external control surface, or simply within Blue Cat's Fader Hub's user interface. Thanks to the included "learn mode", simply touching the knobs of your favorite plug-ins will let you assign parameters for external control (up to 40 controls are available).
It is even possible to map several parameters to a single control and adjust the range of each parameter, to create macro controls that can adjust multiple parameters at once. This lets you create shortcuts to multiple plug-ins to make mixing easier.
Let's now dive deeper into the user interface and explore all the features available in Fader Hub.
The User Interface
Note: The main toolbar, menus and basic features available with all our plug-ins are detailed in the Blue Cat Audio Plug-ins Basics section.
Overview
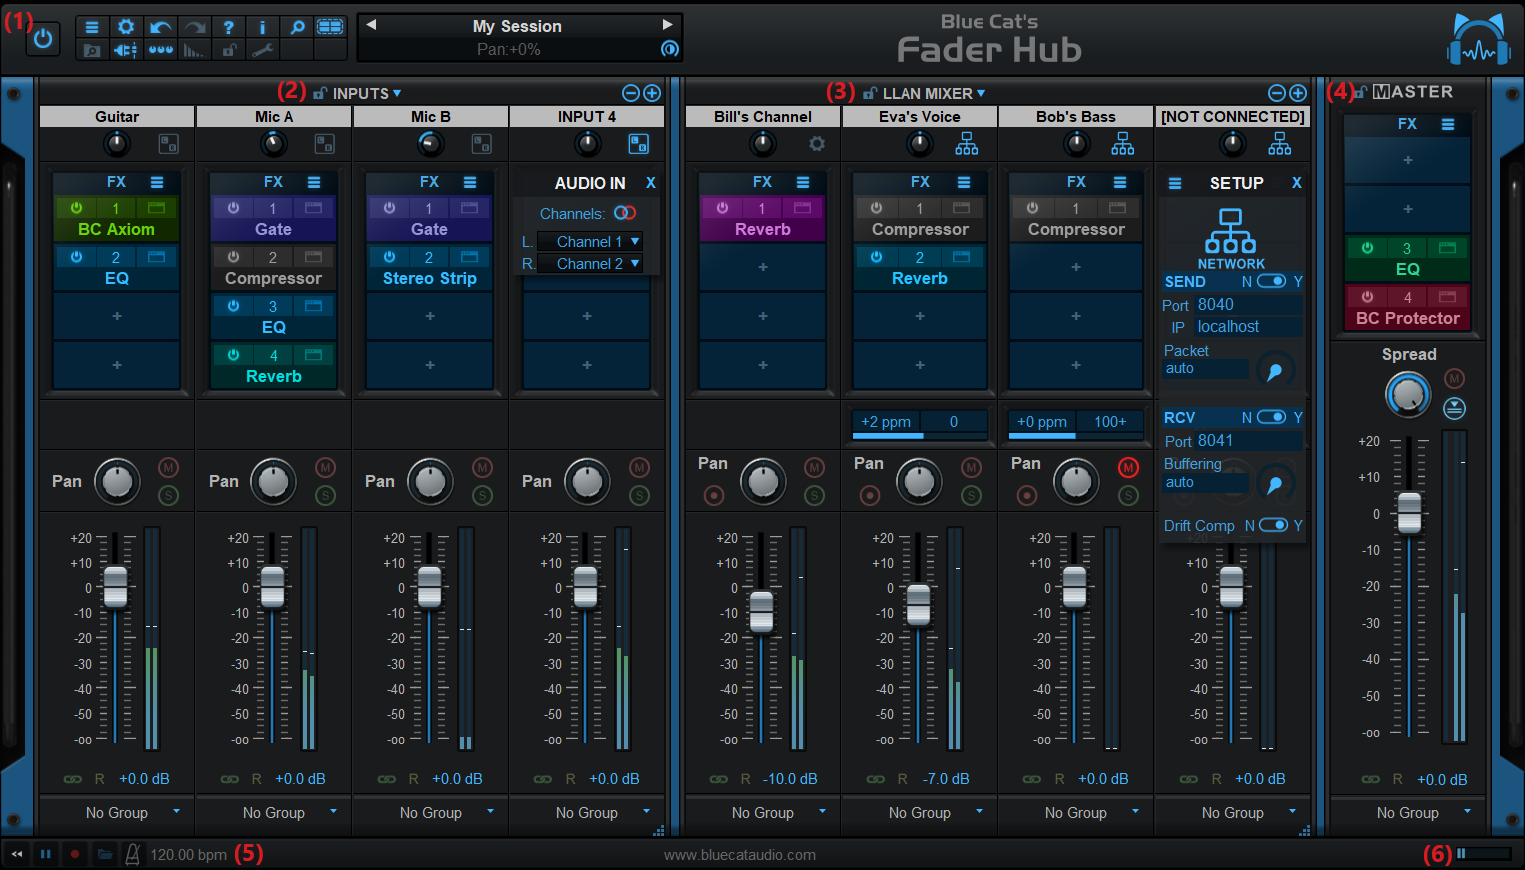
- The main toolbar, with from left to right: the bypass button, the main toolbar buttons, the presets manager and text display LCD.
- The inputs mixer, with audio inputs strips.
- The LLAN mixer, with network audio strips.
- The master strip, managing the local audio output.
- Transport & tempo controls, audio recorder (app only): click on the red circle to record audio, and then open the audio files by clicking on the folder icon.
- Real time workload meter that measures CPU load (becomes red when CPU load is too high).
The main area of the user interface is divided into three parts: (2) the local mixer where you manage local audio inputs (from the audio interface), (3) the LLAN (Low Latency Audio Network) Mixer where you manage the network connections, and (4) the master bus that manages the software's audio output.
When using many strips, you can reduce the width of the user interface by dragging the right part of each mixer to the left. A slider will appear at the bottom to navigate within the mixer.
The main toolbar

- Main plug-in menu (access presets, global settings, ...).
- Show/Hide controls settings menu (MIDI learn, response curve, lock, effects bypass lock...).
- Undo/Redo.
- User manual.
- Open the about box.
- Global GUI zoom control.
- Activate multicore support.
- Show/hide the presets browser.
- Show/hide plug-ins slots.
- Assignable controls menu: show/hide assignable controls (controls mapped from hosted plug-ins), open the params map editor, or select the style of assigned controls.
- Activate tail spillover.
- GUI settings lock (to prevent GUI layout changes when loading presets).
- Show the preferences pane for plug-ins hosting.
Note: some controls may display additional information in the preset LCD (below the name of the current preset) when hovering the mouse on them, so you may want to keep an eye on this area!
Locks
Several locks are available to prevent changes while loading presets: when the lock is active, loading presets will not change the settings of a locked section. A general UI lock is also available in the toolbar, if you want to keep the same user interface settings (GUI layout, opacity, plug-in windows...) while browsing presets.
Common Channel Strip Features

The channel strips in the 3 mixing areas (inputs, LLAN and master) are similar and have many controls in common:
- Channel strip name. Manually entered by clicking on it, or automatically set from network connections depending on the type of strip.
- Input trim (adjust the channel strip's input gain) and settings.
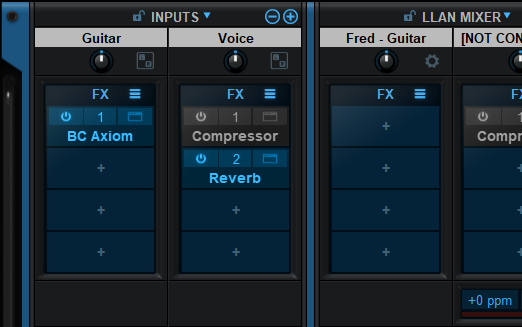
- Plug-ins area: you can load up to 4 built-in or third party plug-ins in each strip (effects or virtuql instruments). The "burger" icon at the top right lets you manage (load/save/copy/paste) complete fx strip settings.
- The center area offers a pan control (blue knob), a mute button (M) and a solo button (S). Note that soloing a strip only affects the current mixer. For example soloing a strip in the input mixer does not affect the other channels in the LLAN mixer. The button at the bottom left can be used to arm the strip for recording.
- Strip fader and meter: adjust the volume at the output of the channel strip. The level meter shows the audio level at the output of the channel strip.
- Grouping / linking: channel strips controls can be linked together, either using the quick link button (green link icon), or the group menu at the bottom. Moving the controls of a strip within a group affects all the strips in the group. You can reverse the link behavior of a strip by clicking on the "R" icon.
The signal flow in the strips is from top to bottom: trim / plug-ins / pan / fader.
The Local Inputs Mixer

Setting up the inputs mixer is straightforward:
- Adjust the number of strips using the +/- buttons or the dropdown menu that appears when clicking on the "Inputs" title (up to 8 stereo strips available).
- Click on the settings icon on the top right.
- Select the input type (mono/stereo) by clicking on the circles icon.
- Select the audio channels for this strip (see below).
- Close the settings popup by ckicking on the blue cross at the top right, or the "AUDIO IN" title.
For every input channel strip, you can click on the strip title to enter its name.
About audio channels: When using the application, audio channels shown in the channels selectors (and the number of channels available) are set in the audio preferences of the application. For the plug-in, the first two audio channels are the main audio inputs, and channel 3 and 4 are usually the side chain input (when available).
Routing
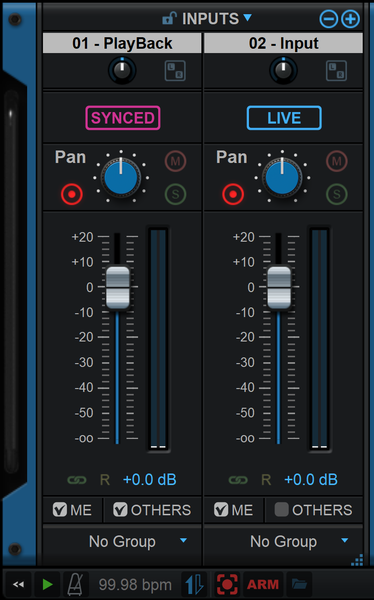
Starting with version 1.1 you can select for each input which one is summed to the local mix ("ME") and/or to the mix sent to others via the network ("OTHERS"):
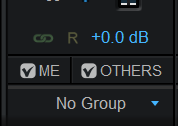
This way you can for example send your microphone signal to others but not hear it on your monitors to avoid feedback.
Live vs Synced Input
Since version 1.2, there are two modes available for any input strip:

- LIVE: default mode. Audio input is sent as soon as possibe to all connected Fader Hubs, minimizing the latency at the expense of not being synchronized (it will be played as received).
- SYNCED: audio input is synchronized for all connected instances. Everyone (including the sender) will hear the input in perfect sync. This is particularly useful when playing with a backing track, a click or pre-recorded sequences. Synced mode ensures that everyone hears the backing track at the same time, regardless of the latencies between different locations.
Tip: you can use the synced mode temporarily on a live input to check the max latency others may be experiencing. The input will be delayed for you as you play, as if you were on the other side of the connection.
The Network Mixer
Although similar, the LLAN Mixer that manages network connection has a few additional fields:
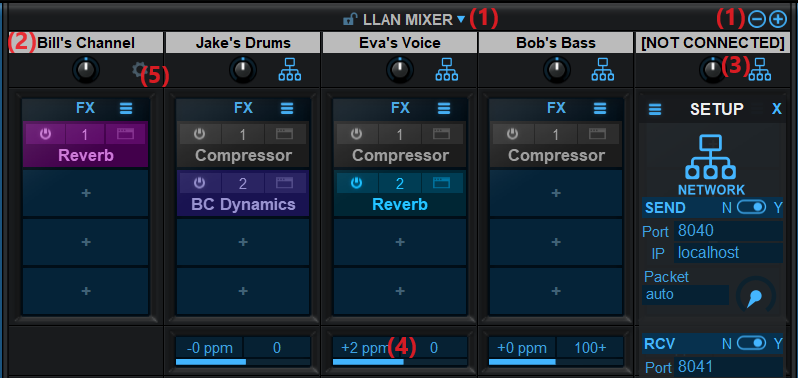
- Adjust the number of strips (busses) using the +/- buttons or the dropdown menu that appears when clicking on the "LLAN Mixer" title (up to 8 stereo strips available).
- The first strip is for your own local bus, managing the local mix. You can click on the title (initially set to "YOUR NAME") to set your name. This is important as this is the name that will identify you with other Fader Hub instances you will connect to. Reminder: effects, panning and level on this personal strip do not affect the signal sent to other instances. It is only for local monitoring (see the signal flow in the introduction).
- Clicking on the other strips titles or on the network icon will open the network settings to setup the connections.
- An additional area in the middle of each strip lets you monitor the network connection. Hover the mouse in this area to display a tooltip with the estimated reception latency.
- Click on the gear icon in your channel to manage additional settings for the local instance (you can set the quality of resampling used for all networks connections: if the senders and receivers are using different sample rates, the software will automatically resample incoming audio. You can adjust the quality of the resampling. Keep in mind that higher settings will consume more CPU, and the "Best" setting can also add quite a bit of latency.
- Select master clock: for the local channel, choose the master clock that will keep the apps transport in sync (for playback/recording). The app can either be a slave and receive clock signals or be the master and send clock signals to others (details below).
- Send clock options: whether in master or slave mode, you can choose to send clock signals to each connected instance individually with appropriate synchronization options (details below).
- Network Latency Compensation: you can activate network latency compensation so that all streams are mixed in sync. This may add latency to the incoming signal but ensures that the latency introduced by the network connections are properly compensated. This is typically used when the application is used for recording and no live instrumentalist is using the application for monitoring. The total latency (including extra plug-ins latency if any) is then reported at the bottom right of the user interface, next to the workload meter.
Just like with input strips, starting with version 1.1 you have extra routing options. these will appear only if an aux output is configured (see the Master section's dropdown menu). For each bus, select if it is sent to the master or the aux bus:
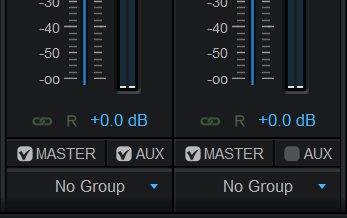
Clock Synchronization
Choosing the Master Clock
Fader Hub can send and/or receive clock signals to synchronize playback or recording between connected instances. You can choose the master clock using the clock icon in the local channel strip:

Note: Fader hub uses a special combination of sample accurate Midi Timecode (MTC) and MIDI Clock to synchronize both MIDI and audio playback as well as BPM. When choosing a master clock option in the application, it also changes the clock sync in the application that is available at the bottom of the user interface:
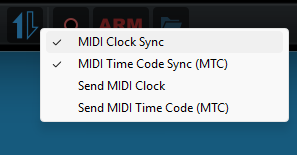
You cannot slave Fader Hub to both a local device and thru the network.A Fader Hub instance slaved to a local device can however send master clock signals to others thru the network and vice versa.
When choosing another instance of Fader Hub as the master, for the synchronization to operate, this other instance should be configured to send a clock signal as a master.
Send Clock Options
When the local strip is chosen as the master, it automatically configures how the clock is sent to other instances. While the defaut configuration ("ahead") is fine in most cases, you can however change the synchronization depending on how/why each application is connected to others:
- Off: clock not sent.
- Unaltered: send clock information in sync with the audio/MIDI streams being sent. Use this mode if the receiver app should play/record in sync with incoming MIDI/audio, with no compensation for the latency. Playback will not be synchronized with the master instance.
- Ahead (default): send clock ahead of time, anticipating the send latency. Use this setting is the receiver and sender should play in sync together, regardless of the latency. This is typically the setting to use when playing with other musicians, so that transport is in sync for all.
- Roundtrip: send clock ahead of time, anticipating both send and receive latencies (roundtrip). Use this setting if sending and receiving back the signal and you want to keep it in sync with local tracks, without having to use latency compensation. You will get undelayed synchronization, despite the potential roundtrip latency.
Clock synchronization only refers to playback or recording ("transport") and does not alter the latency. Using proper clock synchronization you can ensure that playback of pre-recorded sequences or virtual instruments / metronome / click tracks is kept in sync in all applications despite the latency. It also lets you trigger synchronized recording in all connected instances of the application, wherever they are. Welcome to the wonderful world or distributed recording!
Plug-in & Clock Sync
When using fader Hub as a plug-in, it can transform the host's transport into clock signal, so it works natively as a master clock.
It can also be used as a slave but cannot directly synchronize the host's transport. The plug-in will output MIDI Clock and MIDI Timecode (MTC) signals, so if the host can use these (either directy or thru a loopback MIDI device), it can be synchronized with the master Fader Hub instance. Please refer to your DAW's user guide for more details.
Network Connection (In & Out)
By default the LLAN mixer busses are configured to send and receive audio thru the network. You can however change this to connect to other applications on the same machine by selecting the "Local Machine" mode:
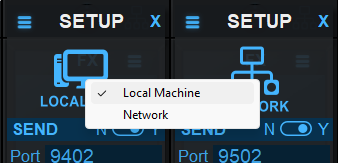
This can be used for example to stream your local mix thru a third party application such as OBS or record the local mix in a DAW etc.
Send Settings
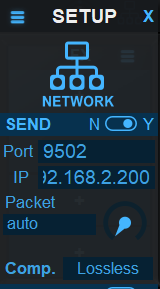
The first thing you may want to setup is how and where the software sends audio data to another instance, on the same machine or on another computer.
If the receiver runs on a different machine, enter the hostname (Windows only), or IP address of the destination machine on the network. The IP address can be found in the network settings of the destination computer for local network connections, and it is the public IP address of the receiver when connecting thru the internet (more on that later).
You should then select the port number the software should be sending to (which corresponds to a physical network port). You can select any number that is not used by another application on the destination machine (you may have to try several numbers until it connects).
When connecting thru the Internet, additional limitations on port numbers may apply (sometimes only ports above 16300 are available or even above 32000). You may want to check on the destination Internet router and firewall if such limitations apply.
Note: these settings must correspond to the IP address and port for the destination machine, see the receive options.
Advanced Send Settings
Once the connection is established, you may want to optimize the network traffic to get a more stable connection. That's what the advanced settings are for.
By default packet size is set to "auto": audio data is sent as they are received by the software. You may however want to set a fixed packet size (in samples) to optimize the connection: larger packets will use less CPU and bandwidth, and will result in more stable connection. It will however increase the latency.
Just make sure that the packet size is smaller than the buffer length used in the destination. It is also a good idea in general to make it at least the same size as the host application's buffer size.
When the connection is not very stable or you need to reduce the network traffic, you can use audio compression (it is not active be default and raw audio data is sent). Lossless compression will not affect the audio quality (audio data will remain the same, bit for bit), while lossy audio compression may be audible when set to lower quality settings.
Note: audio compression will be more efficient with larger packet sizes.
Reception Settings
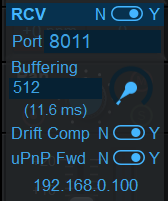
You have setup the commuication channel to send audio from your machine to the other machine. It is now time to set it up the other way round, to receive from the other machine for this strip.
To accept connections, select the port the plug-in should be listening to (which corresponds to a physical network port). When working with another musician, that's the port you want him/her to use to send audio to you.
Advanced Reception Settings
By default buffering is set "none", which means the plug-in will not perform extra buffering, to minimize latency. It will however not work well when connecting thru a busy network with jitter, especially over the Internet. So you will have to manually setup the buffer (in samples).
The larger the buffer, the safer the connection, but the latency will get longer. You can visualize the status of the buffer with the meter in the network channel strip (see the network monitoring paragraph). When dropouts occur, increase the buffer length until dropouts count does not increase anymore.
If the sender and receiver are working on different machines or different audio interfaces that are not in sync, drifting may occur (sample rates are not exactly identical), resulting in dropouts in the long run.
UPnP Fwd: ""Universal Plug'n Play Port Forwarding", used when receiving from the Internet. See the paragraph below about Internet reception.
Optimization Tips
The reception buffer length should always be at least the same or larger than the sender packet size. using multiples of the audio buffer of the application is usually a good way to optimize the latency.
If source and destination are running on different machines or audio interfaces, it is strongly recommended to use drift compensation, even if the drift ratio seems to be minimal: clocks my vary over time, especially with temperature. When communicating over the Internet though, the drift caused by the network communication may be worse, and drift compensation might not work properly, so you may want to deactivate it if you see the drift meter going crazy. with large figures.
Receiving From the Internet
When receiving data from the Internet (WAN), the Internet router has to send the packets received on the specified port to your local machine ("Port Forwarding"). It can be configured manually (as explained in this tutorial), but if your Internet router supports the UPnP IGD (universal Plug'n Play Internet Gateway Device) protocol, Fader Hub can do it automatically for you:
- Make sure that the router supports UPnP and that it is enabled (some routers may have it disabled by default).
- Enable uPnP Fwd in the Fader Hub strip(s) expecting to receive data from the Internet.
- Wait for a few seconds until the public IP address of the Internet router is displayed (or an error message in case of failure).
The public IP address is the address to type in the sender instance used to send the audio data on the other side of the Internet.
When closing fader Hub, the port will automatically be closed.
In case of failure, you may want to try other port numbers (some routers limit the range of ports that can be forwarded), and check that UPnP is properly enabled on the router. There is usually a section on the router to check the list of ports that have been forwarded using the IPnP IGD protocol.
Note: UPnP is only available for the "Network" connection type.
Network Reception Monitoring
Each channel strip in the LLAN mixer displays some additional information to monitor the network connection:
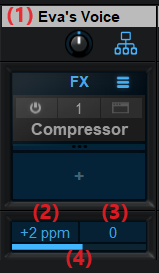
- The title of the strip either displays [NOT CONNECTED] if not receiving audio or the name of the sender (as set in the sender's name field in its own instance) when the connection is streaming audio. You can also hover the mouve over the title to see a tooltip showing both the send and receive status of the connection.
- Drift is displayed in ppm (parts per million) and is non zero if the incoming audio stream is drifting. See teh drift compensation option in the receive settings.
- Dropouts count: shows the number of audio reception dropouts. Click on the field to reset the count.
- Buffer fill meter: shows how the receiving buffer is filled. The nominal value is 100% (center). If the meter goes left, the reception buffer is being emptied, if going right, it is being filled and may overflow when getting close to the maximum.
Fader Hub also reports an estimate of the network latency upon reception with the current connection. You can visualize it by hovering the mouse over the network icon in the strip network settings:
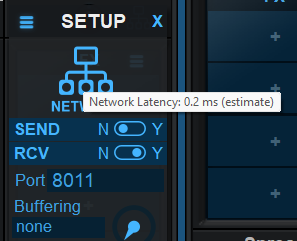
This latency is only the latency caused by the network connection. Global reception latency is usually higher due to buffering. The actual reception latency is shown when hovering the mouse on the reception monitoring area of the mixer.
Master Section and Aux Bus
By default, Fader Hub provides a single stereo output ("MASTER"). Starting with version 1.1 you can also have an extra auxiliary output, to route signals to either output independently:
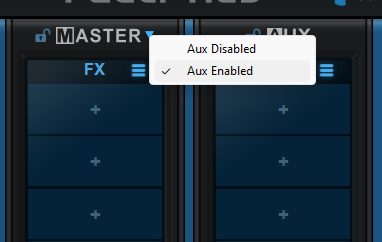
In the application the auxiliary output will be sent to channels 3-4 (while master goes to channels 1-2). For host applications that support aux outputs on effect plug-ins, the auxiliary bus will appear as an aux output on channels 3-4.
Audio Recording
Individual strips can record separate audio files. To do so, simply arm the strips for recording. When using the app, clicking on the record button in the status bar will trigger recording for all armed strips as well as for the master bus. When using the plug-in, armed strips will record when the host application is recording.

In both cases, click on the blue folder icon in tyhe status bar at the bottom to open up the folder with the recorded files.
Input strips vs. LLAN mixer strips: when armed, input strips will record audio post-FX (effects included), whereas LLAN Mixer strips will record audio pre-FX (no effects applied).
In the standalone application, recording can be started/stopped either by clicking on the record button, or by first arming recording (ARM button) and then clicking on the play button. This second method ensures that playback and recording are performed in perfect sync.
Since version 1.2 the recorder keeps all individual recordings in sync, compensating the latency of each individual connection, regardless of the clock and latency compensation settings. It ensures that individual tracks can be mixed back together easily and get a perfect recording with built-in latency compensation, even if the live performance was a bit out of sync due to real time latency. It also makes sure that the recorded tracks are in sync with orginal backing tracks when triggering playback and recording simultaneously.
Also, the exact timestamp at which recording started is saved in the recorded wav file (as a BWF time reference), so that it can be easily imported and synchronized in your DAW.
Multichannel Mode
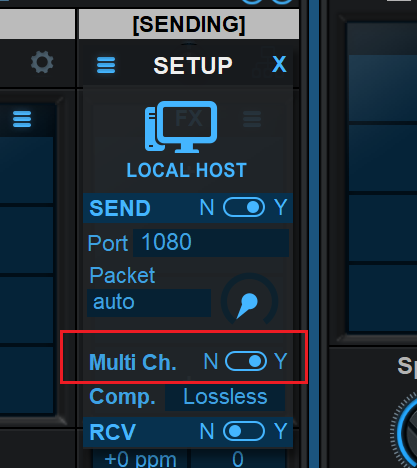
Since version 1.3, it is possible to choose to send individual inputs instead of the stereo mix only. This can be activated for each destination in the LLAN mixer, by enabling Multi Channel mode:
In this mode, all individual inputs selected to be sent to "Others" are carried over the network and received as individual streams, resulting in extra strips on the receiving instance. For example let's say the drummer has 3 stereo inputs, they will all appear in the destination instance as sub-strips of the drums channel (black title background):
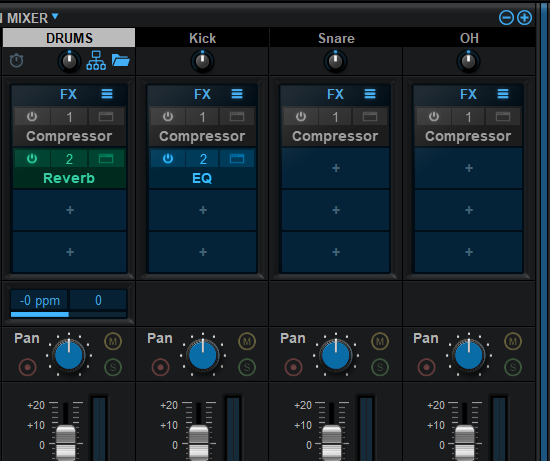
They are mixed together using the individual strips and inserted plug-ins, and the mix then goes thru the Drums bus before being mixed with other busses. You cna use the folder icon to show/hide the sub strips anytime.
When disconnected from the remote source, Fader Hub retains its settings and still shows the sub-strips, but with their titles greyed out:
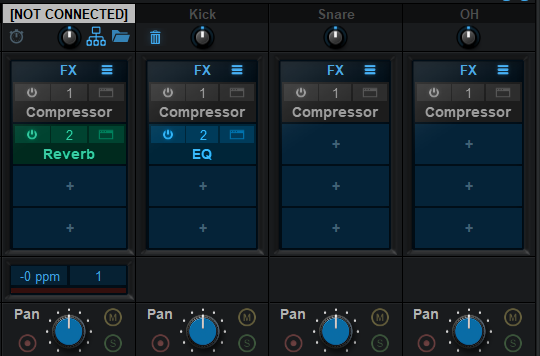
When disconnected, you can choose to forget these sub strips (as well as all your mix settings and plug-ins) by using the trash icon. Beware that this cannot be undoed. Sub-tracks will then re-appear blank, next time you re-connect.
Also, beware that if the remote source removes some of its inputs or chooses to send only the stereo mix, the associated strips will disappear and their settings will be cleared. So you may want to save a preset when your session is ready, to avoid losing some precious settings in case others choose to change their remote setup.
Workload Meter
The workload meter at the bottom right of the user interface gives an idea of the amount of cpu used by the plug-in to process audio frames:

It measures the realtime workload, which corresponds to the time spent processing an audio buffer compared to its duration. This value may be impacted by other tasks running on the system.
In general the average value gives a good idea of the cpu usage of the plug-in, while the peak value is an indication of potential audio dropouts (if larger than 100% for too long), that may be caused by overall system load (not just the plug-in's audio processing).
The workload meter becomes orange then red when the peak load grows. Hover the mouse on the meter to see numerical values in a tooltip.
Browsing Presets
In order to browse both factory and user presets, you can either use the simple presets menu or open the full featured presets browser from the toolbar that remains visible until you close it:
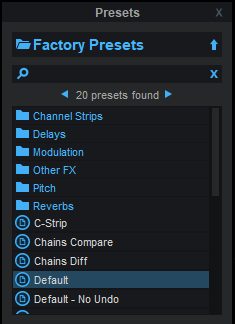
Click on preset files and folders to open them, or use the arrows to navigate between displayed presets. You can navigate upward in the folders tree by clicking on the current folder at the top. Type in the search box to find presets by name (it also searches in folder names). The search is performed recursively in the currently selected folder (displayed at the top).
Search Tips: you can search for multiple terms by separating them with commas. Wildcards are also supported (with * and ? characters), but they are applied to the full path of the preset. For example, to search for all presets containing the word "phase", type *phase* in the search box. To look for these presets only in the factory presets, you can type Factory Presets/*phase*.
Using Built-in effects or VST, VST3 and Audio Unit Plug-Ins
Note: before inserting VST plug-ins, it is strongly recommended that you setup your main VST plug-ins directory in the preferences pane, as detailed later in this manual (this setting does not affect VST3 plug-ins).
Warning: in a 64-bit application you can only load 64-bit plug-ins, and in a 32-bit application you can only load 32-bit plug-ins, unless your are using a third party bridging application.
Each plug-in slot lets you insert a plug-in. When clicking on an empty slot, the following menu appears:
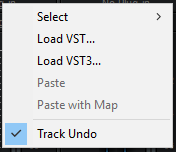
The "Select" item is enabled if you have previously saved plug-ins as favorites using the "save as" command described below. It lets you choose a favorite plug-in directly from the menu, instead of having to load it from the file system.
Selecting "Load VST" will open a standard system window where you can select the VST plug-in you want to load. If the preferences have been properly set, the window should open the appropriate location where you can find the VST plug-ins.
Selecting "Load VST3" will open a standard system window where you can select the VST3 plug-in to be loaded.
On Mac, an additional "Load AU" menu item is available to load Audio Units. It opens a file open dialog in the standard location for Audio Units on your system. Note: if you want to load the system Audio Units provided by Apple, you will need to open the CoreAudio component located in the /System/Library directory (/System/Library/Components/CoreAudio.Component).
You can also choose to paste an existing VST, VST3 or AU plug-in if previously copied into the system clipboard from another slot. When using the "Paste with Map" command, if the plug-in in the source slot had mapped parameters, these parameters will be added to the map until no more assignable parameters are available.
Once a plug-in has been loaded into a slot, a mouse click will display the following plug-in menu that offers various controls over the plug-in:
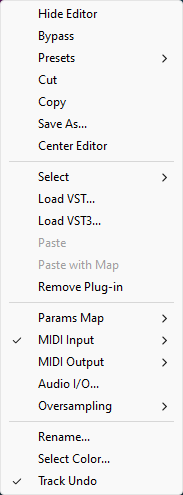
- Show (Hide) Editor: display or hide the plug-in's user interface.
- Bypass: toggle bypass for the plug-in.
- Presets: access the plug-in's factory presets if any, and load/save presets files in the plug-in's native format (fxb/fxp, vstpreset or aupreset).
- Cut: copy the plug-in and its settings into the system clipboard and remove it from the slot.
- Copy: copy the plug-in and its settings into the system clipboard. Onced copied, it can be pasted to any other slot, in any instance of the plug-in (even in a different application).
- Save As: save the plug-in in the slot and its settings as a favorite. Favorites are saved in the plug-in documents folder and can be organized using folders to appear later in sub menus.
- Center Editor: bring back the editor of the plug-in to the center of the screen, in case you cannot find it.
- Select: select a plug-in and its settings from the favorites list.
- Load VST: load another VST plug-in in the slot (will replace the existing plug-in if any).
- Load VST3: load another VST3 plug-in in the slot (will replace the existing plug-in if any).
- Load AU (Mac only): load another Audio Unit plug-in in the slot (will replace the existing plug-in if any).
- Paste: paste a plug-in and its settings from the system clipboard into the slot.
- Paste with Map: paste a plug-in, its settings and mapped parameters from the system clipboard into the slot. Parameters are re-mapped in order, until no more assignable parameter is available.
- Remove Plug-in: remove the plug-in from the slot.
- Params Map: lists the plug-in's parameters that can be mapped for automation, and lets you assign them to external controls (see the next paragraph).
- MIDI In: select the MIDI port(s) this plug-in is receiving data from (see below).
- MIDI Out: select the MIDI port(s) this plug-in is sending MIDI data to (see below).
- Audio I/O: opens the audio i/o routing window for this plug-in (see below).
- Oversampling: select oversampling ratio and quality for the plug-in (see below).
- Rename: rename the instance of the plug-in. Setting an empty name reverts back to the plug-in's default name.
- Set Color: open the system color dialog to select the color for the plug-in slot.
- Track Undo: toggle undo tracking for the slot. If enabled, inserted plug-ins changes will be inspected and added to the plug-in/app undo history when possible. Please note that some plug-ins may not work properly when this feature is enabled. It is also recommended to disable this feature when controlling a plug-in with MIDI events generators such as Blue Cat's DP Meter Pro or Remote Control.
Once a plug-in has been loaded into a slot, the following buttons are available:
Clicking on the power button on the left will bypass/unbypass the plug-in in the slot. The button on the right can be used to show/hide the plug-in's editor.
Missing Plug-Ins
In some cases, it may happen that you are working on a workstation that does not have all plug-ins that were previously loaded into your session. In this case, Fader Hub will display a "Missing Plug-in" message on corresponding slots. You can still continue working on your session: Fader Hub will retain the state of the missing plug-ins as if they were here. The session can be saved later: the data for missing plug-ins will be saved as well, and the session can be restored later without losing data.
For VST and VST3 plug-ins, if the plug-in is missing because of a path issue (the plug-in is located in another directory, or the 64-bit version has a different name from the 32-bit version...), you can choose to relocate the plug-in:
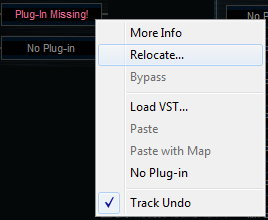
This lets you find the plug-in on your workstation and re-link to it. The state of the plug-in that was previously saved in the preset or the session will be restored, making sure all data is kept.
Note: the plug-in chosen with the relocate function has to be compatible with the plug-in that was originally loaded in this slot. Relocation will fail otherwise.
Mapping Parameters (One To One Quick Mapping)
The "Params Map" item in the plug-in menu lets you map sub plug-in parameters so that they can be automated or controlled with an external control surface. It also lets you view existing mapping for this plug-in if any:
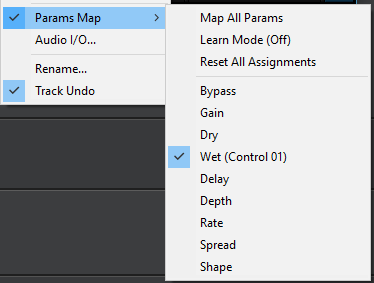
- Map All Params: assign all parameters of this plug-in to remaining controls (in the same order as exposed by the plug-in). The maximum number of parameters that can be mapped is 40.
- Learn Mode (on/off): when learn mode is on, touching a control in your plug-in's user interface will automatically add it to the parameters map (if the plug-in supports it). Once you are done with parameters assignment, you may want to disable learn mode to avoid mapping unwanted parameters.
- Reset All Assignments: removes all assigned parameters from the params map, for this plug-in. This frees all controls used by previously assigned parameters (for this plug-in only).
- All parameters available for assignment are then displayed in the menu. Clicking on a parameter toggles mapping on or off. When a parameter is mapped, the name of the external control (as displayed in the host application) appears next to it, inside parentheses.
Parameters Mapping works the following way: 40 parameters are available for mapping in Blue Cat's Fader Hub. They are named "Control 01" to "Control 40". When a sub plug-in parameter is selected for mapping, the first control available within Blue Cat's Fader Hub is used. Once mapped, the sub plug-in parameter and this control are linked together, so that any change to either of them is reported to the other.
This enables the sub-plug-in to expose its parameters to the outside of the Fader Hub plug-in. You can for example use these external controls for automation, MIDI control , control surface assignment etc. in your DAW.
If assigned controls are shown in Blue Cat's Fader Hub ("Show Assigned Controls" button), new knobs will appear when new parameters are mapped, until the maximum number of 40 controls is reached.
It is possible to choose the style of the knobs using the menu, and set the name of each control by clicking on it:
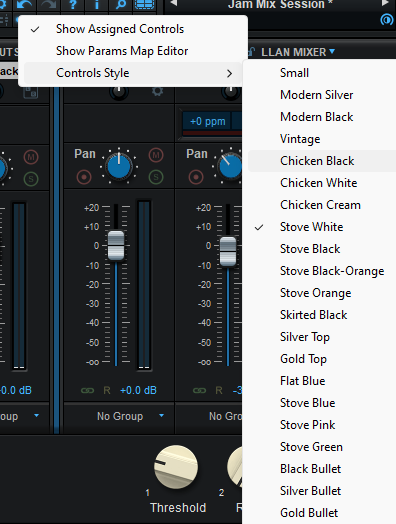
These custom names should be displayed in the host application in place of "Control 01, Control 02..." if it supports it.
Macro Controls: The Parameters Map Editor
It is possible to access more advanced options for parameters mapping and create macro controls assigned to multiple parameters from multiple plug-ins by launching the Params Map Editor:
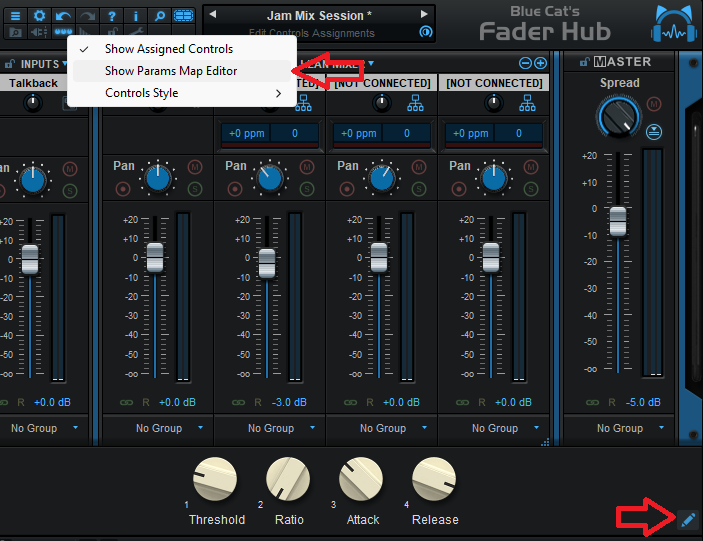
The Map Editor is displayed in a separate window that you can re-size at your convenience:
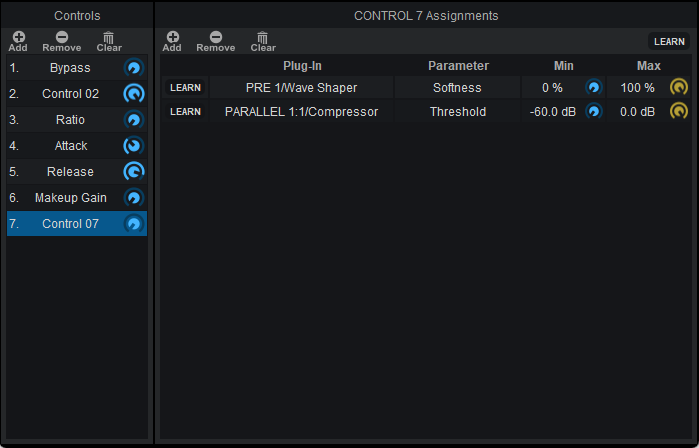
Available controls are displayed on the left (you can add or remove them with the icons on at the top), and when a control is selected you can see the parameters that have been assigned in the pane on the right.
Assignments can either be created manually (using the "Add" icon and then selecting the plug-in and parameter in the menus), or automatically with the learn button at the top right of the pane. When this assignment learn function is engaged, clicking or moving a knob of a plug-in should add the corresponding parameter to the list. Do not forget to disengage it when you are done or unwanted parameters might be added when touching the plug-ins later!
It is also possible to learn parameters individually using the learn button on the left of each line.
Once parameters have been added, their range can be adjusted using the knobs on the right (or by double clicking on the value). To reverse the range, simply invert the min and max values (using a min value that is larger than the max value).
You can also change the name of the controls by double clicking on them in the list displayed in the left pane.
It is also possible to change the order / add parameters by dragging and dropping items in the left column (it works between different instances too).
Internal MIDI Routing
Blue Cat's Fader Hub lets you build your own MIDI connections between inserted plug-ins and the host application. Each slot can be connected to multiple ports to receive and send MIDI events:
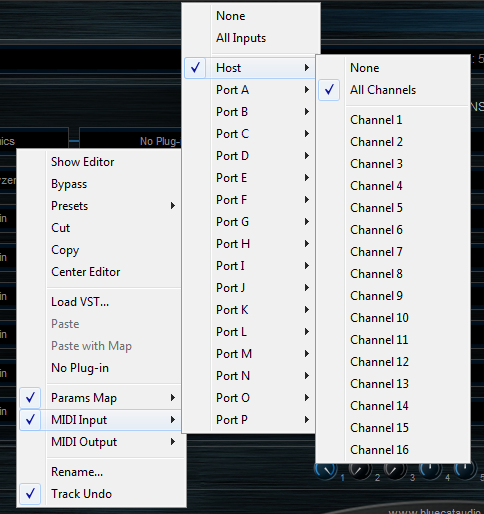
- Host: this port connects to the host application to send (MIDI Out) and receive (MIDI In) events. By default, all slots have their MIDI input connected to the Host.
- Port A to Port P: these are virtual ports that can be used to connect sub plug-ins together.
For the MIDI input of a plug-in you can additionaly choose to filter events by channel so that it receives all events for one or several selected channels only. If you just want the plug-in to receive all events without any filter, choose "All Channels" for the selected port.
Using virtual internal ports is simple: connect the output of a plug-in to a port, and the input of another plug-in to the same port. The two plug-ins will then be able to exchange MIDI data (from sender to receiver). Multiple plug-ins can be connected to the same port (as input or output). MIDI events will be gathered from MIDI Outs and redistributed to to all connected MIDI Ins.
However, there is a limitation in which plug-ins can be connected together:
- It is not possible to create feedback loops.
- only a plug-in that processes audio data before another can send MIDI data to this plug-in. It means that a plug-in can receive MIDI data from plug-ins that are located earlier in the audio processing chain only. If the plug-in is located in a different strip, it can also receive MIDI data from plug-ins that are located in the strips before it (on its left).
These limitations ensure causality and perfect synchronization of MIDI data exchanged between plug-ins, without latency.
Since version 1.2 an extra "MIDI Loopback" output port is available. It allows a plug-in to send MIDI events back to the Fader Hub plug-in or application. You can for example use a plug-in that generates MIDI controls and sends it back to Fader Hub to control macro parameters. Make sure that you are not creating a feedback loop by using different MIDI channels to differentiate the events being sent back and the events received fro; the outside, or this might generate an infinite number of events that plug-ins will not be able to process.
Note: when connecting a plug-in to control its parameters via MIDI, you may want to disable undo tracking on this plug-in, to avoid that to many undo steps are recorded by Blue Cat's Fader Hub and reduce CPU usage.
Audio I/O Routing
Using the "Audio I/O" command in the plug-in menu, it is possible to manually change which audio channels are processed by each plug-in.
Automatic Selection
By default, Blue Cat's Fader Hub will automatically detect the number of channels to use for each plug-in depending on its own configuration: effect plug-ins will process only the main audio channels and leave side chain channels unaffected.
About mono plug-ins: in automatic mode, mono plug-ins will process only the first audio channel, and the wet mono output will be copied to all channels of the main bus (aux and side chain unaffected). If you want to only apply the plug-in to one of the incoming audio channels instead, you can use the manual configuration.
Manual Selection
Automatic detection may however not work properly for some plug-ins, and you may want to change which channels the effect applies to (for multi-mono effects, or to process aux channels for example). That's what the audio I/O window is for:
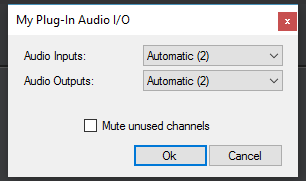
When selecting a specific number of inputs and/or outputs instead of using "automatic", you can choose which channels are connected to each i/o for this particular plug-in:
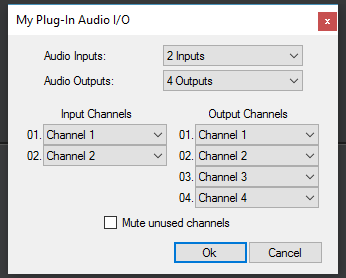
Notes:
- if the same channel is selected for multiple outputs, only the last selected plug-in output will be audible (plug-in outputs are not summed).
- By default, all channels that are not used as outputs by the plug-in remain unchanged (copied from the same channels before the plug-in). For example, on a stereo configuration, if a mono plug-in is set to process only channel 1 and use channel 1 as output, channel 2 will remain unaffected. Select "mute unused audio channels" to mute these unprocessed channels instead.
Auto vs Manual
In automatic mode, Blue Cat's Fader Hub will automatically choose the best configuration according to its own audio layout. This is very useful if you are saving your plug-in chains to reuse them with different audio i/o configurations.
In manual mode, the number of inputs and outputs of the selected plug-in is selected and will not change. It means that you may not be able to use this particular configuration later with another number of audio channels.
Oversampling
It is possible to have a plug-in process audio (and MIDI) at higher samplerates. You can select the oversampling ratio and resampling quality with the oversampling menu:
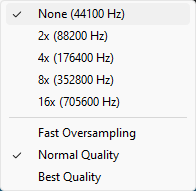
Oversampling can be useful for plug-ins doing non-linear processing (distortion, compression...) which do not have built-in oversampling capabilities and cause artefacts (aliasing). It may also benefit EQs (you can get smoother curves in the upper frequencies).
Oversampling may however result in other types of artefacts and will require more CPU to process the same amount of data. With high quality resampling, additional latency may also apply.
Warning: please note that some third party plug-ins may not support higher sample rates. Save your work before trying this feature on new plug-ins!
Note: The oversampling settings are saved when using the "Save As..." command to save the plug-in as a favorite.
The Preferences Pane
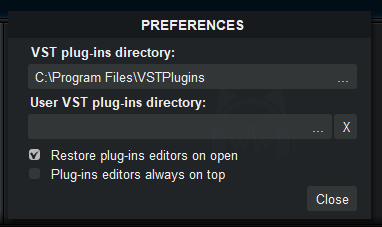
In the preferences pane, you can set the default VST plug-ins path by clicking on it or on the button labelled "...". This VST plug-ins directory is used for several purposes:
- It is the default directory that is opened when you want to load a VST plug-in.
- It is used as the root path when saving/loading presets that include VST effects: the path of VST plug-ins is saved relatively to this root path, so that you can reopen your sessions on different machines that may have different VST paths (typically on a Mac and a PC).
If you happen to have your VST plug-ins installed in several paths, we advise you to choose the VST path that contains most of your plug-ins. You can then use the "User VST plug-ins directory" to define an extra location for plug-ins. This extra path will be used by Fader Hub as an alternative root path to load and save the plug-ins.
Please note that these paths are used for VST2 plug-ins only - they do not affect the location of VST3 plug-ins.
If the "Restore plug-ins editors on open" option is checked (default), when Fader Hub is opened, inserted plug-ins user interfaces will be restored at the same position as when the Fader Hub plug-in was last closed. If the option is unchecked, all plug-ins user interfaces will be kept closed when re-opening the Fader Hub plug-in, and their position on screen will not be saved.
When the "plug-ins editors always on top" option is checked, the windows of the hosted plug-ins will be kept on top of all other windows. It can be useful when you want to make sure the hosted plug-ins remain visible all the time. Also, if you are using Cubase on Windows, you may want to check this option to fix the erratic behavior of Cubase's own "always on top" option.
Drag and drop support
The user interface supports drag and drop to manipulate plug-ins easily:
- drag and drop plug-ins between slots (copy or move).
- hold the alt key on Mac and Ctrl key on windows to copy (duplicate) a plug-in instead of moving it.
- drop the plug-in before another to insert it in the chain
- drag and drop plug-ins between several instances of the software or accross plug-ins (compatible with Axiom, Late Replies, PatchWork and MB-7 Mixer)
- drag and drop .dll, .vst, .vst3, or .component files directly from the Finder or Explorer onto plug-in slots.
- drag and drop .plgnfo files (previously saved from the software) directly from the Finder or Explorer onto plug-in slots.
The various elements of the user interface (knobs, sliders, buttons...) are simple and intuitive to operate, but more information about how to interact with them is available in the "Plug-ins Basics" chapter of this manual.
Operation
Network Requirements
Although Fader Hub does not require specific network features, it streams audio in real time, at pretty low latencies, which cannot be achieved on all networks.
Wired Network
Wifi or PLC networks are usually too slow (and have way to much jitter) to achieve low-latency audio streaming, so use high bandwidth wired networks such as Ethernet instead (gigabit Ethernet is preferred). Please note that this is not a question of bitrate (some wireless or PLC networks do have very large bandwidths), but a matter of latency and jitter (the variations of latency over time).
Internet Connection
For remote connections, high speed Internet via optic fiber is recommended. Wireless connections will not work at all, and it is likely that DSL will cause too many dropouts too.
Firewalls
When using the plug-in to transmit or receive audio data over a network, you may have to enable the selected ports in your firewall. Local transmission between applications usually do not require to open any port on the firewall.
Even better: disable your firewalls and network filters if you can (especially on the receiving machine) as they may induce some additional processing and latency.
Typical Applications
With so many features, Fader Hub can be used for a wide range of applications. Here are a few examples of how this unique tool can be used.
Live Audio Mixer & Recorder
Fader Hub can work without any network connection as a live mixer with multitrack recording capabilities. Connnect up to 8 stereo instruments to the audio inputs of your audio interface, add audio effects with built-in or third party plug-ins, and the band is ready to go!
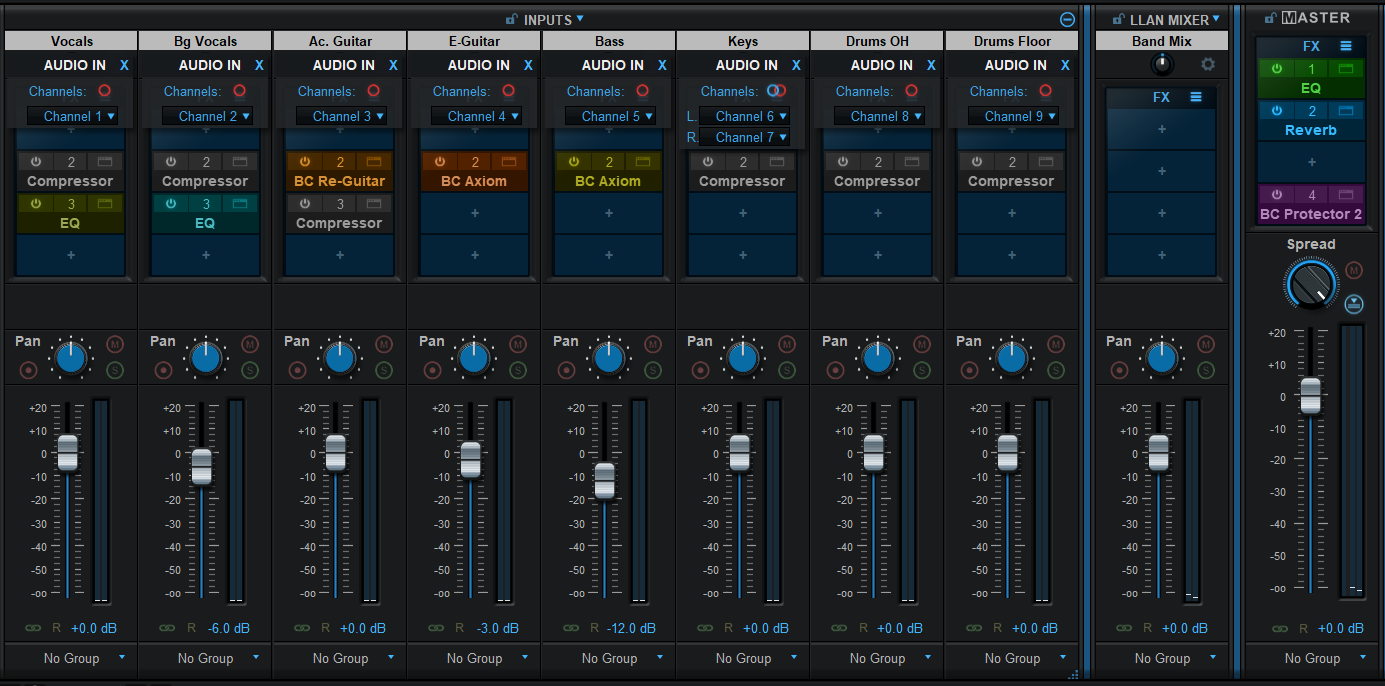
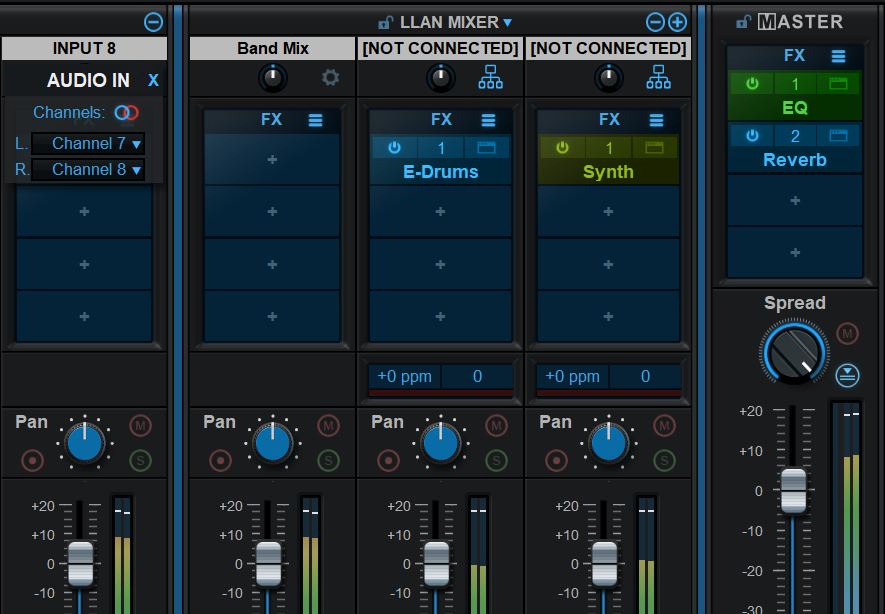
Using virtual instruments? You can get even more channels using unconnected LLAN Mixer strips as hosts for virtual instrument plug-ins (these extra individual strips are although not available for recording).
Multi Mixer & Recorder
This approach can be extended further with multiple machines and/or multiples instances of the Fader Hub app on a single machine. Each instance can create a sub-mix that is sent locally or via the network to a master Fader Hub mixer, resulting in a much larger number of channels.
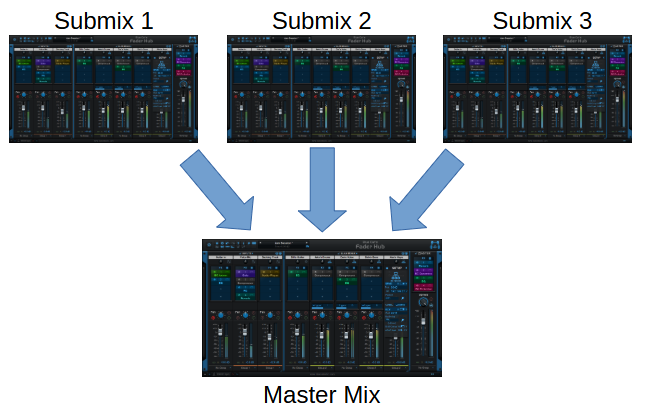
With this approach it is also possible to have multiple people handle sub-mixes (for example the drum kit, all keyboards etc.). You can also use multiple audio interfaces and computers together, benefiting from extra processing power and audio inputs that you would not be able to get on a single machine.
With the multichannel option available since fader Hub 1.3, it is also possible to send the individual tracks (post fader & plug-ins) to the master mixer, so extra adjustments can be made on individual sources instead of submixes only. This lets you aggregate up to 128 audio chanels from 8 different audio interfaces over the network.
On a local network you can achieve very low latencies (just a few milliseconds). To minimize the latency, it is recommended to use the same sample rate and audio buffer sizes on all machines/audio interfaces when possible.
Since the recorder automatically compensates the latency of individual signals, you can get a fully synchronized recording even if each connection has a different latency.
Personal Headphone Mixing System
It is not uncommon these days to see bands on stage or in the studio with a laptop for almost every single musician, helping them managing virtual instruments, samples, audio effects, or chord charts and lyrics: software is everywhere! With Fader Hub and a simple Ethernet connection, these laptops can become personal mixers for musicians, managing their own sound with plug-ins, and their own mix for in-ear monitoring (IEM). No need for extra specific and costly hardware. That's the purpose of Fader Hub's peer-to-peer connection approach.
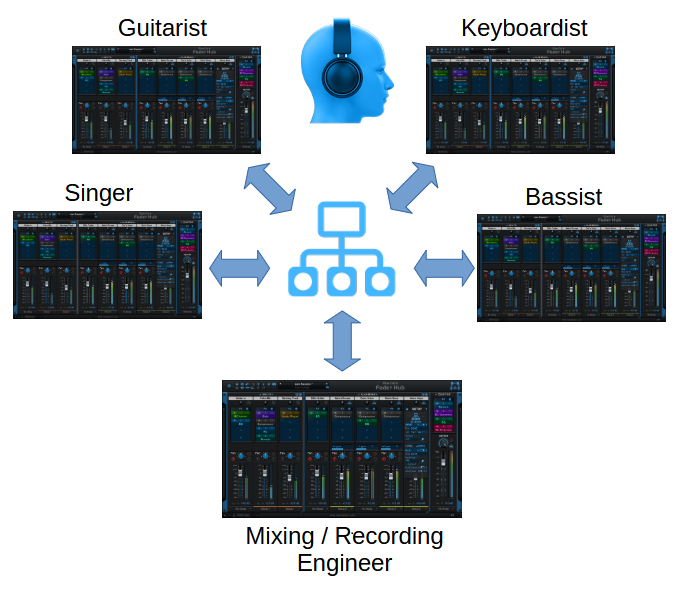
Additionally, the sound engineer can receive all audio streams on his own machine to mix and record the performance, while communicating with the musicians straight into their monitors thanks to the Fader Hub connection.
If you are using both IEMs and amps on stage, it is also possible to have separate mixes for both, using the MASTER and AUX outputs: you probably do ot want to hear the full band in the guitar amp but in the headphones only.
Playing With Other Musicians Online
Optic fiber networks are now fast and reliable enough to provide musicians with low latencies connections over long distances. Fader Hub can be used to play online with other musicians and record the performance.
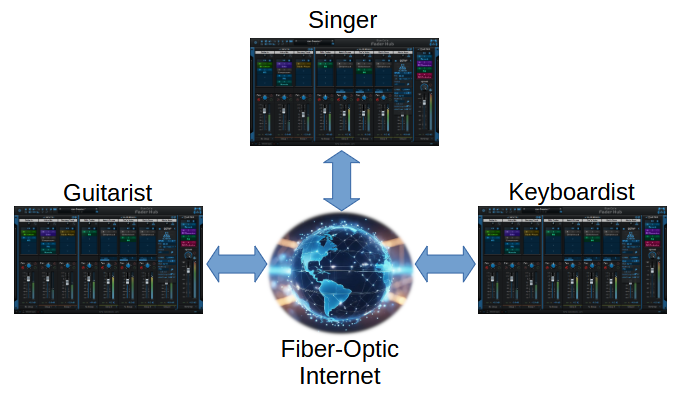
You can even have both local and remote musicians play altogether, performing remotely with only a few band members who could not make it to the rehearsal or recording session.
For such remote sessions, it is recommended to use a microphone on an extra input strip to be able to talk to other musicians thru the low latency connection: if you are connected through a video conferencing system such as Facetime, Zoom or Skype, there is so much latency for audio that your voice will not be in sync with your instrument. Once connected thru Fader Hub's low latency audio network with your microphone you should disable sound in your video conferencing system. Audio quality will also be much better!
Note: because the speed of the audio signal thru the internet is limited by the speed of light in optic fiber, latency will increase with distance.
Thanks to uPnp port forwarding support, the connection between remote locations should be easy (UPnP has to be enabled on the Internet router).
To fight against latency when locations are far away, you can use a backing track or a click track on a SYNCED input strip. Thanks to Fader Hub's unique synchronization features, this will ensure that every sungle player in the session hears the backing track simultaneously, regardless of the latency.
Also you can record each individual signal either locally or remotely (using clock sync), and fader Hub will make sure all these track are perfectly in sync, whatever the latency.
Remote Recording
Most music is now produced remotely, transfering sessions back and forth via the Internet.
But what if you could record musicians remotely, straight into your recording sessions with your own plug-ins, hearing the performance in real time, and providing feedback between takes?
This is made possible with Fader Hub, either as a plug-in straight inside your DAW with a complete session, or as an application, playing a backing track with the file player plug-in.
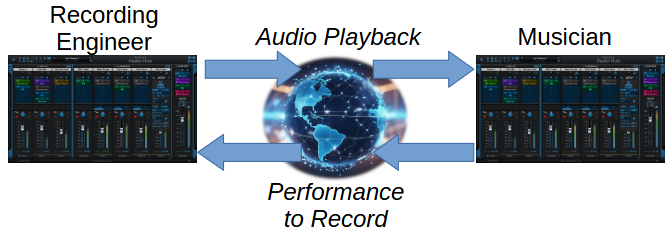
As there is no real-time requirement here, you can increase the receiving buffer size to make sure the connection remains stable and you can capture the entire performance without any dropout and quality loss.
You can also activate network latency compensation to keep all signals in sync and hear the remote recording aligned with the local tracks.
Distributed Recording
Whether you are playing online with other musicians or simply using multiple devices synchronized together thanks to Fader Hub, you can easily record simultaneously on multiple devices. Keep them all synchronized by sending a master clock from the master device, and arm them for recording. Once playback is started on the master (usually with a backing track on a SYNCED input), all armed devices will start recording simultaneously.
This lets you use multiple audio interfaces at the same time in multiple locations, and record the signal locally. All tracks can then be gathered together - no need to synchronized them, they are already synchronized by Fader Hub.
Live Stream Mixer
With it built-in inter-app connectivity, Fader Hub is also a fantastic tool to manage your audio mixes for live streams: you can mix several signals/instruments from your audio interface, and send the mix to another application such as OBS, that does the audio and video streaming.
Of course extra network audio sources can be added as well!
These are just a few examples. As you can see, Fader Hub is a flexible tool that combines audio and network audio in a simple way. It is up to you to adapt it to your own workflow and other audio tools.
Using The Plug-in
Fader Hub is not only an application but also a plug-in. The plug-in can do pretty much the same as the application, except that it has to be loaded in a third party application (or inside itself...), and it provides 4 stereo audio inputs (2 main inputs and 2 side chain inputs when available).
It can thus be used in a similar way as the application, right inside your favorite DAW. But it can also be useful for other purposes as you will see below.
Multi mono processing
It is sometimes handy to process the left and right signal of a stereo pair separately with different plug-ins. This can be easily done with fader Hub using two input strips and panning the two signals accordingly:
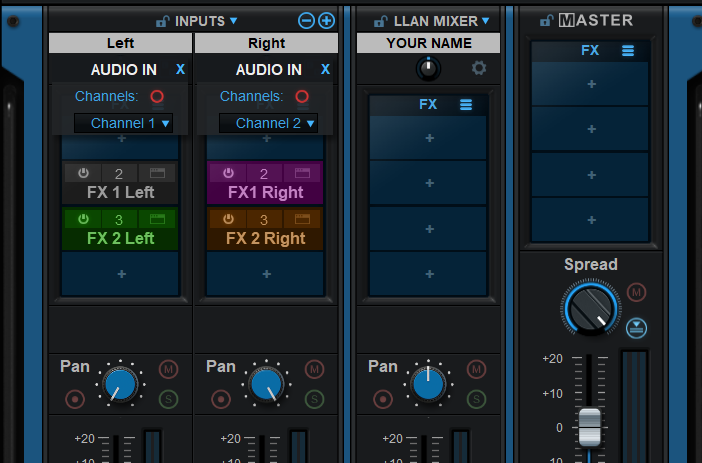
Virtual Instruments Layering
You can use virtual instruments on individual channel strips, add effects and mix them together. Although not a virtual instrument itself, Fader Hub has a MIDI input, so you can control all the instruments from your DAW and get the resulting sound of the plug-in.
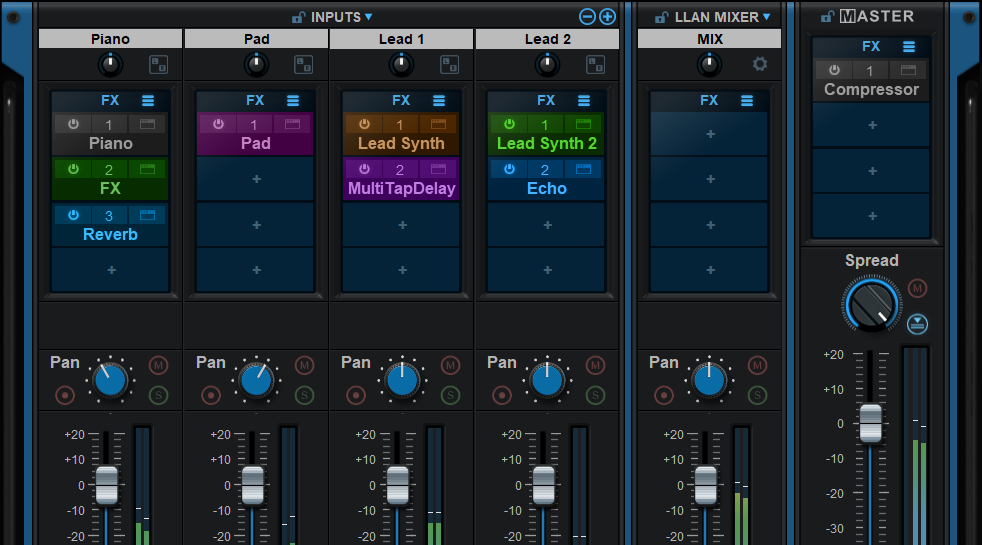
Tip: make sure to enable multicore processing when using several instruments: they will be processed on separate processor cores when available, greatly improving performance.
Adding More Remote Connections
If you find Fader Hub's 8 networks connections may be a limitation, don't worry: you can actually get as many as you want! Fader Hub is indeed available as a built-in plug-in (in the "Utils" category). Just insert another instance of Fader Hub on your "Self" LLAN mixer strip and get 8 more connections instantly!
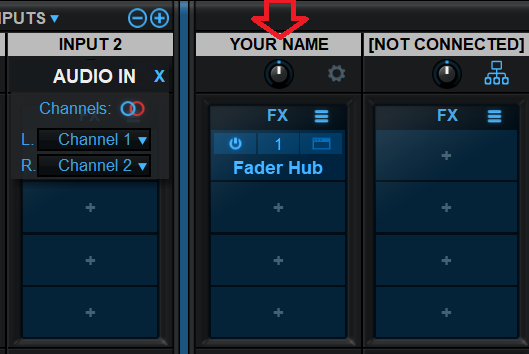
You can repeat the operation inside the new instance if you need even more...
Connector Compatibility
Fader Hub is fully compatible with Blue Cat's Connector, so you can easily stream from and to Fader Hub or Connector at your convenience.
Connector can also be loaded as a plug-in inside Fader Hub if you need more advanced audio & MIDI routing or send the output of the master bus to another application.
Remote Connection Tips
Connecting remotely thru the Internet might require a few optimizations, especially if the machines to connect are far away. Here are a few tips to get the best experience out of Fader Hub.
A Simple Scenario
To make it simple, let's say you want to play with a single remote musician. If she/he is not too far away (typically less than a few thousands kilometers) and both of you have a fiber Internet connection, it should work fine, wit not too much latency.
- It is easier to sync up if connected first by instant messaging, and even better with video and audio (a phone call works too), especially if it is your first time.
- Launch Fader Hub on both sides and connect your instrument(s) and microphone(s). Setup audio effects and you own local mix. You can save the configuration as a preset by the way.
- Set your name in the self-mix bus (click on the title called "YOUR NAME"). You are now ready to connect.
- Add a network strip in the LLAN Mixer (if not already there), and click on the network icon (or the [NOT CONNECTED] title).
- Activate reception ("RCV"), choose a port number, and activate UPnP Forwarding. If successful, it will display your public IP address. Give this IP address and port to the remote musician. In case of error, you may want to try other ports numbers, and check that UPnP is active on your Internet router (some routers also have range limitations for port numbers). manual configuration is also possible, as explained in this tutorial.
- Now activate Send, and setup the port number and IP address as given by the other musician from its RCV configuration.
- You should now both see each other's name (probably flickering with [NOT CONNECTED]) at the top of the network strip and maybe hear some sounds from each other. if not, you may want to check your firewall and verify port bumbers and IP addresses. You can also have an estimate of the connection's latency by hivering the moue over the "Network" icon.
- To stop flickering, increase the buffer size in the RCV section until the connection gets stable. This will increase latency but avoid audio drop outs caused by jitter (note that you may still get occasional audio dropouts at this stage).
- When conditions are not optimal, you may have to increase the packet size in SEND, and also experiment with audio compression. Both will reduce the amount and frequency of data sent over the Internet. When the connection is really stable, you can then decrease the RCV buffer length to reduce the latency.
Enjoy! You can save the entire configuration as a preset (or just the network connection) so that you can connect instantly next time (public IP address may however change).
Typical Values
Optimal buffering and packet size may vary a lot depending on your audio setup and internet connection. Here are a few values that seemed to work pretty well for us (sample rate at 44.1 kHz):
- Packet size: 256 (up to 512 for very long distance).
- Compression: "Lossless" for short distances, down to "Lossy HD" or "Lossy" for lower quality connections.
- Buffering: from 256 in very good conditions up to 2048 or more for very long distances.
- Drift Comp: active most of the time, but when the connection is really bad, sometimes disabling it helps.
And that's it for the moment. You can check our blog for more examples and tutorials!
Standalone Application Basics
Main Features
The standalone application will let you process audio data coming from the inputs of the audio interface and stream it to its output, in real time, without the need for a third party host application. The application also receives MIDI events from all MIDI input interfaces available on the machine, without any particular configuration required.
The core features of the application are the same as the plug-ins versions, except that the application can run on its own.
It is worth noting that user presets are shared between the standalone application and the plug-ins versions, so that presets can be reused between standlone and plug-in sessions.
Application Preferences
The audio/MIDI setup for the application is decribed in details in the first launch chapter.

The configuration window above can be displayed using the Edit/Audio Setup menu item. More information about the various fields can be found in the first launch chapter.
Application Menu
The application menu gives you access to the following commands:
- Edit/Undo: undo last change.
- Edit/Redo: redo last undone change.
- Edit/Audio Setup: open the preferences window.
Keyboard Shortcuts
To speed up operation, several keyboard shortcuts are available in the standalone application:
On Windows
- CTRL+Z: undo.
- Shift CTRL+Z: redo.
- CTRL+P: open the preferences window.
- ALT+F4: quit the application.
On Mac
- CMD+Z: undo.
- Shift CMD+Z: redo.
- CMD+, or CMD+P: open the preferences window.
- CMD+Q: quit the application.
Troubleshooting
No Sound
if you cannot hear anything coming out of the software, you need to check the audio configuration: open the preferences window (Edit Menu / Audio Setup command), and check that the audio engine is running. If it is not running, you may need to select another audio interface or change the buffer and sample rate settings. If it is running, you may want to select another audio interface or differnt audio inputs and outputs.
Cracks and Pops
If you can hear unwanted "cracks" and "pops" during the performance, you may be experiencing audio dropouts, because the application is using too much CPU. You can try to increase the buffer size in the preferences window to reduce CPU usage, and close other applications that are currently running.
Blue Cat Audio Plug-Ins Basics
This chapter describes the basic features that are common to all our plug-ins. If you are already familiar with our products, you can skip this part.
User Interface Basics
About Skins
Like all Blue Cat Audio plug-ins, Blue Cat's Fader Hub uses a skinnable user interface. It means that the appearance and behavior of the user interface can be entirely customized.
Especially with third party skins, the experience may be quite different from the one offered by the default skins that we provide. However, our plug-ins and our skinning engine have several standard features that will be available whatever your favorite skin.
More information about custom skins can be found in the skins section.
The Main Toolbar
In most skins, an optional toolbar at the top of the user interface gives you access to the main options and settings of the plug-in:

Smooth Bypass
On the left, the power button can be used to smoothly bypass the plug-in.
Presets Area
At the center of the toolbar, you can see the current preset area (the "Default Settings" box). It displays the name of the current preset, with a "*" at the end if it has been modified since loaded.
The arrows on the left and right let you navigate thru the (factory and user) presets available for the plug-in.
Clicking on the preset name opens the presets menu which lets you manage the presets of the plug-in.
Using the knob on the bottom right of this area, you can reduce the opacity of the window, and make it transparent (the actual result may depend on the host application). Additional messages may appear in the area next to this knob, depending on the plug-in.
Some plug-ins may also propose you to manually select the audio I/O inside the plug-in (bottom left of the presets area), regardless of the host configuration. It can be useful for example to save CPU by selecting mono to stereo configurations (instead of full stereo sometimes chosen by default by the host), or add extra channels to manage side chain internally, when the host does not provides any side chain input. Please note that this does not change the number of I/O seen by the host application.
Commands
The icons in the toolbar give you access the to the following commands that are detailed in the next paragraph:
| Icon | Name | Function |
|---|---|---|
|
|
Menu | Open the main menu |
|
|
Control Settings | Display the controls settings menu (to manage automation and MIDI control, as described here). |
|
|
Undo | Undo |
|
|
Redo | Redo |
|
|
Manual | User Manual |
|
|
About | About |
|
|
Zoom | Scale the user interface (from 70% to 200%). When loaded in a Blue Cat Audio plug-in host, you can also choose to follow the host's zoom, so that the plug-in gets automatically scaled when the host changes its own zoom factor. The resulting scale factor is the combination of the host and plug-in zooms. |
The Main Menu
The main menu is available from the main toolbar, or if you right click anywhere on the background of the plug-in:
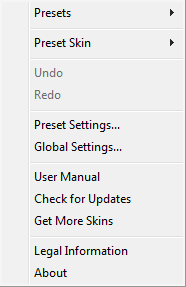
- Presets: opens the presets menu to manage presets.
- Preset Skin: opens the skins menu to choose the skin for the current preset and manage alternative skins for the software.
- Undo/Redo: undo or redo the latest modifications. This includes all changes made to the current preset settings such as MIDI or automation preferences.
- Presets Settings: open the presets settings window. It lets you change the skin, MIDI and automation settings for the current preset.
- Global Settings: open the global settings window. It lets you change the skin, MIDI and automation settings that are used by default in all instances of the plug-in (if not overridden by the current preset).
- User Manual: open this user manual.
- Check for Updates: opens up our website to let you check if any update for this software is available.
- Get More Skins: get more skins for this software.
- Legal Information: browse licensing and misc legal documents.
- About: displays the “about” dialog box.
Controls
Examples
Here are a few examples of typical controls you will encounter in the user interface of our plug-ins:
| slider | slider | knob | button | Text control |
|
|
 |
 |
|
|
Interacting with Controls
You can interact with the controls of the plug-in interface either with the mouse or the keyboard.
Setting the keyboard focus on a control (so that it responds to key strokes) may be automatic (when you pass the mouse over it it gets focus) or manual (you have to click on the control to set the focus on it). Note that all host applications behave differently regarding keyboard handling. In some applications you may not be able to use all keys described later in this manual to interact with our plug-ins. It is usually made obvious to you to know the active surfaces of the skin (the places where you can click with the mouse): the mouse cursor usually changes when you can do something on a control. In the default skins delivered with the plug-in, the cursor changes to a small hand or an arrow to tell you when your mouse is over an active control.
Mouse
Various mouse movements will let you interact with the controls:
| Mouse Interaction | Action |
|---|---|
| Left Click | Acquire focus and start dragging or push (button) |
| Left Click + Alt Key | Set the value to default |
| Left Double Click |
Acquire focus and launch the “fine
tuning” edit box (except button):
 |
| Right Click | Set the value to default |
| Mouse Wheel | Increment or decrement the position (focus required) |
| Mouse Drag | Change the control position depending on mouse movement (except button) |
Keyboard
All control widgets support the following keys (note that some of them are caught by the host and thus never forwarded to the control. For example in Steinberg Cubase SX you cannot use the arrow keys to control the plug-in):
Keys Common to All Controls
| Key | Action |
|---|---|
| Up Arrow | Small increment of the position (up or right) |
| Down Arrow | Small increment of the position (down or left) |
| Left Arrow | Same as Down Arrow |
| Right Arrow | Same as Up Arrow |
| Page Up | Large increment of the position (up or right) |
| Page Down | Large decrement of the position (down or left) |
| + | Small increment of the value of the control |
| - | Small decrement of the value of the control |
| d | Set to default value (same as mouse right click) |
| e |
Opens the 'fine tuning' window to precisely
set the parameter:
 |
| SHIFT | When the key is down, the fine tuning mode is on, and you can modify the value with better precision when moving the mouse, the mouse wheel or using the keyboard. Just release the key to get back to the normal mode. |
Keys Specific to Buttons
| Key | Action |
|---|---|
| Enter | Pushes the button |
Presets
To get started with the plug-in and discover its capabilities, a couple of factory presets are provided. You can also save your own presets and recall them later for other projects. Our plug-ins propose a full-featured preset manager to let you save, browse, organize and recall its presets.
The Presets Menu
The presets menu can be opened from the main menu or the main toolbar. It displays the list of presets available for the plug-in as well as commands to load, save or organize presets:
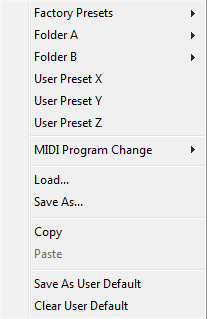
- Factory Presets: shows the list of factory presets delivered with the plug-in.
- "Folder A" to "User Preset Z": user presets and categories.
- MIDI Program Change: activate MIDI Program Change support (see below).
- Load: load preset from file.
- Save: save current state to last loaded user preset.
- Save As: save current preset to a file.
- Copy copy preset to the system clipboard.
- Paste paste preset from the system clipboard, if available.
- Save As User Default: save the current state as the default preset. This preset is used every time a new instance of the plug-in is created.
- Clear User Default: reset the default preset to its factory state: this makes the plug-in forgets the custom settings you might have saved as a default preset.
More about Presets
There are two types of presets: factory presets (read only) that are provided with the plug-in, and user presets that can be created and stored by the user.
The user presets are stored in a subdirectory of the documents folders of your profile ("Documents" on Mac, and "My Documents" on Windows): Blue Cat Audio/[Plug-in Name]/Presets. Each preset is stored as an individual file. You can create folders and subfolders in the Presets directory to classify your presets, as shown in the example below:

If you save a preset named "Default" in the root Presets directory, it will override the factory default preset (that's what "Save As Default" does). To restore the factory default preset, you can just remove this file or use the "Reset Default" command.
MIDI Program Change
It is possible to load presets remotely using MIDI "Bank Select" and "Program Change" messages. To enable this feature, select a MIDI channel to receive the events from in the MIDI Program Change menu item from the presets menu:
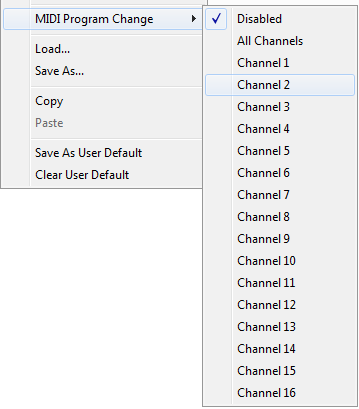
This setting is saved for each plug-in istance with your session but not in presets (except for the default preset, using the "Save as User Default command"). Once activated, the plug-in menu will display the bank number followed by the preset number for each preset:
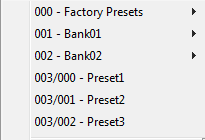
Every root folder is considered as a new bank, starting with the factory presets (bank 0). Program and bank numbers may change while you add folders and presets, so you should be careful when naming them if bank and program numbers matter to you. It is recommended to use folders to make this task simpler. As a side note, sub folders do not define additional banks (all presets contained in sub folders are associated with the current bank.
As specified by MIDI, bank select messages are not used until a program is actually selected.
MIDI Implementation note: the software supports all types of Bank Select methods. You can use either MIDI CC 0 or MIDI CC 32 to select banks. If both are used simultaneously, they are combined together so that you can use more banks (in this case CC0 is LSB and CC32 is MSB, and actual bank number is 128*CC0+CC32).
MIDI and Automation Control
Blue Cat's Fader Hub can also be remotely controlled via MIDI using MIDI CC ("Control Change") messages or automation curves, if your host application supports it. It is possible to customize the channel, control numbers, range and response curve used for each parameter in the settings panel available from the main menu (see the Plug-in Settings chapter for more details).
MIDI and Automation Settings Menu
The main menu
Most skins also provide the ability to change MIDI and automation settings directly in the main user interface. Clicking on the control settings icon in the main toolbar opens the following menu:

- Show Control Settings: show direct access to individual control settings for each parameter in the user interface (see next paragraph).
- Lock Control Settings: lock the current controls settings for MIDI and automation so that they remain unchanged when loading presets.
- Use Global Control Settings: ignore the current MIDI/automation settings and use the global settings instead.
- Control Settings Window: display the control settings window, to change control settings for all parameters.
- Save As Global Control Settings: save the current settings as global settings (used by default, when no specific MIDI/Automation setting has been set for the cuirrent preset).
Individual Control Settings
When this feature is activated using the "Show Control Settings" item in the MIDI and Automation Settings menu, dropdown menu buttons appears next to the main controls displayed by the plug-in:
Clicking on this button shows the MIDI/Automation settings menu:

- MIDI Learn Once: launches MIDI learn mode with auto-stop for the control: touch your MIDI controller and the control will learn from it the MIDI channel and control number.The learn mode will stop automatically upon first message received.
- MIDI Learn: launches MIDI learn mode for the control: touch your MIDI controller and the control will learn from it the MIDI channel and CControl Number. To end the learn mode, reopen this menu and deselect the option. Note: the various types of supported MIDI messages will behave differently with MIDI learn, as explained here.
- MIDI Unlearn: deactivates MIDI control for this parameter.
- Control Settings: launches the advanced settings panel described below. This controls the settings for the current preset.
- All Control Settings: display the control settings window, with access to all parameters.
Advanced MIDI and Automation Settings
You can completely customize the way the plug-in is controlled by automation and MIDI. For a global view of all parameters at a time, you can use the Plug-in Settings window for the current preset which is available from the main menu.

MIDI Settings:
- Enable MIDI: enable/disable the MIDI control of the parameter.
- Channel: MIDI Channel for the parameter control. If set to 0, the plug-ins will accept Control Change Messages from all MIDI Channels (MIDI Omni mode).
- Control Type: Select the type of control (MIDI CC, Note On/Off, NRPN, 14-bit MIDI CC... See full list with details below).
- Ctrl Number: Control Number (CC number, Note number, NRPN number etc.).
- Learn: click on this button to activate the MIDI learn functionality. When it is activated, you can move your MIDI controller, and the plug-in will automatically detect the control settings (details below) .
MIDI and automation settings:
- Response: response curve of the MIDI or automation control: from very fast to slow control.
- Min: minimal value of the parameter when MIDI controlled or automated.
- Max: Maximum value of the parameter when MIDI controlled or automated.
Note: if the Min value is higher than the Max value, the response curve will be reversed: increasing the control value will decrease the parameter value.
Note: if you double click on the parameter text control boxes for the max and min values, a “fine tuning” edit box will appear and let you change the min and max values with more precision:

MIDI Control Types
Our plug-ins now support multiple types of MIDI events to control parameters, in addition to traditional MIDI CC (Control Change) messages:

| Ctrl Type | Description | Ctrl # Range | Value Range | Precision | Comment |
|---|---|---|---|---|---|
| CC | Single MIDI Control Change messages | 0-127 | 0-127 | 7-bit | Low resolution but most widely supported control type. |
| CC 14-bit | Combines two MIDI Control Change messages to achieve better precision | 0-31 | 0-16383 | 14-bit | The two message are CC numbers with an offset of 32. For example for 14-bit CC #0, it is using both CC#0 (MSB) and CC#32 (LSB) to define the full 14-bit value. |
| NRPN | Non Registered Parameters | 0-16383 | 0-16383 | 14-bit | Uses MIDI CC# 6, 38, 98 and 99 (and optional 96-97 for increments) behind the scenes. |
| Note Velocity | Uses the velocity of MIDI Note On events as control value. | 0-127 | 0-127 | 7-bit | Control number is the MIDI note number. Note Off events are ignored. |
| Note On/Off | Set parameter to min upon Note off and max upon Note On | 0-127 | 0-127 | 7-bit | Control number is the MIDI note number. |
| Note | Uses the velocity of MIDI note events as control value, Note Off events considered as min value. | 0-127 | 0-127 | 7-bit | Control number is the MIDI note number. When the note key is released, minimum value is set. |
| Aftertouch | Also known as Poly Pressure. | 0-127 | 0-127 | 7-bit | Control number is the MIDI note number used for aftertouch. |
| Pitch Bend | Pitch Wheel Change event | 0-16383 | None | 14-bit | Control number is not used, the value is global for the selected MIDI Channel. |
| Channel Pressure | Also known as Channel Aftertouch. | 0-127 | None | 7-bit | Control number is not used, the value is global for the selected MIDI Channel. |
MIDI Control Types & MIDI Learn
The various types of supported MIDI events may behave a bit differently regarding MIDI learn, since it is not always possible to make the distiction between them. For all of them except NRPN, if you have selected the type of control that you are expecting, moving the control on the MIDI controller will be enough to learn.
However if another type is selected, only the control types marked as "auto" below will be detected automatically. The default MIDI control type is MIDI CC.
| Ctrl Type | MIDI Learn | Details |
|---|---|---|
| CC | Auto | Move a MIDI CC knob on a controller and it will be detected automatically. |
| CC 14-bit | If Selected | Will be detected if 14-bit CC is selected, or it will default to MIDI CC. |
| NRPN | No | No MIDI Learn available. Control number has to be set manually. |
| Note Velocity | Auto | Hit a note and it will be detected automatically. |
| Note On/Off | If Selected | Hit a note, and it will be detected if this type of control is selected, or it will default to Note Velocity. |
| Note | If Selected | Hit a note, and it will be detected if this type of control is selected, or it will default to Note Velocity. |
| Aftertouch | Auto | Is automatically detected unless the keyboard also supports Channel Pressure. |
| Pitch Bend | Auto | Move the Pitch Wheel and the channel number is automatically detected. |
| Channel Pressure | Auto | Is automatically detected unless the keyboard also supports aftertouch. |
More
Check our online tutorial for more screenshots and more examples of our plug-ins user interfaces.
Plug-in Settings
In addition to the controls offered in the main user interface, Blue Cat's Fader Hub has various settings that let you fine tune the behavior of the plug-in. You can choose to change these settings either for the current preset or globally for all instances of the plug-in.
The Global Settings Window
The settings available in this window apply to all instances of the plug-in, for all presets, if not overridden in the presets settings. Consider these settings as “default” settings.
General
You can change the default skin for all instances of the plug-in: write the skin file path in the text edit box or click on the button to open a file chooser dialog. If you have several instances of the plug-in opened in your session, you will have to re-open the user interfaces of these plug-ins to see the skin change.

The output data refresh rate can also be customized for all instances of the plug-in. It controls the refresh rate of non-audio data produced by the plug-in (parameters, curves...). It also controls the refresh rate of output MIDI CC messages or output automation data. The higher the refresh rate, the better precision, but also the higher cpu usage (some host applications may also have trouble recording MIDI data at high refresh rates). The default value is 50 Hz.
Global Control Input Settings (MIDI and Automation)
The plug-in offers a couple of settings that affect the way it is controlled by MIDI messages or automation. While the first settings only apply to MIDI control, the "Control Response", "Min" and "Max" settings apply to both automation and MIDI control.
For each parameter you can define a default MIDI channel and CC number. You can then control the plug-in with an external MIDI controller or one of our plug-ins that generate MIDI messages.
The settings below are available for each plug-in parameter.
MIDI Settings:
- Enable MIDI: enable/disable the MIDI control of the parameter.
- Channel: MIDI Channel for the parameter control. If set to 0, the plug-ins will accept Control Change Messages from all MIDI Channels (MIDI Omni mode).
- Control Type: Select the type of control (MIDI CC, Note On/Off, NRPN, 14-bit MIDI CC... See full list with details below).
- Ctrl Number: Control Number (CC number, Note number, NRPN number etc.).
- Learn: click on this button to activate the MIDI learn functionality. When it is activated, you can move your MIDI controller, and the plug-in will automatically detect the control settings (details here) .
MIDI and automation settings:
- Response: response curve of the MIDI or automation control: from very fast to slow control.
- Min: minimal value of the parameter when MIDI controlled or automated.
- Max: Maximum value of the parameter when MIDI controlled or automated.

Note: if the Min value is higher than the Max value, the response curve will be reversed: increasing the control value will decrease the parameter value.
Note: if you double click on the parameter text control boxes for the max and min values, a “fine tuning” edit box will appear and let you change the min and max values with more precision:

"Send MIDI events when parameters values change": activate this option when using a control surface that accepts MIDI events as input. MIDI messages will be sent to the output of the plug-in when the user change the parameters values in the user interface, to keep the software and the controller in sync. MIDI is only sent for parameters that are activated for MIDI control.
The Current Preset Settings Window
In this window you can change the settings for the current preset of the current instance of the plug-in only.
Preset Skin
You can choose to use the global skin setting or to change the skin for the current preset. This way you can have different skins for different instances of the plug-in in the same session in order to differentiate them.
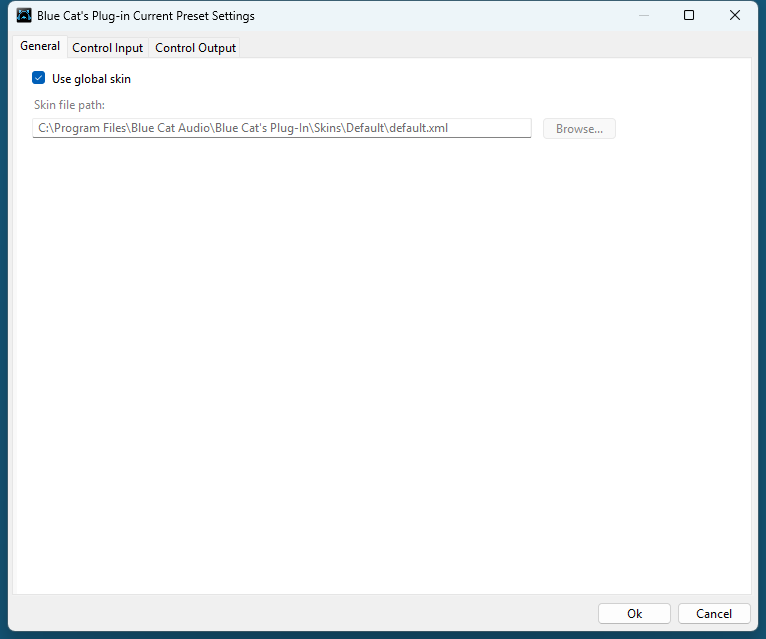
Preset Control Input Settings (MIDI and Automation)
Use the global settings or override them for the current preset. The parameters are the same as for the global input settings.

About Skins
Blue Cat's Fader Hub integrates Blue Cat's skinning engine that allows you to customize the user interface. You can download alternate skins for your plug-in at the following address:
If you don't find a skin that fits your need or if you want a custom one, you can choose to create your own skin.
Choosing the Skin
There are two ways to select the skin of your plug-in: you can change the default (or 'global') skin, or change the skin for the current preset only (either in the preset settings page or from the main menu). The global skin applies to all plug-in instances (choose this one if you want to use the skin used by default, regardless of the session or preset), whereas the current preset skin only applies to the current preset of the current plug-in instance (use this one if you want to change only the skin for the current session/preset).
Note: in some host applications, the plug-in window won't resize automatically when you choose a skin with a different size. In this case, just close the window and re-open it: it will be displayed with the right size.
The Skins Menu
The skins menu can be opened from the main menu. It displays the list of skins available for the plug-in as well as commands to manage the skin used by default when no preset skin has been selected:
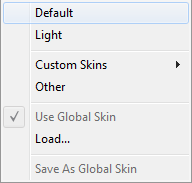
- First Section - Factory Skins: shows the list of factory skins delivered with the plug-in ("Default" and "Light" in this example).
- Second Section - User Skins: shows the list of user skins that have been installed in the Documents Skins folder for the plug-in (see below).
- Use Global Skin: use the global skin for the current preset/session (unloads any custom skin previously selected for the current preset).
- Load: opens a file browser dialog to manually select the skin from the file system.
- Save As Global Skin: use the current preset skin as the global skin (loaded by default if no preset skin has been defined).
Installing User Skins
To select user skins directly from the skins menu, install them in the "Skins" directory available in the plug-in's documents folder:
[Your Documents Folder]/Blue Cat Audio/[Plugin Name]/Skins/
The skin engine will scan this folder for new skins (xml files) and display them in the menu. The skin files should be in the root skins folder or in a subdirectory inside this folder: subdirectories are not scanned recursively.
Other Methods to Select Skins
You can also select the skins in the settings panels available from the main menu:
The global skin (used by default if no preset skin has been selected) can be changed in the global settings pane. The current preset skin can be changed in the preset settings page .
Create a Custom Skin
You can create custom skins for your plug-in in order to adapt it to your exact needs. You can change its look and feel and make it completely integrated in your virtual studio!
Just read the Blue Cat's Skinning Language manual and download the samples for the tutorial on http://www.bluecataudio.com/Skins. You can get ready to create your own skins in a few minutes. You can then share your skins on our website.
More...
This manual only covers the main aspects of Blue Cat's Fader Hub. Our website offers many additional resources for your Blue Cat's Fader Hub plug-in. It is constantly updated, so keep an eye on it!
Updates
As you can see in the history log below, we care about constantly updating our products in order to give you the latest technology available. Please visit our website often to check if Blue Cat's Fader Hub has been updated, or subscribe to our Newsletter to be informed of the latest news about our products.
Note: minor version updates are available from the same location as the original full version download (link received by email upon purchase). The demo version publicly available on our website will not let you register.
You can also follow us on twitter, facebook and instagram for almost real time updates notification, and subscribe to our YouTube channel to watch the latest videos about our software.
Versions History
V1.3 (2026/01/20) |
New Network Audio Multi-Channel Mode (Multitrack):
|
V1.22 (2025/09/08) |
|
V1.21 (2025/08/12) |
|
V1.2 (2025/06/05) |
Synchronization & Network Latency Compensation:
|
V1.1 (2024/11/29) |
|
V1.02 (2024/09/09) |
|
V1.01 (2024/04/10) |
|
V1.0 (2024/01/16) |
First version. |
Thanks again for choosing our software!
See you soon on www.bluecataudio.com!

