![](../..//Vault/Tutorials/Tutorial_RemoteControl_Monitor/Screenshots/main_small.png)
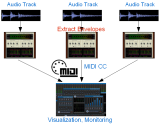
This tutorial shows how to use the Remote Control MIDI control surface and Blue Cat's DP Meter Pro analysis plugin (DPMP) to monitor several tracks in a same screen, on graphs or meters you can customize the way you wish.
The principle is to use the DPMP to generate envelopes which are then displayed all at once in the Remote Control user interface:
This tutorial uses Cakewalk Sonar 6 as a host application, but any directX or VST compatible host that supports MIDI routing will work. See our DP Meter Pro Tutorials for more information about how to use MIDI routing in other applications such as Ableton Live, Steinberg Cubase, Energy XT etc.
Step By Step
01 - On each audio track insert a Digital Peak Meter Pro plug-in (Mono or Stereo depending on the track):
![Step 01 - On each audio track insert a Digital Peak Meter Pro plug-in (Mono or Stereo depending on the track) Step 01 - On each audio track insert a Digital Peak Meter Pro plug-in (Mono or Stereo depending on the track)](../..//Vault/Tutorials/Tutorial_RemoteControl_Monitor/Storyboard/01 - On each audio track insert a Digital Peak Meter Pro plug-in (Mono or Stereo depending on the track).png)
02 - For each inserted Digital Peak Meter Pro, open the presets settings window:
![Step 02 - For each inserted Digital Peak Meter Pro, open the presets settings window Step 02 - For each inserted Digital Peak Meter Pro, open the presets settings window](../..//Vault/Tutorials/Tutorial_RemoteControl_Monitor/Storyboard/02 - For each inserted Digital Peak Meter Pro, open the presets settings window.png)
03 - For each inserted DPMP, enable the peak parameter MIDI output and assign it to a different CC Number:
![Step 03 - For each inserted DPMP, enable the peak parameter MIDI output and assign it to a different CC Number Step 03 - For each inserted DPMP, enable the peak parameter MIDI output and assign it to a different CC Number](../..//Vault/Tutorials/Tutorial_RemoteControl_Monitor/Storyboard/03 - For each inserted DPMP, enable the peak parameter MIDI output and assign it to a different CC Number.png)
03.1 Note that for stereo tracks you will need to enable both L and R peak parameters:
![Step 03.1 Note that for stereo tracks you will need to enable both L and R peak parameters Step 03.1 Note that for stereo tracks you will need to enable both L and R peak parameters](../..//Vault/Tutorials/Tutorial_RemoteControl_Monitor/Storyboard/03.1 Note that for stereo tracks you will need to enable both L and R peak parameters.png)
04 - Once all tracks you want to monitor have a DPMP, create a new empty audio track:
![Step 04 - Once all tracks you want to monitor have a DPMP, create a new empty audio track Step 04 - Once all tracks you want to monitor have a DPMP, create a new empty audio track](../..//Vault/Tutorials/Tutorial_RemoteControl_Monitor/Storyboard/04 - Once all tracks you want to monitor have a DPMP, create a new empty audio track.png)
05 - Insert a Remote Control 32 instance on this track:
![Step 05 - Insert a Remote Control 32 instance on this track Step 05 - Insert a Remote Control 32 instance on this track](../..//Vault/Tutorials/Tutorial_RemoteControl_Monitor/Storyboard/05 - Insert a Remote Control 32 instance on this track.png)
06 - Change the preset skin to the included 'curve.xml' one and close - reopen the plugin window so that it is resized properly:
![Step 06 - Change the preset skin to the included 'curve.xml' one and close - reopen the plugin window so that it is resized properly Step 06 - Change the preset skin to the included 'curve.xml' one and close - reopen the plugin window so that it is resized properly](../..//Vault/Tutorials/Tutorial_RemoteControl_Monitor/Storyboard/06 - Change the preset skin to the included 'curve.xml' one and close - reopen the plugin window so that it is resized properly.png)
07 - Open the presets settings window for the Remote Control 32 plug-in:
![Step 07 - Open the presets settings window for the Remote Control 32 plug-in Step 07 - Open the presets settings window for the Remote Control 32 plug-in](../..//Vault/Tutorials/Tutorial_RemoteControl_Monitor/Storyboard/07 - Open the presets settings window for the Remote Control 32 plug-in.png)
08 - Assign the MIDI input for the first input parameters to the same values as your DPMP outputs:
![Step 08 - Assign the MIDI input for the first input parameters to the same values as your DPMP outputs Step 08 - Assign the MIDI input for the first input parameters to the same values as your DPMP outputs](../..//Vault/Tutorials/Tutorial_RemoteControl_Monitor/Storyboard/08 - Assign the MIDI input for the first input parameters to the same values as your DPMP outputs.png)
09 - Enable the first six parameter curves on the Remote Control 32 user interface:
![Step 09 - Enable the first six parameter curves on the Remote Control 32 user interface Step 09 - Enable the first six parameter curves on the Remote Control 32 user interface](../..//Vault/Tutorials/Tutorial_RemoteControl_Monitor/Storyboard/09 - Enable the first six parameter curves on the Remote Control 32 user interface.png)
10 - Insert a new MIDI track, assign its output to the Remote Control 32 plug-in and verify that MIDI echo is on:
![Step 10 - Insert a new MIDI track, assign its output to the Remote Control 32 plug-in and verify that MIDI echo is on Step 10 - Insert a new MIDI track, assign its output to the Remote Control 32 plug-in and verify that MIDI echo is on](../..//Vault/Tutorials/Tutorial_RemoteControl_Monitor/Storyboard/10 - Insert a new MIDI track, assign its output to the Remote Control 32 plug-in and verify that MIDI echo is on.png)
10.1 - Select All Inputs - MIDI Omni as input for this MIDI track:
![Step 10.1 - Select All Inputs - MIDI Omni as input for this MIDI track Step 10.1 - Select All Inputs - MIDI Omni as input for this MIDI track](../..//Vault/Tutorials/Tutorial_RemoteControl_Monitor/Storyboard/10.1 - Select All Inputs - MIDI Omni as input for this MIDI track.png)
11 - (For Sonar 6 and newer) Open the Synth rack view and enable MIDI output for each DPMP instance:
![Step 11 - (For Sonar 6 and newer) Open the Synth rack view and enable MIDI output for each DPMP instance Step 11 - (For Sonar 6 and newer) Open the Synth rack view and enable MIDI output for each DPMP instance](../..//Vault/Tutorials/Tutorial_RemoteControl_Monitor/Storyboard/11 - (For Sonar 6 and newer) Open the Synth rack view and enable MIDI output for each DPMP instance.png)
12 - Hit Play, here is a result example:
![Step 12 - Hit Play, here is a result example Step 12 - Hit Play, here is a result example](../..//Vault/Tutorials/Tutorial_RemoteControl_Monitor/Storyboard/12 - Hit Play, here is a result example.png)
13 - Change the parameters assignments in the Remote Control 32 presets settings window:
![Step 13 - Change the parameters assignments in the Remote Control 32 presets settings window Step 13 - Change the parameters assignments in the Remote Control 32 presets settings window](../..//Vault/Tutorials/Tutorial_RemoteControl_Monitor/Storyboard/13 - Change the parameters assignments in the Remote Control 32 presets settings window.png)
14 - The envelopes are now assigned to other values, and different colors:
![Step 14 - The envelopes are now assigned to other values, and different colors Step 14 - The envelopes are now assigned to other values, and different colors](../..//Vault/Tutorials/Tutorial_RemoteControl_Monitor/Storyboard/14 - The envelopes are now assigned to other values, and different colors.png)
15 - You can now monitor many tracks at once on a single graph and compare relative levels of all instruments:
![Step 15 - You can now monitor many tracks at once on a single graph and compare relative levels of all instruments Step 15 - You can now monitor many tracks at once on a single graph and compare relative levels of all instruments](../..//Vault/Tutorials/Tutorial_RemoteControl_Monitor/Storyboard/15 - You can now monitor many tracks at once on a single graph and compare relative levels of all instruments.png)
16 - You can then change the skin and choose how you wish to monitor your level, on several graphs:
![Step 16 - You can then change the skin and choose how you wish to monitor your level, on several graphs Step 16 - You can then change the skin and choose how you wish to monitor your level, on several graphs](../..//Vault/Tutorials/Tutorial_RemoteControl_Monitor/Storyboard/16 - You can then change the skin and choose how you wish to monitor your level, on several graphs.png)
17 - Or with meters:
![Step 17 - Or with meters Step 17 - Or with meters](../..//Vault/Tutorials/Tutorial_RemoteControl_Monitor/Storyboard/17 - Or with meters.png)
You are now able to monitor several tracks in a single screen thanks to the DP Meter Pro and Remote Control MIDI capabilities. Go a step further and read our next tutorial, Monitor and Control with Blue Cat's remote Control.
You can also start to customize your user interface with Blue Cat's skinning language, or choose to monitor other parameters (RMS level, Mid/Side level...) with our Audio Analysis tools.
Another trick is to apply the same tutorial on a two computers setup: if they are both connected with a MIDI interface, you can then monitor what's happening on a computer on the other one's screen...
Any questions, comments? You want to submit your own tutorial to win a free license? Please post on our Forum!