This tutorial shows how to use the DP Meter Pro plugin (DPMP) in energyXT, in order to modify the parameters of an instrument or effect on a track according to the envelope of an other track.
Note: this tutorial was written by Rahul Savani. He won a free DPMP license for this tutorial.
Step By Step
01 - Our starting setup (see energyXT manual, if you don't know how to get this far):
.png "Step 01 - Our starting setup (see energyXT manual, if you don't know how to get this far)")
02 - Select DPMP from your plugins folder:

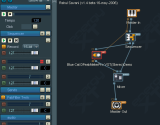
03 - Rewire the connections, so that DPMP receives the audio signal (to be followed) from the sequencer and sends back MIDI data:
 from the sequencer and sends back MIDI data.png "Step 03 - Rewire the connections, so that DPMP receives the audio signal (to be followed) from the sequencer and sends back MIDI data")
03.1 - BTW - Notice that this setup won't work - it's a feature of XT that audio must run --through-- the plugin:

04 - We will use DPMP to send the envelope of a drum track on an audio channel to automate the parameters of a vst synth:

05 - Make sure that the audio track outputs to the correct channel:

06 - Set the vst output to the other channel:

07 - DPMP will now receive audio only from the audio drum track:

08 - Enable the DPMP Midi output for the peak envelope, and set the CC number:

09 - Open up the vst and select CC map from the file menu:

10 - Add a parameter of your choice for automation (make sure it is set to the same cc value as DPMP is sending to):
.png "Step 10 - Add a parameter of your choice for automation (make sure it is set to the same cc value as DPMP is sending to)")
12 - In fact, why not send the CC data to a whole bunch of parameters setting the min and max values on the CC map as you like:

13 - Tweak the Amount and offset parameters of the DPMP:

14 - Tweak the DPMP MIDI output response:

15 - Now, lets actually record the envelope to the CC lane of a MIDI track:

15.1 - How to do it:
Setup a new midi track, and, if you want to see the data as it records, doubleclick the MIDI track to expand it and then select the appropriate CC number.
16 - Press record and watch the envelope being written to the CC controller lane:

17 - Have Fun:
Now you can assign the midi track to any vst, and then on to any insert effects, that you like. Hopefully, you see what a versatile and creative tool you have at your disposal :-).
Any questions, comments? You want to submit your own tutorial to win a free license? Please post on our Forum!