In this tutorial you will learn how to use the DP Meter Pro plugin (DPMP)'s real time capabilities in Ableton Live: use it to let any instrument influence the parameters of any effect for any other instrument. This tutorial shows these capabilities with Blue Cat's free effect.
Note: if you are on Mac, you have to use the VST version, because Live does not support MIDI output for Audio Units nor VST3.
Step By Step
01 - insert the DPMP on the source track (select the track and drag and drop the plug-in):
.PNG "Step 01 - insert the DPMP on the source track (select the track and drag and drop the plug-in)")
02 - Select the DPMP preset settings in the main menu (right click on the background):
.png "Step 02 - Select the DPMP preset settings in the main menu (right click on the background)")
03 - Enable the DPMP Midi output for the transformed peak envelope, and set the CC number:

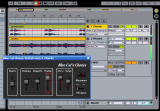
04 - insert the effect you want to control on the target track (we are using Blue Cat's Stereo Chorus here):
.png "Step 04 - insert the effect you want to control on the target track (we are using Blue Cat's Stereo Chorus here)")
05 - Select the chorus presets settings in the main menu:

06 - Enable the chorus MIDI input for selected parameters, set MIDI Channel to Omni (0) and MIDI CC to the same value as for the DPMP output:
 and MIDI CC to the same value as for the DPMP output.png "Step 06 - Enable the chorus MIDI input for selected parameters, set MIDI Channel to Omni (0) and MIDI CC to the same value as for the DPMP output")
07 - Insert a MIDI track:

08 - Switch to the 'Session' view:

09 - Select the source DPMP track as input, and the chorus destination track as output (for an external device, use the MIDI output port):
.png "Step 09 - Select the source DPMP track as input, and the chorus destination track as output (for an external device, use the MIDI output port)")
10 - Hit the play button, the selected parameters are now being changed according to the source track envelope:

11 - Hide the RMS curves on the DPMP to monitor only the peaks:

12 - Tweak the Amount and offset parameters of the DPMP:

13 - Tweak the Chorus MIDI response curve parameters (Min,Max,Response):
.png "Step 13 - Tweak the Chorus MIDI response curve parameters (Min,Max,Response)")
14 - Tweak the DPMP MIDI output response:

15 - Enjoy and play:

Any questions, comments? You want to submit your own tutorial to win a free license? Please post on our Forum!